Hooking and Hijacking DirectX 11 Functions In Skyrim
My last post was a deep dive into the nuts and bolts of how function hooking works, so for my next project I wanted to focus less on how hooking works, and more on how to use it to do something cool. I started looking at function hooking because I wanted to understand how ReShade works, so I decided that I’d take a baby step closer to that goal and draw a triangle across the screen in a real game. I’m a huge Skyrim fan, and it seemed like as good a candidate as any, so that’s what I went with.
This post is going to take it for granted that you already know how function hooking works. If you don’t, and that sounds interesting, see my previous post, or my hooking-by-example project.
 Note: you're looking for modern c++, clean code or best practices, turn back now
As usual with things I write about, all the code for this project is up on github, so if you just want to see the code, have at it!
DLL Hijacking is the New DLL Injection
I’ve built a few projects that have used process injection to get programs to run code they didn’t intend to, so for this project I decided to try something new. Instead of injecting a dll containing the code to draw a triangle, I decided to abuse Windows’ DLL search order to get Skyrim to load a dll full of my code during startup.
Whenever a program loads a DLL by name, it looks in a number of pre-set locations for that DLL, and loads the first one it finds. I knew that Skyrim uses DirectX 11 for it’s renderer, which means that it loads d3d11.dll during startup. My plan was to create my own dll, call it d3d11.dll, and place it in the same directory as Skyrim’s executable.
This dll would sit in between the game code and the real version of d3d11.dll. For functions I didn’t want to add any additional sauce to, my code would call the real dll’s version of that function and return the result. In cases where I wanted to add my own logic, I could intercept any function call I wanted and insert that logic before or after calling the real D3D11.dll’s function. DLLs that do this are called “proxy” dlls. This isn’t a new idea by any means, there’s tons of projects and literature out there for using proxy dlls for everything (including game hacking). Also I stole the idea from ReShade.
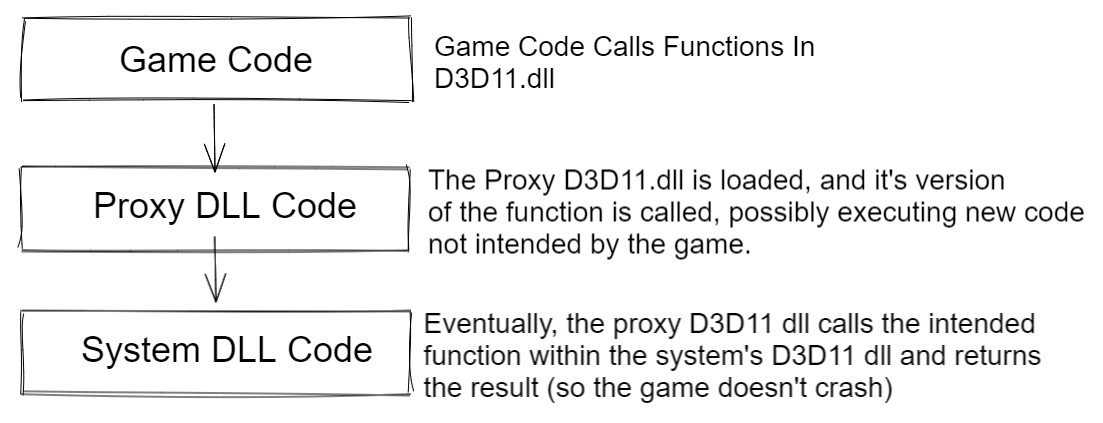
Creating a proxy version of d3d11.dll that contains every function eported by the actual library is a chunk of work, but luckily I didn’t have to do that. Instead, I fired up CFF Explorer and took a look at the functions Skyrim actually imports. It turns out this is just a single D3D11.dll export: D3D11CreateDeviceAndSwapChain. No complaints here.
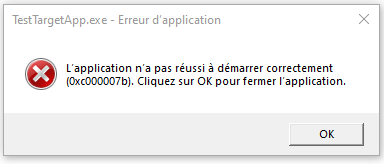
I had never built a proxy dll before, so my first step was to make an empty one (with just a dllmain function), and see what happens if a progrma loads a dll that doesn’t have the functions it expects it to have. This works as well as you might expect. I put a call to MessageBox() in DLLMain to see if things even progressed that far. They didnt.
 I changed my system's language to french once, some things have never changed back
My next step was to try to write a proxy dll that didn’t do anything except forward all calls to D3D11CreateDeviceAndSwapChain to the real version of that function, and return the result. The goal here being that I could get Skyrim to load my dll (confirmed by a call to MessageBox in DLLMain), and run like normal. This is a relatively straightforward process. My .def file already declared that the proxy dll was exporting a function called D3D11CreateDeviceAndSwapChain, so all I had to do was create that function with the right type signature, and in the function body, load the real D3D11 library and call the real D3D11CreateDeviceAndSwapChain function.
typedef HRESULT(__stdcall* fn_D3D11CreateDeviceAndSwapChain)(
  IDXGIAdapter*,
  D3D_DRIVER_TYPE,
  HMODULE,
  UINT,
  const D3D_FEATURE_LEVEL*,
  UINT,
  UINT,
  const DXGI_SWAP_CHAIN_DESC*,
  IDXGISwapChain**,
  ID3D11Device**,
  D3D_FEATURE_LEVEL*,
  ID3D11DeviceContext**);


fn_D3D11CreateDeviceAndSwapChain LoadD3D11AndGetOriginalFuncPointer()
{
  char path[MAX_PATH];
  if (!GetSystemDirectoryA(path, MAX_PATH)) return nullptr;

  strcat_s(path, MAX_PATH * sizeof(char), "\\d3d11.dll");
  HMODULE d3d_dll = LoadLibraryA(path);

  if (!d3d_dll)
  {
    MessageBox(NULL, TEXT("Could Not Locate Original D3D11 DLL"), TEXT("Darn"), 0);
    return nullptr;
  }

  return (fn_D3D11CreateDeviceAndSwapChain)GetProcAddress(d3d_dll, TEXT("D3D11CreateDeviceAndSwapChain"));
}


extern "C" HRESULT __stdcall D3D11CreateDeviceAndSwapChain(
  IDXGIAdapter * pAdapter,
  D3D_DRIVER_TYPE            DriverType,
  HMODULE                    Software,
  UINT                       Flags,
  const D3D_FEATURE_LEVEL * pFeatureLevels,
  UINT                       FeatureLevels,
  UINT                       SDKVersion,
  const DXGI_SWAP_CHAIN_DESC * pSwapChainDesc,
  IDXGISwapChain * *ppSwapChain,
  ID3D11Device * *ppDevice,
  D3D_FEATURE_LEVEL * pFeatureLevel,
  ID3D11DeviceContext * *ppImmediateContext
)
{
  fn_D3D11CreateDeviceAndSwapChain D3D11CreateDeviceAndSwapChain_Orig = LoadD3D11AndGetOriginalFuncPointer();

  HRESULT res = D3D11CreateDeviceAndSwapChain_Orig(
    pAdapter,
    DriverType,
    Software,
    Flags,
    pFeatureLevels,
    FeatureLevels,
    SDKVersion,
    pSwapChainDesc,
    ppSwapChain,
    ppDevice,
    pFeatureLevel,
    ppImmediateContext);

  return res;
}

BOOL WINAPI DllMain(HINSTANCE hinstDLL, DWORD ul_reason_for_call, LPVOID lpvReserved)
{
  if (ul_reason_for_call == DLL_PROCESS_ATTACH)
  {
    MessageBox(NULL, TEXT("Loaded Proxy DLL"), TEXT("Success"), 0);
  }

  return true;
}
Pasting the dll created with the code next to the Skyrim binary (for me: C:\Program Files (x86)\Steam\steamapps\common\Skyrim Special Edition) and then launching the game through Steam successfully popped the message box, and proceeded to play like normal. Perfect.
Finding A Function To Hook
Now that I had my proxy dll minimally working, it was time to use it to do something interesting. I figured it would be pretty easy to add some more code to D3D11CreateDeviceAndSwapChain to set up all the buffers and shaders needed to render a triangle, and then intercept a call to IDXGISwapchain::Present to insert a draw call for that triangle at the end of a frame. There was just one small problem: I had no idea what the address of IDXGISwapchain::Present was, and this is where things take a turn for the hacky.
IDXGISwapChain isn’t really a class, it’s a COM interface. The ppSwapChain pointer returned by D3D11CreateDeviceAndSwapChain is a pointer to something that implements said interface, but you never get to see the actual concrete type pointed to by that pointer, so I couldn’t just make a function pointer to the concrete implementation of Present(). The one saving grace in all this is that i knew that whatever ppSwapChain pointed to, it had a vtable. Somewhere in memory, I already had a pointer to the Present function, I just needed to figure out how to get it.
First, I needed to get a pointer to the vtable for the swapchain that gets created by the call to CreateDeviceAndSwapChain. This meant adding the following perfectly reasonable line of code to my proxy CreateDeviceAndSwapChain function (right before the return statement):
void** swapChainVTable = *reinterpret_cast<void***>(*ppSwapChain); Then I threw a breakpoint right after that line so I could see the value of swapChainVTable in the VS debugger. By itself, this isn’t super helpful, since it’s just a pointer to the first element in the vtable, but in the course of doing this I learned a new Visual Studio trick to help out here. If you add a watch for a variable, and then add a suffix to the name of that watch like “, 50”, Visual Studio will give you a debug view that assumes swapChainVTable is a pointer to an array, and show you the next 50 elements in that array. So I created a watch for “swapChainVTable,50” which showed me the first 50 pointers in the swapchain object’s vtable.
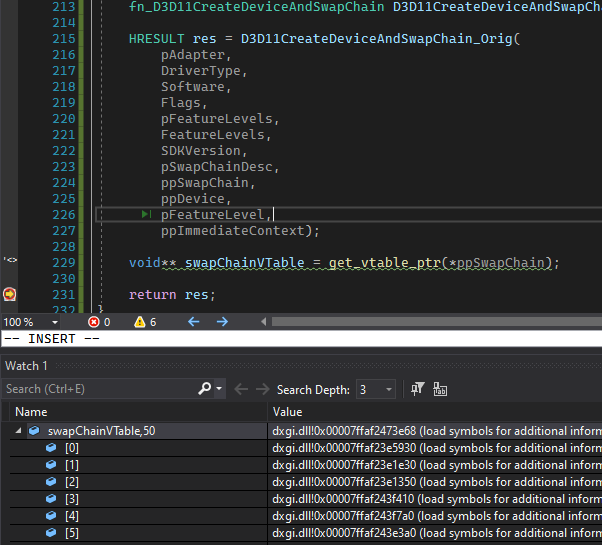
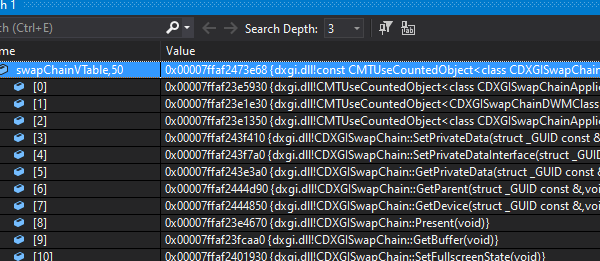
This by itself wasn’t be the most useful (although I guess I could have figured out the right function by trial and error). Microsoft publishes the symbols for D3D11.dll though, so I had VS grab those from the Microsoft symbol server and used them to get the function names that corresponded with the vtable memory addresses. Once I had that, I could see that the Present function is the 9th element in swapChain vtable.
Of course, Microsoft could update DXGI and change the ordering of function in the vtable at any time, but it works for now, so yolo. [Edit: As @__silent_ pointed out on twitter, this is rather unlikely, since it would require a whole new DXGI SwapChain interface that didn’t inherit from any previous versions of IDXGISwapChain]
Once I had the actual address, I could re-use the hooking code from my last post and redirect all calls to Present to my own function, which I could use to issue a draw call for the custom triangle prior to actually calling Present().
HRESULT DXGISwapChain_Present_Hook(IDXGISwapChain* thisPtr, UINT SyncInterval, UINT Flags)
{
  //triangle drawing code will go here

  //this is a specific quirk of my hooking code,
  //the address for the function being hooked is stored in a thread-local stack,
  //Getting the address of the original function means calling PopAddress.
  //more details in the "Hooking By Example" project on my github
  fn_DXGISwapChain_Present DXGISwapChain_Present_Orig;
  PopAddress(uint64_t(&DXGISwapChain_Present_Orig));

  //actuall call Present
  HRESULT r = DXGISwapChain_Present_Orig(thisPtr, SyncInterval, Flags);
  return r;
}

extern "C" HRESULT __stdcall D3D11CreateDeviceAndSwapChain(
  IDXGIAdapter * pAdapter,
  D3D_DRIVER_TYPE            DriverType,
  HMODULE                    Software,
  UINT                       Flags,
  const D3D_FEATURE_LEVEL * pFeatureLevels,
  UINT                       FeatureLevels,
  UINT                       SDKVersion,
  const DXGI_SWAP_CHAIN_DESC * pSwapChainDesc,
  IDXGISwapChain * *ppSwapChain,
  ID3D11Device * *ppDevice,
  D3D_FEATURE_LEVEL * pFeatureLevel,
  ID3D11DeviceContext * *ppImmediateContext
)
{
  fn_D3D11CreateDeviceAndSwapChain D3D11CreateDeviceAndSwapChain_Orig = LoadD3D11AndGetOriginalFuncPointer();

  HRESULT res = D3D11CreateDeviceAndSwapChain_Orig(pAdapter, DriverType, Software, Flags, pFeatureLevels, FeatureLevels, SDKVersion, pSwapChainDesc, ppSwapChain, ppDevice, pFeatureLevel, ppImmediateContext);

  void** swapChainVTable = *reinterpret_cast<void***>(*ppSwapChain);

  //redirects calls to swapChainVTable[8] to DXGISwapChain_Present_Hook
  //for more details about hooking, see my previous blog post
  InstallHook(swapChainVTable[8], DXGISwapChain_Present_Hook);

  return res;
}
Actually Drawing a Triangle
Once I had the IDXGISwapChain::Present hook working, the rest of this project fell into place pretty quickly. I added all the normal D3D11 calls for creating a mesh, compiling shaders, etc to CreateDeviceAndSwapChain (after device creation), and then added the draw commands for the triangle to the Present hook, before having that hook call the regular Present function. Rather than try to shove hlsl code in my cpp files, I just had the code look for a folder called “hook_content” in the same directory as the hooked binary, and load the shaders from there. Yet another idea I stole from ReShade.
The resulting code is simple enough to be a D3D11 tutorial project, so I’m just going to paste it below for reference and not waste much time talking about it. I’ve also included all the hooking code too. As mentioned, the entire project (including the test d3d11 app I built) is also on github.
Full DX11 Hooking Code (Click To Expand)
#pragma once
#include <Windows.h>
#include "debug.h"
#include <stdint.h>
#include <d3dcompiler.h>
#include <d3d11.h>
#include <d3d11_4.h>
#include <shlwapi.h>
#include "hooking.h"

#pragma comment (lib, "Shlwapi.lib") //for PathRemoveFileSpecA
#pragma comment(lib, "d3dcompiler.lib")


typedef HRESULT(__stdcall* fn_D3D11CreateDeviceAndSwapChain)(
  IDXGIAdapter*,
  D3D_DRIVER_TYPE,
  HMODULE,
  UINT,
  const D3D_FEATURE_LEVEL*,
  UINT,
  UINT,
  const DXGI_SWAP_CHAIN_DESC*,
  IDXGISwapChain**,
  ID3D11Device**,
  D3D_FEATURE_LEVEL*,
  ID3D11DeviceContext**);

typedef HRESULT(__stdcall* fn_DXGISwapChain_Present)(IDXGISwapChain*, UINT, UINT);

IDXGISwapChain* swapChain = nullptr;
ID3D11Device5* device = nullptr;
ID3D11DeviceContext4* devCon = nullptr;
ID3D10Blob* vs_blob = nullptr;
ID3D11VertexShader* vs = nullptr;
ID3D10Blob* ps_blob = nullptr;
ID3D11PixelShader* ps = nullptr;
ID3D11Buffer* vertex_buffer = nullptr;
ID3D11InputLayout* vertLayout = nullptr;
ID3D11RasterizerState* SolidRasterState = nullptr;
ID3D11DepthStencilState* SolidDepthStencilState = nullptr;

HRESULT DXGISwapChain_Present_Hook(IDXGISwapChain* thisPtr, UINT SyncInterval, UINT Flags)
{
  devCon->VSSetShader(vs, 0, 0);
  devCon->PSSetShader(ps, 0, 0);
  devCon->IASetInputLayout(vertLayout);
  devCon->RSSetState(SolidRasterState);
  devCon->OMSetDepthStencilState(SolidDepthStencilState, 0);

  UINT stride = sizeof(float) * 6;
  UINT offset = 0;
  devCon->IASetVertexBuffers(0, 1, &vertex_buffer, &stride, &offset);
  devCon->IASetPrimitiveTopology(D3D11_PRIMITIVE_TOPOLOGY_TRIANGLELIST);
  devCon->Draw(3, 0);


  fn_DXGISwapChain_Present DXGISwapChain_Present_Orig;
  PopAddress(uint64_t(&DXGISwapChain_Present_Orig));

  HRESULT r = DXGISwapChain_Present_Orig(thisPtr, SyncInterval, Flags);
  return r;
}


void LoadShaders()
{
  {
    char filepath[512];
    HMODULE hModule = GetModuleHandle(NULL);
    GetModuleFileNameA(hModule, filepath, 512);
    PathRemoveFileSpecA(filepath);

    strcat_s(filepath, 512, "\\hook_content\\passthrough_vs.shader");

    wchar_t wPath[513];
    size_t outSize;

    mbstowcs_s(&outSize, &wPath[0], strlen(filepath) + 1, filepath, strlen(filepath));
    ID3D10Blob* compileErrors = nullptr;

    HRESULT err = D3DCompileFromFile(wPath, 0, 0, "main", "vs_5_0", 0, 0, &vs_blob, &compileErrors);
    if (compileErrors != nullptr && compileErrors)
    {
      ID3D10Blob* outErrorsDeref = compileErrors;
      OutputDebugStringA((char*)compileErrors->GetBufferPointer());
    }

    err = device->CreateVertexShader(vs_blob->GetBufferPointer(), vs_blob->GetBufferSize(), NULL, &vs);
    check(err == S_OK);
  }
  {
    char filepath[512];
    HMODULE hModule = GetModuleHandle(NULL);
    GetModuleFileNameA(hModule, filepath, 512);
    PathRemoveFileSpecA(filepath);

    strcat_s(filepath, 512, "\\hook_content\\vertex_color_ps.shader");

    wchar_t wPath[513];
    size_t outSize;

    mbstowcs_s(&outSize, &wPath[0], strlen(filepath) + 1, filepath, strlen(filepath));
    ID3D10Blob* compileErrors;

    HRESULT err = D3DCompileFromFile(wPath, 0, 0, "main", "ps_5_0", 0, 0, &ps_blob, &compileErrors);
    if (compileErrors != nullptr && compileErrors)
    {
      ID3D10Blob* outErrorsDeref = compileErrors;
      OutputDebugStringA((char*)compileErrors->GetBufferPointer());
    }

    err = device->CreatePixelShader(ps_blob->GetBufferPointer(), ps_blob->GetBufferSize(), NULL, &ps);
    check(err == S_OK);
  }
}


void CreateMesh()
{
  const float vertData[] =
  {
    -1, -1, 0.1,  1,0,0,
    1, 1, 0.1,  0,1,0,
    -1, 1, 0.1,  0,0,1
  };

  D3D11_BUFFER_DESC vertBufferDesc;
  ZeroMemory(&vertBufferDesc, sizeof(vertBufferDesc));
  vertBufferDesc.Usage = D3D11_USAGE_DEFAULT;
  vertBufferDesc.ByteWidth = sizeof(float) * 6 * 3; //6 floats per vert, 3 verts
  vertBufferDesc.BindFlags = D3D11_BIND_VERTEX_BUFFER;
  vertBufferDesc.CPUAccessFlags = 0;
  vertBufferDesc.MiscFlags = 0;

  D3D11_SUBRESOURCE_DATA vertBufferData;
  ZeroMemory(&vertBufferData, sizeof(vertBufferData));
  vertBufferData.pSysMem = vertData;

  HRESULT res = device->CreateBuffer(&vertBufferDesc, &vertBufferData, &vertex_buffer);
  check(res == S_OK);
}


void CreateInputLayout()
{
  D3D11_INPUT_ELEMENT_DESC vertElements[] =
  {
    {"POSITION", 0, DXGI_FORMAT_R32G32B32_FLOAT, 0, 0,D3D11_INPUT_PER_VERTEX_DATA, 0},
    {"COLOR", 0, DXGI_FORMAT_R32G32B32_FLOAT, 0, 12, D3D11_INPUT_PER_VERTEX_DATA, 0}
  };

  HRESULT err = device->CreateInputLayout(vertElements, _countof(vertElements), vs_blob->GetBufferPointer(), vs_blob->GetBufferSize(), &vertLayout);
  check(err == S_OK);
}

void CreateRasterizerAndDepthStates()
{
  D3D11_RASTERIZER_DESC soliddesc;
  ZeroMemory(&soliddesc, sizeof(D3D11_RASTERIZER_DESC));
  soliddesc.FillMode = D3D11_FILL_SOLID;
  soliddesc.CullMode = D3D11_CULL_NONE;
  HRESULT err = device->CreateRasterizerState(&soliddesc, &SolidRasterState);
  check(err == S_OK);

  D3D11_DEPTH_STENCIL_DESC depthDesc;
  ZeroMemory(&depthDesc, sizeof(D3D11_DEPTH_STENCIL_DESC));
  depthDesc.DepthEnable = true;
  depthDesc.DepthWriteMask = D3D11_DEPTH_WRITE_MASK_ALL;
  depthDesc.DepthFunc = D3D11_COMPARISON_ALWAYS;
  err = device->CreateDepthStencilState(&depthDesc, &SolidDepthStencilState);
  check(err == S_OK);
}

fn_D3D11CreateDeviceAndSwapChain LoadD3D11AndGetOriginalFuncPointer()
{
  char path[MAX_PATH];
  if (!GetSystemDirectoryA(path, MAX_PATH)) return nullptr;

  strcat_s(path, MAX_PATH * sizeof(char), "\\d3d11.dll");
  HMODULE d3d_dll = LoadLibraryA(path);

  if (!d3d_dll)
  {
    MessageBox(NULL, TEXT("Could Not Locate Original D3D11 DLL"), TEXT("Darn"), 0);
    return nullptr;
  }

  return (fn_D3D11CreateDeviceAndSwapChain)GetProcAddress(d3d_dll, TEXT("D3D11CreateDeviceAndSwapChain"));
}

inline void** get_vtable_ptr(void* obj)
{
  return *reinterpret_cast<void***>(obj);
}

extern "C" HRESULT __stdcall D3D11CreateDeviceAndSwapChain(
  IDXGIAdapter * pAdapter,
  D3D_DRIVER_TYPE            DriverType,
  HMODULE                    Software,
  UINT                       Flags,
  const D3D_FEATURE_LEVEL * pFeatureLevels,
  UINT                       FeatureLevels,
  UINT                       SDKVersion,
  const DXGI_SWAP_CHAIN_DESC * pSwapChainDesc,
  IDXGISwapChain * *ppSwapChain,
  ID3D11Device * *ppDevice,
  D3D_FEATURE_LEVEL * pFeatureLevel,
  ID3D11DeviceContext * *ppImmediateContext
)
{
  MessageBox(NULL, TEXT("Calling D3D11CreateDeviceAndSwapChain"), TEXT("Ok"), 0);

  fn_D3D11CreateDeviceAndSwapChain D3D11CreateDeviceAndSwapChain_Orig = LoadD3D11AndGetOriginalFuncPointer();

  HRESULT res = D3D11CreateDeviceAndSwapChain_Orig(pAdapter, DriverType, Software, Flags, pFeatureLevels, FeatureLevels, SDKVersion, pSwapChainDesc, ppSwapChain, ppDevice, pFeatureLevel, ppImmediateContext);

  HRESULT hr = (*ppDevice)->QueryInterface(__uuidof(ID3D11Device5), (void**)&device);
  hr = (*ppImmediateContext)->QueryInterface(__uuidof(ID3D11DeviceContext), (void**)&devCon);

  LoadShaders();
  CreateMesh();
  CreateInputLayout();
  CreateRasterizerAndDepthStates();

  swapChain = *ppSwapChain;
  void** swapChainVTable = get_vtable_ptr(swapChain);

  InstallHook(swapChainVTable[8], DXGISwapChain_Present_Hook);
  //present is [8];

  return res;
}

BOOL WINAPI DllMain(HINSTANCE hinstDLL, DWORD ul_reason_for_call, LPVOID lpvReserved)
{
  if (ul_reason_for_call == DLL_PROCESS_ATTACH)
  {
    MessageBox(NULL, TEXT("Target app has loaded your proxy d3d11.dll and called DllMain. If you're launching Skyrim via steam, you need to dismiss this popup quickly, otherwise you get a load error"), TEXT("Success"), 0);
  }

  return true;
}
Hooking Code (Click To Expand)
Hooking.h:
#pragma once
#include <Windows.h>
#include <stdint.h>


void InstallHook(void* func2hook, void* payloadFunc);
__declspec(noinline) void PopAddress(uint64_t trampolinePtr);
Hooking.cpp:
#include "hooking.h"
#include <Windows.h>
#include <stack>
#include <stdio.h>
#include <memoryapi.h>
#include <wow64apiset.h> // for checking is process is 64 bit
#include <TlHelp32.h> //for PROCESSENTRY32, needs to be included after windows.h
#include <Psapi.h>
#include <stdint.h>
#include "capstone/x86.h"
#include "capstone/capstone.h"
#include "debug.h"

thread_local std::stack<uint64_t> hookJumpAddresses;


#if _WIN64
typedef uint64_t addr_t;
#else
typedef uint32_t addr_t;
#endif

bool IsProcess64Bit(HANDLE process)
{
  BOOL isWow64 = false;
  IsWow64Process(process, &isWow64);

  if (isWow64)
  {
    //process is 32 bit, running on 64 bit machine
    return false;
  }
  else
  {
    SYSTEM_INFO sysInfo;
    GetSystemInfo(&sysInfo);
    return sysInfo.wProcessorArchitecture == PROCESSOR_ARCHITECTURE_AMD64;
  }
}

void* AllocPageInTargetProcess(HANDLE process)
{
  SYSTEM_INFO sysInfo;
  GetSystemInfo(&sysInfo);
  int PAGE_SIZE = sysInfo.dwPageSize;

  void* newPage = VirtualAllocEx(process, NULL, PAGE_SIZE, MEM_COMMIT | MEM_RESERVE, PAGE_EXECUTE_READWRITE);
  return newPage;
}


void* AllocPage()
{
  SYSTEM_INFO sysInfo;
  GetSystemInfo(&sysInfo);
  int PAGE_SIZE = sysInfo.dwPageSize;

  void* newPage = VirtualAlloc(NULL, PAGE_SIZE, MEM_COMMIT | MEM_RESERVE, PAGE_EXECUTE_READWRITE);
  return newPage;
}

void* AllocatePageNearAddressRemote(HANDLE handle, void* targetAddr)
{
  check(IsProcess64Bit(handle));

  SYSTEM_INFO sysInfo;
  GetSystemInfo(&sysInfo);
  const uint64_t PAGE_SIZE = sysInfo.dwPageSize;

  uint64_t startAddr = (uint64_t(targetAddr) & ~(PAGE_SIZE - 1)); //round down to nearest page boundary
  uint64_t minAddr = min(startAddr - 0x7FFFFF00, (uint64_t)sysInfo.lpMinimumApplicationAddress);
  uint64_t maxAddr = max(startAddr + 0x7FFFFF00, (uint64_t)sysInfo.lpMaximumApplicationAddress);

  uint64_t startPage = (startAddr - (startAddr % PAGE_SIZE));

  uint64_t pageOffset = 1;
  while (1)
  {
    uint64_t byteOffset = pageOffset * PAGE_SIZE;
    uint64_t highAddr = startPage + byteOffset;
    uint64_t lowAddr = (startPage > byteOffset) ? startPage - byteOffset : 0;

    bool needsExit = highAddr > maxAddr && lowAddr < minAddr;

    if (highAddr < maxAddr)
    {
      void* outAddr = VirtualAllocEx(handle, (void*)highAddr, (size_t)PAGE_SIZE, MEM_COMMIT | MEM_RESERVE, PAGE_EXECUTE_READWRITE);
      if (outAddr)
        return outAddr;
    }

    if (lowAddr > minAddr)
    {
      void* outAddr = VirtualAllocEx(handle, (void*)lowAddr, (size_t)PAGE_SIZE, MEM_COMMIT | MEM_RESERVE, PAGE_EXECUTE_READWRITE);
      if (outAddr != nullptr)
        return outAddr;
    }

    pageOffset++;

    if (needsExit)
    {
      break;
    }
  }

  return nullptr;
}

void* AllocatePageNearAddress(void* targetAddr)
{
  return AllocatePageNearAddressRemote(GetCurrentProcess(), targetAddr);
}

//I use subst to alias my development folder to W:
//this will rebase any virtual drives made by subst to
//their actual drive equivalent, to prevent conflicts. Likely
//not important for most people and can be ignored
void RebaseVirtualDrivePath(const char* path, char* outBuff, size_t outBuffSize)
{
  memset(outBuff, 0, outBuffSize);

  char driveLetter[3] = { 0 };
  memcpy(driveLetter, path, 2);

  char deviceDrive[512];
  QueryDosDevice(driveLetter, deviceDrive, 512);

  const char* virtualDrivePrefix = "\\??\\";
  char* prefix = strstr(deviceDrive, virtualDrivePrefix);
  if (prefix)
  {
    size_t replacementLen = strlen(deviceDrive) - strlen(virtualDrivePrefix);
    size_t rebasedPathLen = replacementLen + strlen(path) - 2;
    check(rebasedPathLen < outBuffSize);
    memcpy(outBuff, deviceDrive + strlen(virtualDrivePrefix), replacementLen);
    memcpy(outBuff + replacementLen, &path[2], strlen(path) - 2);
  }
  else
  {
    check(strlen(path) < outBuffSize);
    memcpy(outBuff, path, strlen(path));
  }
}

//returns the first module called "name" -> only searches for dll name, not whole path
//ie: somepath/subdir/mydll.dll can be searched for with "mydll.dll"
HMODULE FindModuleInProcess(HANDLE process, const char* name)
{
  char* lowerCaseName = _strdup(name);
  _strlwr_s(lowerCaseName, strlen(name) + 1);

  HMODULE remoteProcessModules[1024];
  DWORD numBytesWrittenInModuleArray = 0;
  BOOL success = EnumProcessModules(process, remoteProcessModules, sizeof(HMODULE) * 1024, &numBytesWrittenInModuleArray);

  if (!success)
  {
    fprintf(stderr, "Error enumerating modules on target process. Error Code %lu \n", GetLastError());
    DebugBreak();
  }

  DWORD numRemoteModules = numBytesWrittenInModuleArray / sizeof(HMODULE);
  CHAR remoteProcessName[256];
  GetModuleFileNameEx(process, NULL, remoteProcessName, 256); //a null module handle gets the process name
  _strlwr_s(remoteProcessName, 256);

  MODULEINFO remoteProcessModuleInfo;
  HMODULE remoteProcessModule = 0; //An HMODULE is just the DLL's base address

  for (DWORD i = 0; i < numRemoteModules; ++i)
  {
    CHAR moduleName[256];
    CHAR absoluteModuleName[256];
    CHAR rebasedPath[256] = { 0 };
    GetModuleFileNameEx(process, remoteProcessModules[i], moduleName, 256);
    _strlwr_s(moduleName, 256);
    char* lastSlash = strrchr(moduleName, '\\');
    if (!lastSlash) lastSlash = strrchr(moduleName, '/');

    char* dllName = lastSlash + 1;

    if (strcmp(dllName, lowerCaseName) == 0)
    {
      remoteProcessModule = remoteProcessModules[i];

      success = GetModuleInformation(process, remoteProcessModules[i], &remoteProcessModuleInfo, sizeof(MODULEINFO));
      check(success);
      free(lowerCaseName);
      return remoteProcessModule;
    }
    //the following string operations are to account for cases where GetModuleFileNameEx
    //returns a relative path rather than an absolute one, the path we get to the module
    //is using a virtual drive letter (ie: one created by subst) rather than a real drive
    char* err = _fullpath(absoluteModuleName, moduleName, 256);
    check(err);
  }

  free(lowerCaseName);
  return 0;

}

void PrintModulesForProcess(HANDLE process)
{
  HMODULE remoteProcessModules[1024];
  DWORD numBytesWrittenInModuleArray = 0;
  BOOL success = EnumProcessModules(process, remoteProcessModules, sizeof(HMODULE) * 1024, &numBytesWrittenInModuleArray);

  if (!success)
  {
    fprintf(stderr, "Error enumerating modules on target process. Error Code %lu \n", GetLastError());
    DebugBreak();
  }

  DWORD numRemoteModules = numBytesWrittenInModuleArray / sizeof(HMODULE);
  HMODULE remoteProcessModule = 0; //An HMODULE is just the DLL's base address

  for (DWORD i = 0; i < numRemoteModules; ++i)
  {
    CHAR moduleName[256];
    CHAR absoluteModuleName[256];
    GetModuleFileNameEx(process, remoteProcessModules[i], moduleName, 256);

    //the following string operations are to account for cases where GetModuleFileNameEx
    //returns a relative path rather than an absolute one, the path we get to the module
    //is using a virtual drive letter (ie: one created by subst) rather than a real drive
    char* err = _fullpath(absoluteModuleName, moduleName, 256);
    check(err);
    printf("%s\n", absoluteModuleName);
  }
}

HMODULE GetBaseModuleForProcess(HANDLE process)
{
  HMODULE remoteProcessModules[1024];
  DWORD numBytesWrittenInModuleArray = 0;
  BOOL success = EnumProcessModules(process, remoteProcessModules, sizeof(HMODULE) * 1024, &numBytesWrittenInModuleArray);

  if (!success)
  {
    fprintf(stderr, "Error enumerating modules on target process. Error Code %lu \n", GetLastError());
    DebugBreak();
  }

  DWORD numRemoteModules = numBytesWrittenInModuleArray / sizeof(HMODULE);
  CHAR remoteProcessName[256];
  GetModuleFileNameEx(process, NULL, remoteProcessName, 256); //a null module handle gets the process name
  _strlwr_s(remoteProcessName, 256);

  MODULEINFO remoteProcessModuleInfo;
  HMODULE remoteProcessModule = 0; //An HMODULE is just the DLL's base address

  for (DWORD i = 0; i < numRemoteModules; ++i)
  {
    CHAR moduleName[256];
    CHAR absoluteModuleName[256];
    CHAR rebasedPath[256] = { 0 };
    GetModuleFileNameEx(process, remoteProcessModules[i], moduleName, 256);

    //the following string operations are to account for cases where GetModuleFileNameEx
    //returns a relative path rather than an absolute one, the path we get to the module
    //is using a virtual drive letter (ie: one created by subst) rather than a real drive
    char* err = _fullpath(absoluteModuleName, moduleName, 256);
    check(err);

    RebaseVirtualDrivePath(absoluteModuleName, rebasedPath, 256);
    _strlwr_s(rebasedPath, 256);

    if (strcmp(remoteProcessName, rebasedPath) == 0)
    {
      remoteProcessModule = remoteProcessModules[i];

      success = GetModuleInformation(process, remoteProcessModules[i], &remoteProcessModuleInfo, sizeof(MODULEINFO));
      if (!success)
      {
        fprintf(stderr, "Error getting module information for remote process module\n");
        DebugBreak();
      }
      break;
    }
  }

  return remoteProcessModule;
}

DWORD FindPidByName(const char* name)
{
  HANDLE h;
  PROCESSENTRY32 singleProcess;
  h = CreateToolhelp32Snapshot( //takes a snapshot of specified processes
    TH32CS_SNAPPROCESS, //get all processes
    0); //ignored for SNAPPROCESS

  singleProcess.dwSize = sizeof(PROCESSENTRY32);

  do {

    if (strcmp(singleProcess.szExeFile, name) == 0)
    {
      DWORD pid = singleProcess.th32ProcessID;
      CloseHandle(h);
      return pid;
    }

  } while (Process32Next(h, &singleProcess));

  CloseHandle(h);

  return 0;
}

uint32_t WriteMovToRCX(uint8_t* dst, uint64_t val)
{
  check(IsProcess64Bit(GetCurrentProcess()));

  uint8_t movAsmBytes[] =
  {
    0x48, 0xB9, 0xAA, 0xAA, 0xAA, 0xAA, 0xAA, 0xAA, 0xAA, 0xAA, //movabs 64 bit value into rcx
  };
  memcpy(&movAsmBytes[2], &val, sizeof(uint64_t));
  memcpy(dst, &movAsmBytes, sizeof(movAsmBytes));

  return sizeof(movAsmBytes);

}

uint32_t WriteSaveArgumentRegisters(uint8_t* dst)
{
  uint8_t asmBytes[] =
  {
    0x51, //push rcx
    0x52, //push rdx
    0x41, 0x50, //push r8
    0x41, 0x51, //push r9
    0x48, 0x83, 0xEC, 0x40, //sub rsp, 64 -> space for xmm registers
    0x0F, 0x11, 0x04, 0x24, // movups xmmword ptr [rsp],xmm0
    0x0F, 0x11, 0x4C, 0x24, 0x10, //movups xmmword ptr [rsp+10h],xmm1
    0x0F, 0x11, 0x54, 0x24, 0x20, //movups xmmword ptr [rsp+20h],xmm2
    0x0F, 0x11, 0x5C, 0x24, 0x30 //movups  xmmword ptr [rsp+30h],xmm3
  };

  memcpy(dst, &asmBytes, sizeof(asmBytes));
  return sizeof(asmBytes);
}

uint32_t WriteRestoreArgumentRegisters(uint8_t* dst)
{

  uint8_t asmBytes[] =
  {
    0x0F, 0x10, 0x04, 0x24, //movups xmm0,xmmword ptr[rsp]
    0x0F, 0x10, 0x4C, 0x24, 0x10,//movups xmm1,xmmword ptr[rsp + 10h]
    0x0F, 0x10, 0x54, 0x24, 0x20,//movups xmm2,xmmword ptr[rsp + 20h]
    0x0F, 0x10, 0x5C, 0x24, 0x30,//movups xmm3,xmmword ptr[rsp + 30h]
    0x48, 0x83, 0xC4, 0x40,//add rsp,40h
    0x41, 0x59,//pop r9
    0x41, 0x58,//pop r8
    0x5A,//pop rdx
    0x59 //pop rcx
  };

  memcpy(dst, &asmBytes, sizeof(asmBytes));
  return sizeof(asmBytes);
}

uint32_t WriteAddRSP32(uint8_t* dst)
{
  uint8_t addAsmBytes[] =
  {
    0x48, 0x83, 0xC4, 0x20
  };
  memcpy(dst, &addAsmBytes, sizeof(addAsmBytes));
  return sizeof(addAsmBytes);
}

uint32_t WriteSubRSP32(uint8_t* dst)
{
  uint8_t subAsmBytes[] =
  {
    0x48, 0x83, 0xEC, 0x20
  };
  memcpy(dst, &subAsmBytes, sizeof(subAsmBytes));
  return sizeof(subAsmBytes);
}

uint32_t WriteAbsoluteCall64(uint8_t* dst, void* funcToCall)
{
  check(IsProcess64Bit(GetCurrentProcess()));

  uint8_t callAsmBytes[] =
  {
    0x49, 0xBA, 0xAA, 0xAA, 0xAA, 0xAA, 0xAA, 0xAA, 0xAA, 0xAA, //movabs 64 bit value into r10
    0x41, 0xFF, 0xD2, //call r10
  };
  memcpy(&callAsmBytes[2], &funcToCall, sizeof(void*));
  memcpy(dst, &callAsmBytes, sizeof(callAsmBytes));

  return sizeof(callAsmBytes);
}

uint32_t WriteAbsoluteJump64(void* absJumpMemory, void* addrToJumpTo)
{
  check(IsProcess64Bit(GetCurrentProcess()));

  //this writes the absolute jump instructions into the memory allocated near the target
  //the E9 jump installed in the target function (GetNum) will jump to here
  uint8_t absJumpInstructions[] = { 0x49, 0xBA, 0xAA, 0xAA, 0xAA, 0xAA, 0xAA, 0xAA, 0xAA, 0xAA, //mov 64 bit value into r10
                    0x41, 0xFF, 0xE2 }; //jmp r10

  uint64_t addrToJumpTo64 = (uint64_t)addrToJumpTo;
  memcpy(&absJumpInstructions[2], &addrToJumpTo64, sizeof(addrToJumpTo64));
  memcpy(absJumpMemory, absJumpInstructions, sizeof(absJumpInstructions));
  return sizeof(absJumpInstructions);
}

uint32_t WriteAbsoluteJump64(HANDLE process, void* absJumpMemory, void* addrToJumpTo)
{
  check(IsProcess64Bit(process));

  //this writes the absolute jump instructions into the memory allocated near the target
  //the E9 jump installed in the target function (GetNum) will jump to here
  uint8_t absJumpInstructions[] = { 0x49, 0xBA, 0xAA, 0xAA, 0xAA, 0xAA, 0xAA, 0xAA, 0xAA, 0xAA, //mov 64 bit value into r10
                      0x41, 0xFF, 0xE2 }; //jmp r10

  uint64_t addrToJumpTo64 = (uint64_t)addrToJumpTo;
  memcpy(&absJumpInstructions[2], &addrToJumpTo64, sizeof(addrToJumpTo64));

  WriteProcessMemory(process, absJumpMemory, absJumpInstructions, sizeof(absJumpInstructions), nullptr);
  return sizeof(absJumpInstructions);
}

uint32_t WriteRelativeJump(void* func2hook, void* jumpTarget)
{
  uint8_t jmpInstruction[5] = { 0xE9, 0x0, 0x0, 0x0, 0x0 };

  int64_t relativeToJumpTarget64 = (int64_t)jumpTarget - ((int64_t)func2hook + 5);
  check(relativeToJumpTarget64 < INT32_MAX);

  int32_t relativeToJumpTarget = (int32_t)relativeToJumpTarget64;

  memcpy(jmpInstruction + 1, &relativeToJumpTarget, 4);

  DWORD oldProtect;
  bool err = VirtualProtect(func2hook, 1024, PAGE_EXECUTE_READWRITE, &oldProtect);
  check(err);

  memcpy(func2hook, jmpInstruction, sizeof(jmpInstruction));
  return sizeof(jmpInstruction);

}

uint32_t WriteRelativeJump(void* func2hook, void* jumpTarget, uint8_t numTrailingNOPs)
{
  uint8_t jmpInstruction[5] = { 0xE9, 0x0, 0x0, 0x0, 0x0 };

  int64_t relativeToJumpTarget64 = (int64_t)jumpTarget - ((int64_t)func2hook + 5);
  check(relativeToJumpTarget64 < INT32_MAX);

  int32_t relativeToJumpTarget = (int32_t)relativeToJumpTarget64;

  memcpy(jmpInstruction + 1, &relativeToJumpTarget, 4);

  DWORD oldProtect;
  bool err = VirtualProtect(func2hook, 1024, PAGE_EXECUTE_READWRITE, &oldProtect);
  check(err);

  memcpy(func2hook, jmpInstruction, sizeof(jmpInstruction));

  uint8_t* byteFunc2Hook = (uint8_t*)func2hook;
  for (int i = 0; i < numTrailingNOPs; ++i)
  {
    memset((void*)(byteFunc2Hook + 5 + i), 0x90, 1);
  }

  return sizeof(jmpInstruction) + numTrailingNOPs;
}


uint32_t WriteRelativeJump(HANDLE process, void* func2hook, void* jumpTarget)
{
  uint8_t jmpInstruction[5] = { 0xE9, 0x0, 0x0, 0x0, 0x0 };

  int64_t relativeToJumpTarget64 = (int64_t)jumpTarget - ((int64_t)func2hook + 5);
  check(relativeToJumpTarget64 < INT32_MAX);

  int32_t relativeToJumpTarget = (int32_t)relativeToJumpTarget64;

  memcpy(jmpInstruction + 1, &relativeToJumpTarget, 4);

  DWORD oldProtect;
  bool err = VirtualProtectEx(process, func2hook, 1024, PAGE_EXECUTE_READWRITE, &oldProtect);
  check(err);

  err = WriteProcessMemory(process, func2hook, jmpInstruction, sizeof(jmpInstruction), nullptr);
  check(err);

  return sizeof(jmpInstruction);
}

HMODULE FindModuleBaseAddress(HANDLE process, const char* targetModule)
{
  HMODULE hMods[1024];
  DWORD cbNeeded;

  if (EnumProcessModules(process, hMods, sizeof(hMods), &cbNeeded))
  {
    for (uint32_t i = 0; i < (cbNeeded / sizeof(HMODULE)); i++)
    {
      TCHAR moduleName[MAX_PATH];

      // Get the full path to the module's file.

      if (GetModuleFileNameEx(process, hMods[i], moduleName,
        sizeof(moduleName) / sizeof(TCHAR)))
      {
        // Print the module name and handle value.
        if (strstr(moduleName, targetModule) != nullptr)
        {
          return hMods[i];
        }
      }
    }
  }

  return NULL;
}

void* FindAddressOfRemoteDLLFunction(HANDLE process, const char* dllName, const char* funcName)
{
  //first, load the dll into this process so we can use GetProcAddress to determine the offset
  //of the target function from the DLL base address
  HMODULE localDLL = LoadLibraryEx(dllName, NULL, 0);
  check(localDLL);
  void* localHookFunc = GetProcAddress(localDLL, funcName);
  check(localHookFunc);

  uint64_t offsetOfHookFunc = (uint64_t)localHookFunc - (uint64_t)localDLL;
  FreeLibrary(localDLL); //free the library, we don't need it anymore.

  //Technically, we could just use the result of GetProcAddress, since in 99% of cases, the base address of the dll
  //in the two processes will be shared thanks to ASLR, but just in case the remote process has relocated the dll,
  //I'm getting it here separately.

  HMODULE remoteModuleBase = FindModuleBaseAddress(process, dllName);

  return (void*)((uint64_t)remoteModuleBase + offsetOfHookFunc);
}

void SetOtherThreadsSuspended(bool suspend)
{
  HANDLE hSnapshot = CreateToolhelp32Snapshot(TH32CS_SNAPTHREAD, 0);
  if (hSnapshot != INVALID_HANDLE_VALUE)
  {
    THREADENTRY32 te;
    te.dwSize = sizeof(THREADENTRY32);
    if (Thread32First(hSnapshot, &te))
    {
      do
      {
        if (te.dwSize >= (FIELD_OFFSET(THREADENTRY32, th32OwnerProcessID) + sizeof(DWORD))
          && te.th32OwnerProcessID == GetCurrentProcessId()
          && te.th32ThreadID != GetCurrentThreadId())
        {

          HANDLE thread = ::OpenThread(THREAD_ALL_ACCESS, FALSE, te.th32ThreadID);
          if (thread != NULL)
          {
            if (suspend)
            {
              SuspendThread(thread);
            }
            else
            {
              ResumeThread(thread);
            }
            CloseHandle(thread);
          }
        }
      } while (Thread32Next(hSnapshot, &te));
    }
  }
}

struct X64Instructions
{
  cs_insn* instructions;
  uint32_t numInstructions;
  uint32_t numBytes;
};

X64Instructions StealBytes(void* function)
{
  // Disassemble stolen bytes
  csh handle;
  cs_open(CS_ARCH_X86, CS_MODE_64, &handle);
  cs_option(handle, CS_OPT_DETAIL, CS_OPT_ON); // turn ON detail feature with CS_OPT_ON

  size_t count;
  cs_insn* disassembledInstructions; //allocated by cs_disasm, needs to be manually freed later
  count = cs_disasm(handle, (uint8_t*)function, 20, (uint64_t)function, 20, &disassembledInstructions);

  //get the instructions covered by the first 5 bytes of the original function
  uint32_t byteCount = 0;
  uint32_t stolenInstrCount = 0;
  for (int32_t i = 0; i < count; ++i)
  {
    cs_insn& inst = disassembledInstructions[i];
    byteCount += inst.size;
    stolenInstrCount++;
    if (byteCount >= 5) break;
  }

  //replace stolen instructions in target func wtih NOPs, so that when we jump
  //back to the target function, we don't have to care about how many
  //bytes were stolen
  memset(function, 0x90, byteCount);

  cs_close(&handle);
  return { disassembledInstructions, stolenInstrCount, byteCount };
}

bool IsRelativeJump(cs_insn& inst)
{
  bool isAnyJumpInstruction = inst.id >= X86_INS_JAE && inst.id <= X86_INS_JS;
  bool isJmp = inst.id == X86_INS_JMP;
  bool startsWithEBorE9 = inst.bytes[0] == 0xEB || inst.bytes[0] == 0xE9;
  return isJmp ? startsWithEBorE9 : isAnyJumpInstruction;
}

bool IsRelativeCall(cs_insn& inst)
{
  bool isCall = inst.id == X86_INS_CALL;
  bool startsWithE8 = inst.bytes[0] == 0xE8;
  return isCall && startsWithE8;
}

bool IsRIPRelativeInstr(cs_insn& inst)
{
  cs_x86* x86 = &(inst.detail->x86);

  for (uint32_t i = 0; i < inst.detail->x86.op_count; i++)
  {
    cs_x86_op* op = &(x86->operands[i]);

    //mem type is rip relative, like lea rcx,[rip+0xbeef]
    if (op->type == X86_OP_MEM)
    {
      //if we're relative to rip
      return op->mem.base == X86_REG_RIP;
    }
  }

  return false;
}

template<class T>
T GetDisplacement(cs_insn* inst, uint8_t offset)
{
  T disp;
  memcpy(&disp, &inst->bytes[offset], sizeof(T));
  return disp;
}

//rewrite instruction bytes so that any RIP-relative displacement operands
//make sense with wherever we're relocating to
void RelocateInstruction(cs_insn* inst, void* dstLocation)
{
  cs_x86* x86 = &(inst->detail->x86);
  uint8_t offset = x86->encoding.disp_offset;

  uint64_t displacement = inst->bytes[x86->encoding.disp_offset];
  switch (x86->encoding.disp_size)
  {
  case 1:
  {
    int8_t disp = GetDisplacement<uint8_t>(inst, offset);
    disp -= int8_t(uint64_t(dstLocation) - inst->address);
    memcpy(&inst->bytes[offset], &disp, 1);
  }break;

  case 2:
  {
    int16_t disp = GetDisplacement<uint16_t>(inst, offset);
    disp -= int16_t(uint64_t(dstLocation) - inst->address);
    memcpy(&inst->bytes[offset], &disp, 2);
  }break;

  case 4:
  {
    int32_t disp = GetDisplacement<int32_t>(inst, offset);
    disp -= int32_t(uint64_t(dstLocation) - inst->address);
    memcpy(&inst->bytes[offset], &disp, 4);
  }break;
  }
}


//relative jump instructions need to be rewritten so that they jump to the appropriate
//place in the Absolute Instruction Table. Since we want to preserve any conditional
//jump logic, this func rewrites the instruction's operand bytes only.
void RewriteStolenJumpInstruction(cs_insn* instr, uint8_t* instrPtr, uint8_t* absTableEntry)
{
  uint8_t distToJumpTable = uint8_t(absTableEntry - (instrPtr + instr->size));

  //jmp instructions can have a 1 or 2 byte opcode, and need a 1-4 byte operand
  //rewrite the operand for the jump to go to the jump table
  uint8_t instrByteSize = instr->bytes[0] == 0x0F ? 2 : 1;
  uint8_t operandSize = instr->size - instrByteSize;

  switch (operandSize)
  {
  case 1: instr->bytes[instrByteSize] = distToJumpTable; break;
  case 2: {uint16_t dist16 = distToJumpTable; memcpy(&instr->bytes[instrByteSize], &dist16, 2); } break;
  case 4: {uint32_t dist32 = distToJumpTable; memcpy(&instr->bytes[instrByteSize], &dist32, 4); } break;
  }
}

//relative call instructions need to be rewritten as jumps to the appropriate
//plaec in the Absolute Instruction Table. Since we want to preserve the length
//of the call instruction, we first replace all the instruction's bytes with 1 byte
//NOPs, before writing a 2 byte jump to the start
void RewriteStolenCallInstruction(cs_insn* instr, uint8_t* instrPtr, uint8_t* absTableEntry)
{
  uint32_t numNOPs = instr->size - 2;
  uint8_t distToJumpTable = uint8_t(absTableEntry - (instrPtr + instr->size - numNOPs));

  //calls need to be rewritten as relative jumps to the abs table
  //but we want to preserve the length of the instruction, so pad with NOPs
  uint8_t jmpBytes[2] = { 0xEB, distToJumpTable };
  memset(instr->bytes, 0x90, instr->size);
  memcpy(instr->bytes, jmpBytes, sizeof(jmpBytes));
}

uint32_t AddJmpToAbsTable(cs_insn& jmp, uint8_t* absTableMem)
{
  char* targetAddrStr = jmp.op_str; //where the instruction intended to go
  uint64_t targetAddr = _strtoui64(targetAddrStr, NULL, 0);
  return WriteAbsoluteJump64(absTableMem, (void*)targetAddr);
}

uint32_t AddCallToAbsTable(cs_insn& call, uint8_t* absTableMem, uint8_t* jumpBackToHookedFunc)
{
  char* targetAddrStr = call.op_str; //where the instruction intended to go
  uint64_t targetAddr = _strtoui64(targetAddrStr, NULL, 0);

  uint8_t* dstMem = absTableMem;

  uint8_t callAsmBytes[] =
  {
    0x49, 0xBA, 0xAA, 0xAA, 0xAA, 0xAA, 0xAA, 0xAA, 0xAA, 0xAA, //movabs 64 bit value into r10
    0x41, 0xFF, 0xD2, //call r10
  };
  memcpy(&callAsmBytes[2], &targetAddr, sizeof(void*));
  memcpy(dstMem, &callAsmBytes, sizeof(callAsmBytes));
  dstMem += sizeof(callAsmBytes);

  //after the call, we need to add a second 2 byte jump, which will jump back to the
    //final jump of the stolen bytes
  uint8_t jmpBytes[2] = { 0xEB, uint8_t(jumpBackToHookedFunc - (dstMem + sizeof(jmpBytes))) };
  memcpy(dstMem, jmpBytes, sizeof(jmpBytes));

  return sizeof(callAsmBytes) + sizeof(jmpBytes); //15
}


/*build a "jump - sandwich" style trampoline. This style of trampoline has three sections:

    |----------------------------|
    |Stolen Instructions         |
    |----------------------------|
    |Jummp back to target func   |
    |----------------------------|
    |Absolute Instruction Table  |
    |----------------------------|

Relative instructions in the stolen instructions section need to be rewritten as absolute
instructions which jump/call to the intended target address of those instructions (since they've
been relocated). Absolute versions of these instructions are added to the absolute instruction
table. The relative instruction in the stolen instructions section get rewritten to relative
jumps to the corresponding instructions in the absolute instruction table.
*/

uint32_t BuildTrampoline(void* func2hook, void* dstMemForTrampoline)
{
  X64Instructions stolenInstrs = StealBytes(func2hook);

  uint8_t* stolenByteMem = (uint8_t*)dstMemForTrampoline;
  uint8_t* jumpBackMem = stolenByteMem + stolenInstrs.numBytes;
  uint8_t* absTableMem = jumpBackMem + 13; //13 is the size of a 64 bit mov/jmp instruction pair

  for (uint32_t i = 0; i < stolenInstrs.numInstructions; ++i)
  {
    cs_insn& inst = stolenInstrs.instructions[i];
    if (inst.id >= X86_INS_LOOP && inst.id <= X86_INS_LOOPNE)
    {
      return 0; //bail out on loop instructions, I don't have a good way of handling them
    }

    if (IsRelativeJump(inst))
    {
      uint32_t aitSize = AddJmpToAbsTable(inst, absTableMem);
      RewriteStolenJumpInstruction(&inst, stolenByteMem, absTableMem);
      absTableMem += aitSize;
    }
    else if (IsRelativeCall(inst))
    {
      uint32_t aitSize = AddCallToAbsTable(inst, absTableMem, jumpBackMem);
      RewriteStolenCallInstruction(&inst, stolenByteMem, absTableMem);
      absTableMem += aitSize;
    }
    else if (IsRIPRelativeInstr(inst))
    {
      RelocateInstruction(&inst, stolenByteMem);
    }

    memcpy(stolenByteMem, inst.bytes, inst.size);
    stolenByteMem += inst.size;
  }

  WriteAbsoluteJump64(jumpBackMem, (uint8_t*)func2hook + 5);
  free(stolenInstrs.instructions);

  return uint32_t((uint8_t*)absTableMem - (uint8_t*)dstMemForTrampoline);
}


void PushAddress(uint64_t addr) //push the address of the jump target
{
  hookJumpAddresses.push(addr);
}

//we absolutely don't wnat this inlined
__declspec(noinline) void PopAddress(uint64_t trampolinePtr)
{
  uint64_t addr = hookJumpAddresses.top();
  hookJumpAddresses.pop();
  memcpy((void*)trampolinePtr, &addr, sizeof(uint64_t));
}


void InstallHook(void* func2hook, void* payloadFunc)
{
  SetOtherThreadsSuspended(true);

  DWORD oldProtect;
  VirtualProtect(func2hook, 1024, PAGE_EXECUTE_READWRITE, &oldProtect);

  //102 is the size of the "pre-payload" instructions that are written below
  //the trampoline will be located after these instructions in memory
  void* hookMemory = AllocatePageNearAddress(func2hook);

  uint32_t trampolineSize = BuildTrampoline(func2hook, (void*)((char*)hookMemory + 102));

  uint8_t* memoryIter = (uint8_t*)hookMemory;
  uint64_t trampolineAddress = (uint64_t)(memoryIter)+102;

  memoryIter += WriteSaveArgumentRegisters(memoryIter);
  memoryIter += WriteMovToRCX(memoryIter, trampolineAddress);
  memoryIter += WriteSubRSP32(memoryIter); //allocate home space for function call
  memoryIter += WriteAbsoluteCall64(memoryIter, &PushAddress);
  memoryIter += WriteAddRSP32(memoryIter);
  memoryIter += WriteRestoreArgumentRegisters(memoryIter);
  memoryIter += WriteAbsoluteJump64(memoryIter, payloadFunc);

  //create the relay function
  void* relayFuncMemory = memoryIter + trampolineSize;
  WriteAbsoluteJump64(relayFuncMemory, hookMemory); //write relay func instructions

  //install the hook
  uint8_t jmpInstruction[5] = { 0xE9, 0x0, 0x0, 0x0, 0x0 };
  const int32_t relAddr = int32_t((int64_t)relayFuncMemory - ((int64_t)func2hook + sizeof(jmpInstruction)));
  memcpy(jmpInstruction + 1, &relAddr, 4);
  memcpy(func2hook, jmpInstruction, sizeof(jmpInstruction));

  SetOtherThreadsSuspended(false);
}
Wrap Up
This was a fun project to work on, and I feel like all of these hooking/hacking related projects have taught me an awful lot about stuff that I took for granted before. Hopefully it was as much fun to read about as it was to figure out. Who knows, maybe one day you’ll need to add an obnoxious triangle to a third party binary and some of this will come in handy.
I’ve got nothing else interesting to say so I guess that means it’s time to plug my Twitter hadle (@khalladay) and share a couple links I found helpful while figuring out to make this project work. Enjoy!
- https://guidedhacking.com/threads/what-is-dll-hijacking-fast-explanation.13607/
- https://itm4n.github.io/windows-dll-hijacking-clarified/
- https://www.fireeye.com/blog/threat-research/2019/06/hunting-com-objects.html
- https://docs.microsoft.com/en-us/windows/win32/com/component-object-model–com–portal