Screen Space Distortion and a Sci-fi Shield Effect
Sometimes inspiration comes from the weirdest places. I was idly browsing reddit after work awhile ago and stumbled onto this post by user Guillaume_Langis. It was a gif of a shield effect that they had created for their game Warfleet. The comments section on that site was filled (predictably) with users asking how they effect was done, and Guillame ended up actually posting the c# and shader source online for people to play with, which is awesome (thanks!)
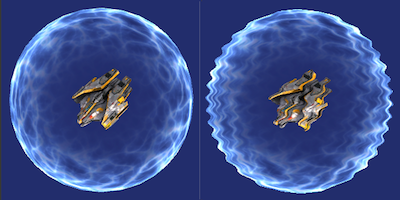
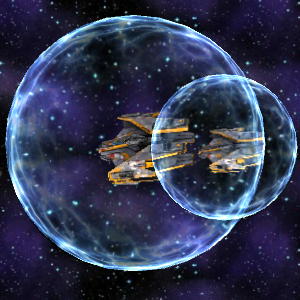
The effect already looks great, but when I think of a sci-fi shield I think of distortion, and wobbling “force field” style effects, which is what I’m going to add to the shield effect, talk about in this article and use to turn the shield effect into this:
Some Initial Housekeeping
The space ship in these screen shots is available free on the asset store, and the texture I threw on the shield was just one I got by googling for “plasma texture.” I also took the liberty of optimizing the original effect which was posted to reddit. You can find the original code here.
All the scripts and shaders used in this post will be available at the end of the article, but to start with, I’ve uploaded a unity project with a scene set up with this effect ready to go so that it’s easy to follow along here. This article is about how to build a distortion effect, not about how to create to shield effect so it won’t be explained, but it will be a lot easier to follow this post if you have a project set up with it. I haven’t included the space ship or space textures from the screenshots because I didn’t make those, but you should be able to get them yourself pretty easily. As we go through this post, my screenshots will alternate between what the sample scene should look like and what it looks like with real assets.
Ok, now that that’s out of the way, time to get cracking.
The Basics of Screen Space Distortion
Let’s start by talking about what exactly a Screen Space Distortion effect is. You’ve definitely seen the effect before, it’s used to render everything from refraction to heat haze to trippy drug sequences in games, and it’s actually really simple.
At it’s core, all the effect requires is that you render your main camera (the one which will show the distortion) to a texture instead of rendering it directly to the framebuffer, then blit it (draw it) to the frame buffer from that texture using a shader which offsets the uvs used to sample your main camera texture.
A really simple example might look something like this:
Of course, there isn’t a one size fits all way to modify the UV coordinates, which is where the fun starts. But before we get there, lets walk through the code required to make the trivial example above actually functional.
First, we need to get our main camera rendering to a secondary texture. Usually when you want a camera to render to a texture in Unity you use the targetTexture attribute of the camera component, but not today. Unity is a bit quirky here, but I’ve found in practice that you can’t blit a texture to the frame buffer if that texture is currently a camera’s target texture. Since we’re going to be blitting this texture to the framebuffer as we apply our post effect, we need to use a different bit of api:
public class ScreenSpaceDistortionEffect : MonoBehaviour
{
    RenderTexture screenRT;
    Camera mainCam;

    void Awake()
    {
    	screenRT = new RenderTexture(Screen.width, Screen.height, 16, RenderTextureFormat.Default);
    	mainCam = GetComponent<Camera>();
    	mainCam.SetTargetBuffers(screenRT.colorBuffer, screenRT.depthBuffer);
    }

    void OnPostRender()
    {
    	Graphics.Blit(screenRT, (RenderTexture)null);
    }
}
The SetTargetBuffers call is how we are going to work around the targetTexture weirdness, if you attach this component to your main camera object, you should see that nothing is different in your game view than before we wrote this script, but behind the scenes, we have ourselves a nice easy to work with RenderTexture for our game. Which is perfect!
Now all we need to do is distort that texture. If you look at the docs for Graphics.Blit, you’ll find that you can specify a material. If you think of Graphics.Blit like a full screen quad, then the material you specify here is just the material on that Quad. Blit automatically sets the _MainTex property of this material to your source render texture. Since all we need to do is modify the texture coordinates that we map to the screen, we can get by with a pretty simple material. The example above uses the following:
vOUT vert(vIN v)
{
    vOUT o;
    o.pos = mul(UNITY_MATRIX_MVP, v.vertex);
    o.uv = v.texcoord;
    return o;
}

fixed4 frag(vOUT i) : COLOR
{
    return tex2D(_MainTex, fixed2( i.uv.x + sin(i.uv.y * 100)*0.01, i.uv.y) );
}
I’m going to call this shader our “composite” shader, since it’s what we’re going to use to combine data about how to render the distortion effect with our regular camera view.
Now you just need to modify the earlier c# code to use this new shader, and you should see exactly the same type of effect across your screen.
RenderTexture screenRT;
Camera mainCam;
Material effectMaterial;
void Awake()
{
    screenRT = new RenderTexture(Screen.width, Screen.height, 16, RenderTextureFormat.Default);
    mainCam = GetComponent<Camera>();
    mainCam.SetTargetBuffers(screenRT.colorBuffer, screenRT.depthBuffer);

    effectMaterial = new Material(Shader.Find("Custom/Composite"));
}

void OnPostRender()
{
    Graphics.Blit(screenRT, (RenderTexture)null, effectMaterial);
}
Voila! We now officially have our post effect working!
An Actually Useful Implementation
Now that we have the basics down, it’s time for us to decide how we should go about modifying our screen uvs. Unless you’re going for some sort of drug trip / dream sequence effect, performing arithmetic on the uvs alone is likely not going to cut it. Today we’re going to create a secondary screen buffer (the “shield” buffer), and draw our shield(s) into it using a replacement shader. We’ll then use the contents of that buffer to deform our screen uvs.
But before we get to the replacement shader, let’s just render our shield as is into the secondary buffer (to make sure the buffer is working at all).
We’re going to be modifying our C# script again. We need to create the second render texture for the shield, but we don’t need this one to be at full screen res, since we aren’t going to be actually using it for colours in the framebuffer, and it’s much lighter on your gpu to only draw into the smaller buffer. Then we need to set up our camera, and get it rendering into this buffer. Here’s what that looks like:
RenderTexture shieldRT;
RenderTexture screenRT;
Camera distortCam;
Camera mainCam;
Material effectMaterial;

void Awake()
{
    screenRT = new RenderTexture(Screen.width, Screen.height, 0, RenderTextureFormat.Default);
    screenRT.wrapMode = TextureWrapMode.Repeat;

    shieldRT = new RenderTexture(Screen.width/4,Screen.height/4,0, RenderTextureFormat.Default);
    shieldRT.wrapMode = TextureWrapMode.Repeat;

    effectMaterial = new Material(Shader.Find("Custom/Composite"));

    mainCam = GetComponent<Camera>();
    mainCam.SetTargetBuffers(screenRT.colorBuffer, screenRT.depthBuffer);

    distortCam = new GameObject("DistortionCam").AddComponent<Camera>();
    distortCam.enabled = false;
}

void OnPostRender()
{
    distortCam.CopyFrom(mainCam);
    distortCam.backgroundColor = Color.grey;
    distortCam.cullingMask = 1 << LayerMask.NameToLayer("Shield");
    distortCam.targetTexture = shieldRT;
    distortCam.Render ();

    effectMaterial.SetTexture("_DistortionTex", shieldRT);
    Graphics.Blit(screenRT, null, effectMaterial);
}
If you run this now (and make the shieldRT public), you’ll be able to see that we are successfully drawing into our shield buffer, but our effect shader isn’t doing anything useful with that data yet, so let’s look at that next. For this initial step, let’s modify the composite shader to simply subtract the G and B values of the distortion texture from the screen uvs:
sampler2D _DistortionTex;
fixed4 frag(vOUT i) : COLOR
{
    fixed4 distort = tex2D(_DistortionTex, i.uv);
    fixed4 tex = tex2D(_MainTex, fixed2(i.uv.xy - (distort.gb - 0.5)));
    return tex;
}
If you hit run now, this is what the sample scene should look like:
Not exactly what we’re after - but at least it’s interesting!
Now that we’ve proven that the secondary buffer is working, it’s time to think about how we want our shield to look. When I think of a force field, I think of it as energy repelling things away from whatever is inside the shield. So I think I’d like my shield to communicate that visually. Let’s shift the UVs on the edge of the shield away from the center of the circle.
To do this, we’re going to use a replacement shader, which is going to swap the shader on our shield bubbles when they’re rendered by our distortion camera. This will let us write the data we need to our secondary buffer without changing how the bubble looks in game.
Let’s use the following as a starting point:
CGPROGRAM
#pragma vertex vert
#pragma fragment frag
#include "ShieldEffect.cginc"

struct vIN
{
    float4 vertex : POSITION;
    float2 texcoord : TEXCOORD0;
    float3 normal : NORMAL;
};

struct vOUT
{
    float4 pos : SV_POSITION;
    float3 oPos : TEXCOORD0;
    float3 wPos : TEXCOORD1;
    float3 wNorm : TEXCOORD2;
    float3 objPos : TEXCOORD3;
};

sampler2D _MainTex;

vOUT vert(vIN v)
{
    vOUT o;
    o.pos = mul(UNITY_MATRIX_MVP, v.vertex);
    float3 zeroPos = mul(UNITY_MATRIX_MVP, float4(0.0,0.0,0.0,1.0));
    o.wPos = mul(_Object2World, v.vertex);
    o.wNorm = normalize(mul(fixed4(v.normal, 0.0), _World2Object).xyz);
    o.objPos = v.vertex.xyz;
    o.oPos = normalize(o.pos.xyz - zeroPos.xyz);

    return o;
}

fixed4 frag(vOUT i) : COLOR
{
    fixed4 tex = fixed4(i.oPos.x,0.0,i.oPos.y, 1.0);
    float intensity = CalcShieldIntensity16(i.objPos);

    float3 viewdir = normalize(_WorldSpaceCameraPos - i.wPos);
    float ang = 1.0- dot(viewdir, i.wNorm) + intensity;

    return (tex *  ang) + 0.5;
}
ENDCG
Before we go about plumbing this in to our game, let’s talk about what’s going on here. First, since we want our effect to look the same no matter what angle we’re viewing from, it simplifies a lot of things if we work in screenspace for generating the actual colours that we’re writing to the buffer. What we want is for the colours we write to be representative of their direction from the center of the shield, so to do that, we transform the origin point of the object (the zeroPos variable) into screen space as well, and then subtract that point from our vertex’s position in screen space. This gives us a nice direction vector to work with.
In the fragment shader, we turn this direction vector into a colour, and we use a rim light calculation to attenuate the colours towards the center of the shield (since the normals for the center of the screen space sphere will always point towards the camera). Then we add 0.5 to everything, so that we can use this buffer to distort things in both directions in U,V space (since you can’t write a negative colour into a buffer). This means that any pixel in the buffer which is written out as 128,128,128 will do nothing, but values above and below are valid.
Finally, we add the intensity calculation to our fragment so that our impacts can distort more along their edges. This obviously won’t be 100% accurate because the direction of the distortion isn’t really being taken into account, but it creates a good looking effect anyway. You could spend more time making sure that the impact bubbles distort in a consistent way out from their center, but for brevity’s sake I’m not going to in this post.
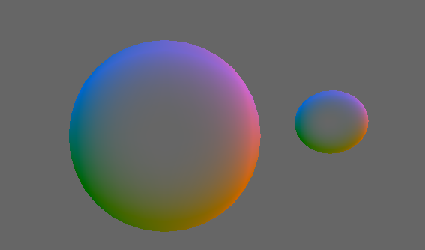
This is going to give us a shield buffer that looks something like this (assuming 2 shields on screen):
Now all we need to do is get the replacement shader working. Just get the shader into your script the same way we loaded in the Composite shader, and make this really simple 1 line change to the Render call in OnPostRender:
distortCam.RenderWithShader(shieldReplacementShader, null);And with that, we should have the following!
Note that you may find that the effect is too intense even with the replacement shader (this is extremely noticeable if you’re working with the scene I gave you at the beginning of the article). In that case you may want to tone down the intensity of the effect by adding a multiplication into the compostie shader:
fixed4 tex = tex2D(_MainTex, fixed2(i.uv.xy + (distort.gb - 0.5) * 0.1 ));if you’re following along at home, the your sample scene should look like this if you grab your shield and move it around:
You may also notice that the edges of your shield bubble are now a little bit jagged. This is because we’re rendering to a smaller buffer for the shield effect. This can be alleviated by increasing the size of the shield renderTexture (which is EXTREMELY expensive), or doing some sort of blur operation on your shield buffer (probably less expensive). However we’re not going to worry about it today because by the end of the article we’re going to have an approach that hides this jagginess.
This is great and all, but now our shield looks all weird since we’re distorting the UVs that it’s being drawn with too. I’d like to preserve the nice plasma texture on the shield, so I’m going to move the actual rendering of the shield to a different camera, and make sure the camera that we’re distorting the UVs on doesn’t see objects on the shield layer. This is really easy to do, but will leave us with a different problem. We’ll get to that in a second.
First, let’s modify our c# effect script to create this new camera for us:
RenderTexture shieldRT;
RenderTexture screenRT;
Camera distortCam;
Camera mainCam;
Camera shieldCam;

Shader shieldReplacementShader;
Material effectMaterial;

void Awake()
{
    screenRT = new RenderTexture(Screen.width, Screen.height, 0, RenderTextureFormat.Default);
    screenRT.wrapMode = TextureWrapMode.Repeat;

    shieldRT = new RenderTexture(Screen.width/4,Screen.height/4,0, RenderTextureFormat.Default);
    shieldRT.wrapMode = TextureWrapMode.Repeat;

    shieldReplacementShader = Shader.Find("Custom/Replacement");
    effectMaterial = new Material(Shader.Find("Custom/Composite"));

    mainCam = GetComponent<Camera>();
    mainCam.SetTargetBuffers(screenRT.colorBuffer, screenRT.depthBuffer);
    mainCam.cullingMask &= ~(1 << LayerMask.NameToLayer("Shield"));

    distortCam = new GameObject("DistortionCam").AddComponent<Camera>();
    distortCam.enabled = false;

    shieldCam = new GameObject("Shield Cam").AddComponent<Camera>();
}

void Update()
{
    shieldCam.cullingMask = distortCam.cullingMask;
    shieldCam.clearFlags = CameraClearFlags.Depth;
    shieldCam.depth = mainCam.depth + 1;
    shieldCam.transform.position = mainCam.transform.position;
    shieldCam.transform.rotation = mainCam.transform.rotation;
    shieldCam.cullingMask = 1 << LayerMask.NameToLayer("Shield");
    shieldCam.fieldOfView = mainCam.fieldOfView;
    shieldCam.orthographic = mainCam.orthographic;
    shieldCam.orthographicSize = mainCam.orthographicSize;
}

void OnPostRender(){...}
Notice that we also added a line to remove the Shield layer from the main camera’s culling mask. Now that we have a second camera doing this for us, that camera doesn’t need to create draw calls to incorrectly render the shield colour.
With this change, our shield looks a lot better, but like I said, this has exacerbated another problem we have. Earlier we accepted that our distortion effect wasn’t going to have depth information, and therefore would distort things in front of the shield, but now, we also don’t have depth information for the shield colour itself, which means that shields will render on top of everything else. This is much more noticeable, and makes this effect really unwieldy, so we’re going to have to do something about that.
From Full Screen Effect to Projective Texturing
Buckle up, things are about to get fun.
All the problems that we have right now are due to us treating the shields like they aren’t geometry: we’re rendering them to a buffer to distort the whole screen, and then using a secondary camera which has no depth information to paste them over the rest of the game. Wouldn’t it be great if we could use our depth buffer to occlude both the distortion and colours of the shield?
In the past, I’ve seen this done by manually calculating a depth pass, but this is expensive and requires you to double the draw calls of everything you want included in the depth buffer that you’re going to use to occlude your warp effect; so instead of doing that, here’s what we’re going to do today:
- Render the main camera (without warp) to a render texture
- Render the multi colored shield buffer as usual
- Copy the main camera render texture to the buffer that the shield camera will draw into
- Share a depth buffer between our main camera and our shield camera so that our shields are occluded properly without incurring extra draw calls
- Continue to render our shields after everything else, but pass the main camera render texture to our shield shaders, and let them deal with the warp effect themselves so that when the shield is occluded, the warp effect is occluded too
- Blit the shield camera render texture to the screen
It’s a lot of changes, but at the end of the day we’re going to end up with a really really easy to use shield bubble effect that behaves exactly like we expect it should without incurring extra draw calls or doing a lot of extra full screen operations. So without further ado, let’s take it from the top!
Rendering the main camera to a render texture
The first part of this list should be pretty easy after all the work with render textures we did above. In fact we’re already rendering the main camera to a render texture (the screenRT) so we’re actually in good shape.
First of all, we need to stop our main camera from blitting to the screen, and we need to set our offscreen buffer to a global shader uniform so we can access it later. We’re going to change the our OnPostRender function in our c# script from this:
void OnPostRender()
{
    ...
    effectMaterial.SetTexture("_DistortionTex", shieldRT);
    Graphics.Blit(screenRT, null, effectMaterial);
}
To this:
void OnPostRender()
{
    ...
    Shader.SetGlobalTexture("_DistortionBuffer", shieldRT);
    Shader.SetGlobalTexture("_ScreenBuffer", screenRT);

    Graphics.Blit(screenRT, finalRT);
}
One important thing to note here is that if you want objects which have warp be be seen through each other, you’re going to have to render them to this buffer. For our shields, the easiest way to do this is to create a duplicate shield sphere, assign it the optimized (non warp) shader, child it to the original shield sphere and make sure it isn’t on the Shield layer. This isn’t going to work in all cases, but it will for our purposes today.
Notice that we’re no longer going to be setting properties of the composite material. This is because with our new approach, the composite material’s logic is going to be handled by the shield shader, so we don’t actually need the composite any more.
You may also have noticed that the code above references a new RenderTexture. About that:
Two New RenderTextures
Step three and four of our new technique hint at some new render textures that we’re going to need. The first of which is our finalRT. This is the render texture that the camera rendering our warp objects will write into. We’ve already got the code to copy our main camera’s output into that texture like we said we’d do, but we also need to set up this render texture. We also need to set up a render texture specifically for storing the depth buffer from the main camera so that we can pass that to our shield camera as well.
Our new Awake function should look like the following:
RenderTexture shieldRT;
RenderTexture screenRT;
RenderTexture finalRT;
RenderTexture depthRT;
Camera distortCam;
Camera mainCam;
Camera shieldCam;

Shader shieldReplacementShader;
Material effectMaterial;

void Awake()
{
    screenRT = new RenderTexture(Screen.width, Screen.height, 0, RenderTextureFormat.Default);
    screenRT.wrapMode = TextureWrapMode.Repeat;

    finalRT = new RenderTexture(Screen.width, Screen.height, 0, RenderTextureFormat.Default);
    finalRT.wrapMode = TextureWrapMode.Repeat;

    depthRT = new RenderTexture(Screen.width, Screen.height, 16, RenderTextureFormat.Depth);
    depthRT.wrapMode = TextureWrapMode.Repeat;

    shieldRT = new RenderTexture(Screen.width/4,Screen.height/4,16, RenderTextureFormat.Default);
    shieldRT.wrapMode = TextureWrapMode.Repeat;

    shieldReplacementShader = Shader.Find("Custom/Replacement");

    mainCam = GetComponent<Camera>();
    mainCam.SetTargetBuffers(screenRT.colorBuffer, depthRT.depthBuffer);
    mainCam.cullingMask &= ~(1 << LayerMask.NameToLayer("Shield"));

    distortCam = new GameObject("DistortionCam").AddComponent<Camera>();
    distortCam.enabled = false;

    shieldCam = new GameObject("Shield Cam").AddComponent<Camera>();
    shieldCam.SetTargetBuffers(finalRT.colorBuffer, depthRT.depthBuffer);
}
...
Excellent! Now we have to make sure that our shieldCam is set to not clear anything before it renders, since we now are very deliberately populating it’s buffers with data from our main camera:
void Update()
{
...
    shieldCam.clearFlags = CameraClearFlags.Nothing;
...
}
And finally, you may notice that we’re not actually drawing anything to the screen anymore. We need to tell our shieldCam that it’s cool to render everything to the frame buffer when it’s done. I like to keep as much of the logic for an effect within the same script as I can, so I did this by adding a new function to our effect script, and putting a component on the shield camera to call this inside an OnPostRenderCall. You can find a scene with everything set up like this in the code dump at the end of the article.
public void BlitToScreen()
{
    Graphics.Blit(finalRT, (RenderTexture)null);
    screenRT.DiscardContents();
    finalRT.DiscardContents();
    shieldRT.DiscardContents();
}
Notice that we also clear the contents of our render textures in this function.
Warping Inside our Fragment Shaders
There’s one last thing we need to do to finish this effect, and that’s to move the logic that used to live in our composite shader to the shader we use to draw our shields. There’s a completed shader at the end of this article but all we’re doing is adding uniforms to the shader so we can see the screenRT and shieldRT (the warp buffer), and then filling in areas of our object that would be transparent if we were alpha blending with a distorted lookup into screenRT. The addition to the fragment shader looks like this:
fixed4 frag(v2f i) : SV_Target
{
    float3 viewdir = normalize(_WorldSpaceCameraPos - i.worldPos);
    float ang = 1 - (abs(dot(viewdir, normalize(i.normal))));
    half4 rimCol = _RimColor * pow(ang, _RimPower) * _RimIntensity;

    half4 texColor = tex2D(_MainTex, i.texcoord);
    fixed4 tex =  rimCol * texColor;

    float4 screen = ComputeScreenPos(i.objectPos);
    fixed4 distortion = tex2Dproj(_DistortionBuffer, UNITY_PROJ_COORD(screen));

    float4 screenPos = screen;
    screenPos.xy =  screenPos.xy - (distortion.rb - 0.5) * 1.5;

    float4 d = tex2Dproj(_ScreenBuffer, UNITY_PROJ_COORD(screenPos));
    return  tex + d + texColor * CalcShieldIntensity16(i.oPos);
}
The ComputeScreenPos and UNITY_PROJ_COORD macros do most of the hard work for us here, but you can see where we’ve basically lifted the logic completely from the composite shader and added it here. This is going to make our 100% opaque objects look like they’re alpha blending with a warp effect. It also lets our war effect be occluded by geometry, by other warp effects, and if you took my advice and wrote out a non warp version of shield to the main camera, you can see one shield through another. All of this put together might look something like this:
When you look at the final shader I have posted in the google drive, you’ll also notice that I’ve added a second pass to it so that we can properly show the shield impacts on the side of the shield behind the ship we’re looking at. I skipped over the distortion effect in that pass to make it a bit more performant, but I wanted to keep the shield impacts so that the player could see all the direction that they were being shot at from. Again, this is open to interpretation, as it does make the shader much more expensive.
And At last, that’s everything!
How Expensive Is This
So the inevitable question that’s always (rightly) asked about cool graphics code is “how expensive is it?” So before we wrap up for today, let’s do a quick performance analysis of our new shield versus the original shield posted and figure out exactly what using either of them means for our performance. Since virutally all my Unity experience is on mobile, let’s look at this like our intended target is a mobile device.
On the draw call front, the original shader from Warfleet comes in the lowest, with a single draw call. This is followed by my optimized version of the shader, which I added a draw call to so that we could render the inside/back face of the sphere’s impacts as well. Our post effect version comes in last, with a draw call to render the shield to our buffer, and 1 draw call per side of the shield that we’re rendering.
It’s worth noting that if all you’re looking for is a more performant version of the original effect, you could remove the back face pass in the optimized version and be there.
Finally, I’ve set up a small test scene to see what the on device cost of the effect is. The scene is simple enough, whenever I tap the screen I spawn another instance of the shield and offset it a bit from the first one. I’ve turned on the on board profiler on an iPhone 6 to grab the performance data over time. It’s not a perfect test, but the test scene is consistent across every shader so at least the numbers will be useful. Here are the results:
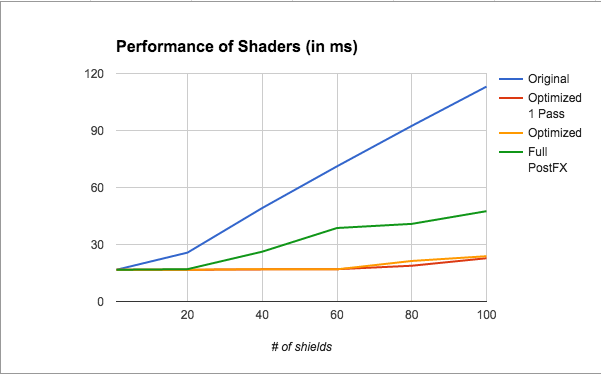
Remember that these results are on a metal capable device (which means the cost of a draw call is lower than you’d see on OpenGL), these numbers are only useful relative to each other, and not as an absolute measure of the cost of these shaders on any device except the iPhone 6.
Conclusion
That should do it, as said above, the source for everything here can be found on google drive here. Hopefully this has been helpful enough that you don’t feel limited to just making sci fi shields, but feel like you can go forth and create refraction shaders, heat haze, whatever!
If you have any questions about anything, spot a mistake, or just want to say hi, send me a message on twitter.
Happy shading!