Minimizing Mip Map Artifacts In Atlassed Textures
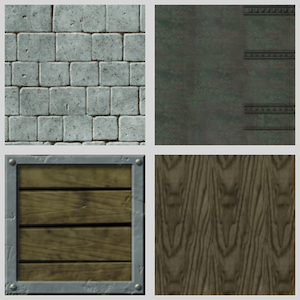
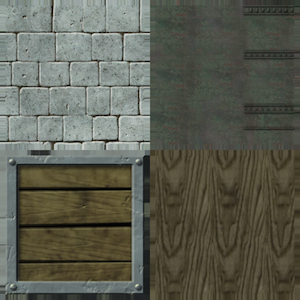
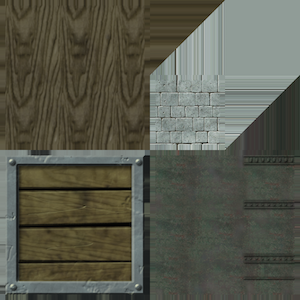
Since all my professional work is on mobile games, I spend a LOT of time working on tools and systems that can squeeze as much performance out of low powered hardware as possible. Perhaps unsurprisingly, one of these tools is texture atlassing, that is, packing multiple textures into a larger image, which ends up looking something like this:
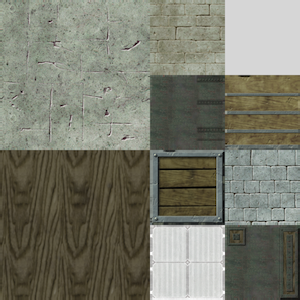
That Texture Atlassing is a good idea isn’t really news. I’m not here to sell you on the benefits of doing it (although if I was, I’d mention things like fewer texture state changes, improved batching, lower memory usage, and the ability to use NPOT textures on ES2 hardware), what I am here to do is to walk through how to build a good one.
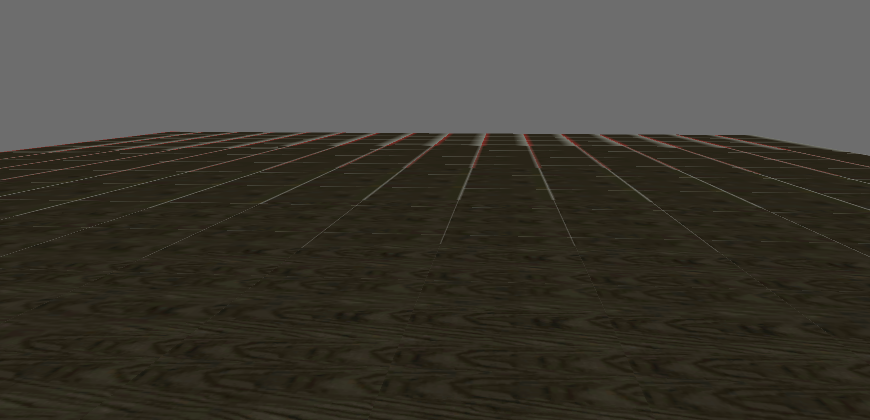
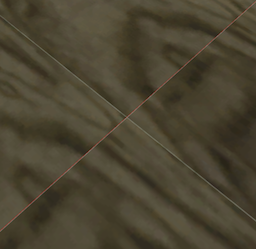
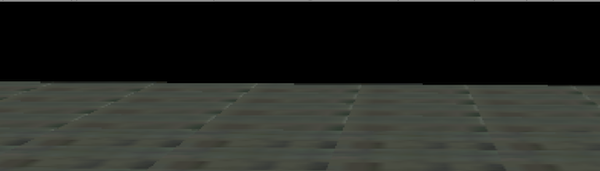
There are a lot of tutotials and texture atlassing options out there already, but they all seem targetted at people making 2D games or using them for UI. While these are perfectly good use cases, they often ignore one of the harder problems when you’re working with Texture Atlasses: mip mapping. If you’ve ever atlassed a 3D scene (which is a very VERY good idea on mobile), you’ve probably noticed some ugly texture seams when your camera pulls back:
 (I didn't use the atlas in the first picture to make this one)
This is what it looks like when your texture atlasser isn’t build to handle mip mapping. Notice how in the distance, there starts to be weird colours (from an adjacent sprite in my atlas) polluting the appearance of our texture. Again, not applicable to UI or 2D things, but very applicable to what I do (3D), so today I thought I’d go over how write a texture atlasser that does solve these problems.
Brief Aside: What is Mip Mapping
Mip Mapping is a rendering technique which creates lower resolution versions of a texture, and swaps to these lower resolution textures based on how far away an object is from the camera. This is done both to increase rendering speed, and to improve rendering quality. Without mip mapping, as textures get farther away, then tend to start “shimmering”, which looks really unnatural, with mip mapping the renderer switches to a lower resolution (and essentially pre antialiased) version of the texture, which eliminates this shimmer:
If you’re using Unity, you’ve almost certainly been using mip maps the whole time without knowing it (although you may have wondered why the size of your images in memory was larger than you thought), and in most cases you never have to think about mip mapping at all. With texture atlassing, you do, and this is because mip maps are usually generated by taking the original image, and shrinking it by halving both dimensions of the texture. This is done multiple times, so a 512x512 texture will have mips with a width and height of 256,128,64,32,etc. This shrinking is done most often using a simple Bilinear Filter, which essentially averages a bunch of pixels in the high resolution image to determine what colour a pixel is in a lower resolution version
In most cases, this is great, but in a texture atlas, this can lead to the edges of individual textures getting mixed with neighboring textures when the mips are generated. In extreme cases (like pictured above), the edges of a really bright texture can pick up dark colours and look very different from what’s intended. There are lots of ways to mitigate this in a texture atlasser, but I’ve yet to find a texture atlasser out there that does any of them by default, so today we’re going to build one that does.
How A Texture Atlasser Works
At a high level, a texture atlasser consists of two parts, which I’ve assigned super unofficial names:
- A Texture Packer, which determines where to put each texture in the atlas
- A Blitter, which uses the UV rectangles generated by the bin packer to draw textures into the output atlas texture.
The Texture Packer is a pretty universal component. We’re going to walk through building one for completeness sake, but the real meat here is what we do in the Blitter to help our mip maps.
How to Build a Texture Packer
Since it’s the first step in the process, let’s tackle the packer first. I’m going to write all the code in Unity because then I can piggy back on all their systems and keep the amount of code in this article manageable, but the core concepts are applicable anywhere. It’s worth noting that there isn’t really anything special about this texture packing implementation, we’ll get to the real meat of what I want to talk about in the Blitter section.
The Output Struct
Speaking of core concepts, let’s talk about what our Texture Packer is going to output.
public struct AtlasLayout
{
    int width;
    int height;
    public List<Texture2D> textures;
    public List<Rect> rects;

    public AtlasLayout(int w, int h)
    {
    	width = w;
    	height = h;
    	textures = new List<Texture2D>();
    	rects = new List<Rect>();
    }
};
The reason we need to output all this data is to handle cases where we want to return list of AtlasLayouts instead of a single one, which we might want to do if we have a lot of textures to atlas, but our hardware limits us to a max of 2048x2048 textures (like some mobile phones). In the interest of brevity, I’m not going to handle multiple atlasses in this article, but I still feel like having a defined output struct makes things cleaner.
So now we have our output set up, let’s start fitting rectangles into other rectangles, shall we? There are lots of algorithms for doing this (many are described in detail here, but the one I like best is the MaxRect algorithm.
The PackTextures Function
The algorithm works by defining a list of “Free Rectangles”, that is, a list of empty rectangles in the target atlas texture. Before the first texture is packed, our list of Free rectangles will contain a single element which has position (0,0), and be the size of the atlas. I’m going to start putting this initial setup into our PackTexture function, which will be the publically exposed function we call when we want to kick off the TexturePacker.
public static AtlasLayout PackTextures(Texture2D[] textures, int maxWidth, int maxHeight)
{
    AtlasLayout results = new AtlasLayout(maxWidth, maxHeight);

    List<Rect> freeRects = new List<Rect>();
    List<Texture2D> textureToPlace = new List<Texture2D>(textures);
    texturesToPlace = texturesToPlace.OrderBy( x => x.width * x.height).ToList();

    freeRects.Add(new Rect(0,0,maxWidth, maxHeight));
    ...
You’ll notice that I’m also sorting our input textures. This is to make sure that we try to place the larger textures first, since they’re the hardest ones to find space for in an atlas. Linq is awful for runtime performance, but for a build-time tool like our atlasser, it makes our lives a lot easier (and my blog post a lot shorter).
Now we need to start placing atlasses into the area defined by our free list. To figure out where to place a texture, we’re going to call our FindIdealRect function. This function is going to return two score values to us, along with the candidate rectangle that it finds.
We’re going to call FindIdealRect on every texture that we have to place, and only actually Insert the rectangle which has the best score. Then we’ll remove that texture from the list and do the whole process again.
This looks like this:
...
while (texturesToPlace.Count > 0)
{
	int bestShortSideScore = int.MaxValue;
	int bestLongSideScore = int.MaxValue;
	Texture2D bestTex = texturesToPlace[0];
	Rect bestRect = new Rect();

	foreach(Texture2D curTex in texturesToPlace)
	{
    	int shortSideScore = int.MaxValue;
    	int longSideScore = int.MaxValue;

    	Rect target = FindIdealRect(curTex.width,
    				curTex.height,
    				freeRects,
    				ref shortSideScore,
    				ref longSideScore);

    	if (shortSideScore < bestShortSideScore
    		|| (shortSideScore == bestShortSideScore && longSideScore < bestLongSideScore))
    	{
    		bestShortSideScore = shortSideScore;
    		bestLongSideScore = longSideScore;
    		bestTex = curTex;
    		bestRect = target;
    	}
	}

	if (bestRect.width > 0 && bestRect.height > 0)
	{
		RemoveRectFromFreeList(bestRect, freeRects);
		results.textures.Add(bestTex);
		results.rects.Add(bestRect);
		texturesToPlace.Remove(bestTex);

	}
	else break; //no room left
}
return results;
}
Notice that the scores I was talking about above are named shortSideScore and longSideScore in this code example. The results object we add textures/rectangles to is the AtlasLayout struct we’re going to return. Then we exit the function by returning that struct. In the example above, if we run out of space in the atlas, the packer simply exits early.
In a production system, you’ll want to do something more intelligent than this, but what you do is dependent on your project. For example, I worked on a game with very strict memory budgets for our environment artists. The atlas for an environment couldn’t exceed 1024x1024, so if we went over, the atlasser would expand the target atlas to a size big enough for the textures to fit, but return an error. This allowed the artists to visualize what was exceeding the atlas bounds, but still prevented overly large atlasses from entering production.
Next, it’s time to add some actual texture packing logic to it. To do that we need to flesh out two functions that you may have noticed above:
private static Rect FindIdealRect(int width, int height, List<Rect> freeRects,
    ref int bestShortSideFit, ref int bestLongSideFit);

private static void RemoveRectFromFreeList(Rect rectToRemove, List<Rect> freeRects);
The Placement Function
The Placement Function is where we’re going to actually find a rectangle in the atlas to assign to a texture. There are lots of ways to pick a rectangle out of the free list, but the heuristic I’m going to use is the “Short Side Fit” heuristic. This means that we are going to try to find a free rectangle which has the least amount of remaining space along 1 dimension. This sounds much more abstract than it looks like in code, don’t worry.
So that we have a bit of context, let’s start this section by taking a look at what this function look like without the finding/scoring logic.
private static Rect FindIdealRect(int width,
				 int height,
				 List<Rect> freeRects,
				 ref int bestShortSideFit,
				 ref int bestLongSideFit)
{
	Rect bestNode = new Rect();

	for (int i = 0; i < freeRects.Count; ++i)
	{
		if (freeRects[i].width >= width && freeRects[i].height >= height)
		{
			// score the rect here

			// if score is the best, replace bestNode with this rect,
			// and set bestShortSideFit and bestLongSideFit to new
			// values
		}
	}

	return bestNode;
}
As you can see, there really isn’t too much to talk about here, it’s just easier to think about the next part when you know how it all fits together.
Let’s look at the scoring code next. Remember all we care about is how much space is left over in the freeRectangle once we place our texture rect into it:
//score the rect here
int remainingX = (int)(freeRects[i].width - width);
int remainingY = (int)(freeRects[i].height - height);

int shortSideFit = Mathf.Min(remainingX, remainingY);
int longSideFit = Mathf.Max(remainingX, remainingY);

// if score is the best...
Once we know our score values, all that’s left is to see if these are the best scores we have, and do something if they are:
// if score is the best, replace bestNode with this rect,
// and set bestShortSideFit and bestLongSideFit to new
// values

if (shortSideFit < bestShortSideFit ||
   (shortSideFit == bestShortSideFit && longSideFit < bestLongSideFit))
{
	bestNode = new Rect(freeRects[i].x,freeRects[i].y, width, height);
	bestShortSideFit = shortSideFit;
	bestLongSideFit = longSideFit;
}
Remember that the bestShortSideFit and bestLongSideFit arguments are going to be read later by the PackTexture function to decide which texture to place next.
That’s all there is to this function! All that’s left now is for us to be able to gracefully remove a rectangle from our free list.
The Remove Function
Once we’ve found our target free rect, we add that placed texture rect to our output list, and remove that texture’s area from the free rectangle that it was placed in. In a lot of cases, this is going to give us a shape that isn’t a rectangle any more.
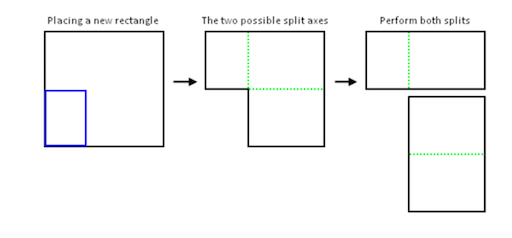 Image from
 However, since we are only storing rectangles in our FreeRect list, we need to split this new shape into rectangles. The MaxRect algorithm name refers to the fact that we actually are going to split these kinds of shapes into up to 4 rectangles instead of two, meaning that we will have some overlap.
What this overlap means in practice is that when we need to remove a rectangular area from our list of free rectangles, we have to check every rectangle in the free list and remove / subdivide all the ones that are affected, not just the one that we found to place our texture into. We also need to remove any rectangles in the free list which are wholly encompassed by another rectangle, which can happen as we add more and more textures to the atlas.
We’re going to put all of this in the RemvoeRectFromFreeList function that we saw earlier:
private static void RemoveRectFromFreeList(Rect rectToRemove, List<Rect> freeRects);The signature is pretty straightforward, and to be honest, so is the function, but let’s take a look at the outline of it first:
private static void RemoveRectFromFreeList( Rect rectToRemove,
				        List<Rect> freeRects)
{
    for (int i = 0; i < freeRects.Count; ++i)
    {
    	Rect freeRect = freeRects[i];

    	if (freeRect.Overlaps(rectToRemove))
    	{
    	    //subdivide rectangle here
    	    freeRects.RemoveAt(i--);
    	}
    }

    //remove free rects that are wholly contained by others
}
As discussed, there’s only really two interesting parts to this function, the subdivision of affected rectangles, and the removal of ones that are wholly overlapped by larger ones.
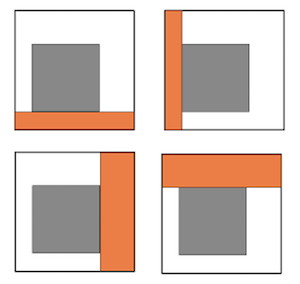
Let’s look at the subdivision first, It’s tempting to think that we only need to split along the top and right sides because we will always be subtracting the texture rect from the bottom left corner of the freeRect, and if you’re always working with nicely power of two textures that may be the case, but things can get hairy when you mix in npot textures, so we check on all four sides of the input rectangle, like this:
//subdivide rectangle here
if (rectToRemove.x < freeRect.x + freeRect.width && rectToRemove.x + rectToRemove.width > freeRect.x) {
	// New node at the top side of the used node.
	if (rectToRemove.y > freeRect.y && rectToRemove.y < freeRect.y + freeRect.height) {
		Rect newNode = freeRect;
		newNode.height = rectToRemove.y - newNode.y;
		freeRects.Add(newNode);
	}

	// New node at the bottom side of the used node.
	if (rectToRemove.y + rectToRemove.height < freeRect.y + freeRect.height) {
		Rect newNode = freeRect;
		newNode.y = rectToRemove.y + rectToRemove.height;
		newNode.height = freeRect.y + freeRect.height - (rectToRemove.y + rectToRemove.height);
		freeRects.Add(newNode);
	}
}

if (rectToRemove.y < freeRect.y + freeRect.height && rectToRemove.y + rectToRemove.height > freeRect.y) {
	// New node at the left side of the used node.
	if (rectToRemove.x > freeRect.x && rectToRemove.x < freeRect.x + freeRect.width) {
		Rect newNode = freeRect;
		newNode.width = rectToRemove.x - newNode.x;
		freeRects.Add(newNode);
	}

	// New node at the right side of the used node.
	if (rectToRemove.x + rectToRemove.width < freeRect.x + freeRect.width) {
		Rect newNode = freeRect;
		newNode.x = rectToRemove.x + rectToRemove.width;
		newNode.width = freeRect.x + freeRect.width - (rectToRemove.x + rectToRemove.width);
		freeRects.Add(newNode);
	}
}

freeRects.RemoveAt(i--);
Note: this subdivision code has been shamelessly stolen from the public domain implementation of the MaxRect algorithm on the Unity Wiki)
Finally, all that’s left is to prune our freeList of tiny rectangles:
//remove free rects that are wholly contained by others
for(int i = 0; i < freeRects.Count; ++i)
{
	for(int j = i+1; j < freeRects.Count; ++j)
	{
		if (freeRects[i].IsContainedIn(freeRects[j]))
		{
			freeRects.RemoveAt(i);
			--i;
			break;
		}

		if (freeRects[j].IsContainedIn(freeRects[i]))
		{
			freeRects.RemoveAt(j);
			--j;
		}
	}
}
The only interesting part of this code is the IsContainedIn function, which is just an extension method that I added to the Rect object to make this code more readable. That method is defined as follows:
public static bool IsContainedIn(this Rect a, Rect b)
{
	return a.x >= b.x && a.y >= b.y
		&& a.x+a.width <= b.x+b.width
		&& a.y+a.height <= b.y+b.height;
}
And with that, we’ve covered all the code needed to build a fully featured texture packer! Congratulations! The full source for the finished class is available here: [LINK TO PASTEBIN]
In my implementation, I wrap all of the code thus far in a TexturePacker class. I’m going to assume that you’ve done the same for the rest of this tutorial,.
Despite all our hard work, our journey isn’t over, it’s time to put all this code to work and actually make an atlas.
Building the Blitter
As simple as it sounds, the Blitter is actually more nuanced than the packer, because it’s where you really start to dig into the features that you want our Texture Atlasser to have. At it’s most basic, all it needs to do is to copy pixels from one texture to another, so let’s start by getting the simplest impementation possible set up:
public static Texture2D MakeAtlas(ref Texture2D[] textures, out Rect[] packedRects)
{
	AtlasLayout packResults = TextureAtlasser.PackTextures(textures, 2048,2048);
	Texture2D outAtlas = new Texture2D(packResults.width, packResults.height);

	textures = packResults.textures;
	packedRects = packResults.rects;

	for (int i = 0; i < packResults.textures.Count; i++)
	{
		Rect rect = packResults.rects[i];
		Texture2D readableTex = null;

		//load the image uncompressed
		string fileURL = AssetDatabase.GetAssetPath(packResults.textures[i]);
		byte[] imgByes = File.ReadAllBytes(fileURL);
		readableTex = new Texture2D(1,1,TextureFormat.ARGB32,false);
		readableTex.LoadImage(imgByes);

		Color[] pixels = readableTex.GetPixels();
		outAtlas.SetPixels((int)rect.x, (int)rect.y,(int)rect.width,(int)rect.height,pixels);
		outAtlas.wrapMode = TextureWrapMode.Clamp;
		outAtlas.Apply();

	}

	return outAtlas;
}
Make sure you set your wrap mode to clamp, otherwise you’re going to get texture seams when using textures on the edges of the atlas, that might look like this:
You’ll know this is from your wrap mode instead of your mips because the seams won’t go away when you zoom in.
Also notice that in the above, I’m hardcoding the size of our atlas to be 2048x2048. This is just for brevity, in your system, you’ll likely want to revisit this and do something smarter.
There’s a really really big mistake that you can make in your blitter, and that’s using textures that have already been compressed by Unity. Unless you’re importing all your textures as uncompressed, Unity has likely already applied some amount of compression to the textures in your project. If we use the Unity imported textures in our atlas, when the atlas is compressed, we’re going to compress the images inside it twice, which is going to make them look far worse than they have to.
To get around that, you can load the image directly from disk as a byte array and use that instead (like I’m doing above). It’s a few extra lines of code that makes a big difference on your final product. Note that this will only work if your images are jpgs or pngs. If they’re tifs, or psds or something else weird, you’ll have to find a different solution.
What we have here is where most texture atlassing systems seem to stop, and this is a perfectly sensible place to stop if you aren’t going to be mipping your atlasses, but there are two things we can do to make this more friendly, which I’ll talk about next.
Padding Support
One thing we can do is to add support for padding to our blit function. Padding simply means adding space between the different textures that we pack in our atlas:
One key thing to note with padding in an atlas, is that we want the padding to be inner padding. For example, if we have a 512x512 texture in the atlas,and we want to add 5 pixels of padding, we are going to add the padding to the perimeter of that texture’s rectangle and render the texture into a 502x502 rectangle in the center. You can do it the other way around, but it’s easier for artists to reason about how much texture space they’re using if we can still say things like “you can fit 4 512x512 textures into a 1024x1024 atlas.”
This means that we’re going to have to resize our input textures on the fly. Luckily Unity has a super handy function already available to us, which takes a UV coordinate and returns the properly bilinearly sampled texel color, nifty right?
So what we’re going to do is modify our function signature to take an integer argument for padding:
public static Texture2D MakeAtlas(ref Texture2D[] textures, out Rect[] packedRects, int padding)and then modify the code that’s inside the for loop we saw above:
for (int i = 0; i < packResults.textures.Count; i++)
{
	Rect rect = packResults.rects[i];
	Texture2D readableTex = null;

	//load the image uncompressed
	string fileURL = AssetDatabase.GetAssetPath(packResults.textures[i]);
	byte[] imgByes = File.ReadAllBytes(fileURL);
	readableTex = new Texture2D(1,1,TextureFormat.ARGB32,false);
	readableTex.LoadImage(imgByes);

	int localPadding = Mathf.Min(padding, readableTex.width /4);
	rect.x += localPadding;
	rect.width -= localPadding*2;
	rect.y += localPadding;
	rect.height -= localPadding*2;

	for (int x = 0; x < rect.width; x++)
	{
		for (int y = 0; y < rect.height; y++)
		{
			Color pixel = readableTex.GetPixelBilinear(x / rect.width, y / rect.height);
			outAtlas.SetPixel((int)rect.x + x, (int)rect.y +y, pixel);
		}
	}

	outAtlas.wrapMode = TextureWrapMode.Clamp;
	outAtlas.Apply();
}
Ok, now we’re talking!
Notice that we have a check in there to make sure that we never add so much padding that a texture is completely invisible on the atlas, or so much padding that the padded areas overlap.
Edge Bleeding
So this is great, and is going to make sure that (at least on the higher resolution mips), our textures aren’t going to bleed into each other. Unfortunately it means (at least right now), that they’ll instead pick up whatever value we clear our texture to. What we want to do next is to make sure that the areas that contain our padding are filled with the edge colour of the textures inside them. This is going to give us an atlas that looks something like this:
To do this, the easiest way is to simply set the wrapMode of our readableTex to clamp and sample UVs outside of 0 to 1 for the padding regions. In code, this looks like this:
for (int i = 0; i < packResults.textures.Count; i++)
{
    //Some Code Omitted For Brevity

    readableTex.wrapMode = TextureWrapMode.Clamp;
    readableTex.LoadImage(imgByes);

    int localPadding = Mathf.Min(padding, readableTex.width /4);

    Rect innerRect = packResults.rects[i];
    innerRect.x += localPadding;
    innerRect.y += localPadding;
    innerRect.width -= localPadding*2;
    innerRect.height -= localPadding*2;

    for (int x = (int)rect.x; x < (int)rect.x + (int)rect.width; x++)
    {
        for (int y = (int)rect.y; y < (int)rect.y + (int)rect.height; y++)
        {
        	int xSample = x - (int)innerRect.x;
        	int ySample = y - (int)innerRect.y;

        	Color pixel = readableTex.GetPixelBilinear(xSample / innerRect.width, ySample / innerRect.height);
        	outAtlas.SetPixel(x,y, pixel);
        }
    }

    packedRects[i] = innerRect;

    outAtlas.wrapMode = TextureWrapMode.Clamp;
    outAtlas.Apply();
}
Notice that we have to replace the rectangle in our packedRect array with the padded one, otherwise when we use that UV rect, it will include the padding area around the texture, which is less than ideal.
Perfect! Now what about those areas that have no texture in them at all… they’re still going to be a problem when we start using lower resolution mips, so we need to fill them in too. What’s worked for me in the past is visit every pixel, and if it isn’t contained in a UV rect, look along the horizontal and vertical axis until you find the closest pixel that is, and shade using that color.
Your atlas will end up looking something like what I have below. For the purposes of this example, I shrank the rock texture in the above atlas to make some more space.
The code changes to make this work are a bit more involved than before, so I’m going to go through each part instead of throwing all the code at you at once.
First, since we’re going to need to look up colours our packed textures after they’ve been placed, we’re going to need to store the readable textures we create in an array that we can access later:
Texture2D[] readables = new Texture2D[textures.Length];Then in the body of the packing loop, we need to assign the readable textures we create to this array:
readables[i] = readableTex;So far so easy right? Now, after we get out of the packing loop, we need to add a second set of loops, which is going to iterate over all the pixels in our output atlas, and check if they are contained in any of our (unpadded) UV rects. If they aren’t, we’ll grab the texture in the one that’s closest and call GetPixelBilinear again:
for (int x = 0; x < outAtlas.width; ++x)
{
    for (int y = 0; y < outAtlas.height; ++y)
    {
    	float closestDist = float.MaxValue;
    	Color c = Color.clear;

    	for (int r = 0; r < packedRects.Length; ++r)
    	{
            Rect curRect = packedRects[r];
            if (curRect.Contains(new Vector2(x,y)))
            {
            	closestDist = -1;
            	break;
            }

            int d = DistanceToRect(curRect, x,y);

            if (d < closestDist)
            {
            	closestDist = d;
            	float uvX = (x - curRect.x) / curRect.width;
            	float uvY = (y - curRect.y) / curRect.height;
            	c = readables[r].GetPixelBilinear(uvX, uvY);
            }
    	}

    	if (closestDist > -1)
    	{
    	    outAtlas.SetPixel(x,y,c);
    	}
    }
}

outAtlas.wrapMode = TextureWrapMode.Clamp;
outAtlas.Apply();
Not the fastest code in the world, but it churns throuh filling in the space on an almost empty 2048x2048 texture in a few seconds on my laptop so I’m calling it good enough for a build time tool. It’s important to make sure that you only call outAtlas.Apply() at the end of your function, as that’s the call that persists data to disk and is very slow, if you call it inside a loop you’ll be waiting for awhile.
The last bit of code we need is the body of the DistanceToRect function, which returns the distance from a given point to the edge of a rectangle:
private static float DistanceToRect(Rect r, int x, int y)
{
    float xDist = float.MaxValue;
    float yDist = float.MaxValue;

    xDist = Mathf.Max(Mathf.Abs(x - r.center.x) - r.width / 2, 0);
    yDist = Mathf.Max(Mathf.Abs(y - r.center.y) - r.height / 2, 0);
    return xDist * xDist + yDist * yDist;
}
Wrapping Things Up
What we have now is a perfectly good Texture Atlasser! With padding and edge bleed, the mips you care most about (the higher resolution ones) are likely going to be completely unblemished. If anything here wasn’t clear, or you just want some source, it’s available at the end of this post.
However, there’s one more thing you can do to make this really shine. If you’re following along, you may have realized that even with all of this set up (and padding cranked), there isn’t really much you can do about the smallest mip level. There’s just too little resolution to reasonably store information about different textures, and no matter how much padding you add, you still end up with some mipping artifacts:
 I had to zoom in on my image to highlight the artifacts, forgive the low resolution
To get around this, you can set the mip bias of the texture to a negative number, so that it always will pull from a higher mip map. This will make your texture sharper, and prevent it from hitting the lowest mip level (assuming you bias it to -1). This obviously has minor performance implications, but assuming you have the wiggle room to weather them, it’s going to get you a much nicer looking scene.
The code to do this is a little odd because Unity doesn’t really let you control anything about your mip maps unless you do it when the texture is imported, this is a bit odd, given that you can write other metadata (like we did with our wrapMode earlier) before you save the asset to disk, but regardless, we’re going to need to write a custom texture importer to set our mip bias.
Custom asset importers are pretty easy to build with unity. Here’s one that gets us the mip bias value we want on our input atlasses:
public class AtlasImporter : AssetPostprocessor
{
    private void OnPostprocessTexture(Texture2D import)
    {
    	if (assetPath.Contains("Atlasses"))
    	{
    	   import.mipMapBias = -1.0f;
    	}
    }
}
Make sure to put this on a script located in your Editor folder in our Project Hierarchy, or the code won’t get run. Assuming you’ve done all that correctly, when you regenerate (or reimport) your atlas, those far away seams should be completely cleared up:

You’ll notice that what texture data is present in the image changes when I change the mip bias, this is expected because we are literally sampling from a different, higher resolution mip map in the second photo, so things aren’t going to look 100% identical to when we didn’t have the bias set.
With that done, we have our atlasser! It’s worth noting that this won’t solve all your problems if the input textures to your atlasser arent power-of-two sized. If that isn’t the case for you, you’ll want to generate your own mips in addition to everything we’ve talked about here. I recommend not letting an NPOT texture get in an atlas meant for 3D content, but if you for some reason must do that, more info is available from NVidia
Whew, this covered a lot of ground! In case you weren’t following along at home, all the code that I’ve talked about here has been uploaded to github
If you have any questions about this, or spot a mistake, shoot me an email, or a twitter message. I check twitter…sorta…not frequently, but I will eventually see it if you send me something there. My email / twitter is available in the sidebar. Have a good one!