A Pencil Sketch Effect
There are a handful of effects that have kicked around in my brain for awhile in a nebulous “one day, I want to build that” sort of way. Some of these include using genetic algorithms to turn images into triangles (like here), Portals, Procedural Clouds, and the one I decided to build this weekend: Real Time Hatching (or something like it)!
Real Time Hatching is the fancy (and much more concise) way of describing the class of rendering effects that make scenes look like they were drawn (or at least shaded) by hand. The effect is actually reasonably simple, but it’s pretty fun and provides a few good excuses to talk about fixed/half/float precision.
I’m going to present the basic effect as it would look if you wanted to write a shader to attach to a single object, how to turn that into a post effect that will work on the whole screen, and take a few detours in the process. All the code here is going to be for Unity 5.5, so your mileage may vary if you’re using a different version.
Tonal Art Maps
Before we do anything though, we need to talk about the basic theory behind real time hatching. The whole effect is based on the concept of Tonal Art Maps (or TAMs). These are a series of textures which correspond to how you want your art to like at different lighting intensities. The tricky part about them is that in order for things to look right, each texture needs to contain all the information stored in all the maps which correspond to brighter tones within them. So your second brightest map needs to contain all the texture data of your brightest, plus the additional data that makes this map darker.
This is sorta complicated when stated in words, but it’s a lot more intuitive when you see the textures. The following was taken from a widely cited research paper (located here which presented the technique we’re going to use today.
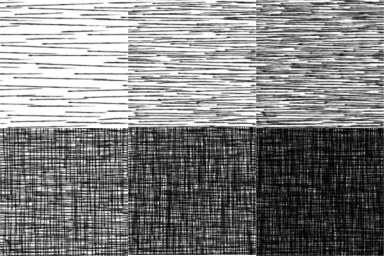
As you can see, each map represents pencil strokes that an artist would make to shade in a part of a piece of paper. The darker maps contain all the pencil strokes from the brighter regions, and then add more. If you don’t follow this rule when creating your maps, the strokes won’t nicely flow into each other, and you’ll end up with very weird looking line shading.
In order for us to have a “proper” TAM, we need to go a step further than simply authoring our hatching textures according to the above rules, we also need to provide custom mips. If you don’t, then as your objects get farther away, you’re going to see less and less stroke detail on them. The paper goes into detail as to how they generated the custom mips, and provides an example of what they made:
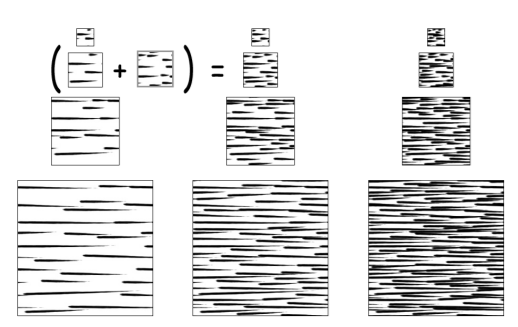 from http://hhoppe.com/hatching.pdf
I’m actually going to skip all of this custom mip texture generation stuff, because I don’t feel like creating my own TAM generator, given that my interest in this effect was really just in figuring out how it worked, not using it for a commercial product. Suffice to say, I’m sure it would look better if you spend the time to create the custom mips. If you want to get a look at a working TAM generator, I found one written in processing here
Ok, that was a lot of writing for not a lot of output, but now that we have our TAM images, we can proceed with actually creating the effect.
A Single Object Shader
So now that we have our TAM, we need to create a shader that uses them. The paper that I cited earlier presents a method for applying a set of TAMs to an object using 6 texture lookups, because (importantly), you could pack those 6 lookups into two texture accesses. This is an important thing to dwell on for a second, because it gets missed a lot of the time when people post real time hatching shaders: DO NOT add 6 texture lookups to your shader for hatching. Pack the textures into the channels of 2 RGB textures instead.
To pack the TAM textures together, I wrote a quick and dirty Unity tool. The code is a bit long to paste here, but it’s available on the github repo linked at the end of the post, or in the gist here.
I used that tool to combine the above 6 TAM images into the following:
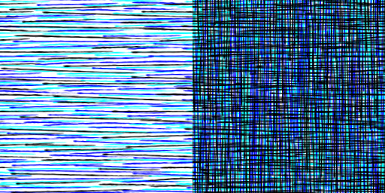
Which is much more space efficient! Now we need to look at how the shader is going to work.
Obviously we’re going to be blending between the 6 channels in our two textures, but how we do it is pretty nifty. Before we get started though, let’s get the basic skeleton of our shader out of the way. Remember that for now, we’re going to be writing a shader that we can apply to a single object. Here’s the setup:
sampler2D _MainTex;
float4 _MainTex_ST;

sampler2D _Hatch0;
sampler2D _Hatch1;
float4 _LightColor0;

v2f vert (appdata v)
{
    v2f o;
    o.vertex = mul(UNITY_MATRIX_MVP, v.vertex);
    o.uv = v.uv * _MainTex_ST.xy + _MainTex_ST.zw;
    o.nrm = mul(float4(v.norm, 0.0), unity_WorldToObject).xyz;
    return o;
}

fixed4 frag (v2f i) : SV_Target
{
    fixed4 color = tex2D(_MainTex, i.uv);
    half3 diffuse = color.rgb * _LightColor0.rgb * dot(_WorldSpaceLightPos0, normalize(i.nrm));

    //hatching logic goes here

    return color;
}
The complete source for the effect is available on github here, but hopefully the above is enough to get us all on the same page. All we have here is a standard diffuse shader. While you will likely need more than a single directional light in a real project, the hatching logic works well with any light input, so I’m going with a simple case here.
The first thing we need to do is to get a scalar representation of how bright our fragment is with all the lighting applied. This just requires a dot product against a vector constant (0.2326, 0.7152, 0.0722).
half intensity = dot(diffuse, half3(0.2326, 0.7152, 0.0722));This constant comes from the luminosity function, and in theory requires that the colour we’re multiply it against has been converted to linear space. Depending on what platform you’re on, you may or may not care about this. For simplicity I’m going to omit it, just be aware that light most lighting calculations, if you aren’t working with linear colour, you’re sacrificing correctness in favor of performance.
Also note that we’re calculating this value in halfs. While you likely wouldn’t see too much of a difference with a fixed precision variable, an 11 bit fixed precision variable is only accurate to about 0.0039 (or 1/256), and the luminosity constant we’re using requires more precision to accurately represent. If you’re splitting hairs, you can’t store 0.7152 completely correctly in a half either, but it’s off by much, much less (if you’re interested, more info on half precision vars can be found here).
If we add that line to our shader, and output the result, we’ll end up with a nice grayscale effect:
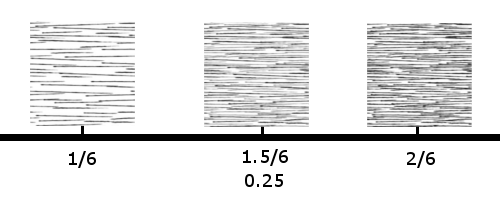
Now all we need to do is to convert that scalar intensity value into a hatch texture sample. We have 6 hatch channels, which means that there are going to be 6 different intensity values that will map to a sample from only 1 hatch texture (1/6, 2/6, 3/6, 4/6, 5/6, 6/6). Any value that isn’t one of these exact values is going to require us to blend between the two textures that our value is between. This means that an intensity value of 1.5 / 6 (or 0.25) will require us to blend between the texture that corresponds to 1/6 and 2/6. This is demonstrated in the diagram below.
Unfortunately for us, GPUs (or at least, mobile GPUs) aren’t great at branching logic. So while it seems straightforward to write this with a few if statements like so:
fixed3 rgb;
if (intensity > 1.0 && intensity < 2.0)
{
    fixed3 hatch = tex2D(hatch0, uv);
    rgb += hatch.r * (1.0 - intensity);
    rgb += hatch.g * intensity;
}
else if (intensity == 2.0)
{
    rgb = tex2D(hatch, uv).g;
}
else if ...
We really, really, don’t want to do that in our shader, since it would mean a big unnecessary performance penalty. Instead, what we want is to write something that looks like this:
fixed3 rgb;
fixed3 hatch = tex2D(hatch0, uv);
rgb += hatch.r * weight0;
rgb += hatch,g * weight1;
rgb += hatch.b * weight2;
...
Notice how in both cases we end up doing the same number of texture samples, but the second case contains no branching at all. What we need to do is calculate the weights we multiply by so that we only take data from the hatch textures we want to use. It would also be nice if those weights could be created such that the sum of the weights for the textures we want added up to 1, while the weights for the other hatch samples stayed at 0.
Let’s look at how to do this. Again, we have 6 textures that we need to calculate weights for, so it stands to reason that we’re going to need to compare our intensity value against 6 numbers to determine these weights. We are going to store the difference between our intensity and each of these comparing values in 2 half3s. It’s going to look like this:
half i = intensity * 6;
half3 intensity3 = half3(i,i,i);
half3 weights0 = intensity3 - half3(0,1,2);
half3 weights1 = intensity3 - half3(3,4,5);
There’s a few things to talk about in the above snippet. First of all, why am I using integer steps instead of decimal 1/6 steps? This is to avoid multiple divisons by 6 later on. We know that at most, we’re going to have 2 weights which are non zero, and those two weights need to add up to 1, so as long as the step between each weight is 1, we can simply lerp between them and get our final answer. Note that for this to work, we also need to multiply our intensity value by 6.
Let’s step through the above with a sample intensity value of 0.75
half i = 0.75 * 6; // 4.5
half3 intensity3 = half3(i,i,i); //(4.5,4.5,4.5)
half3 weights0 = intensity3 - half3(0,1,2); //(4.5,3.1,2.5)
half3 weights1 = intensity3 - half3(3,4,5); //(1.5,0.5,-0.5)
Gross, we have some weight values that are outside of our 0-1 range, that’s not going to do us any favours later on, so let’s wrap our math in saturate calls and try that again.
half i = 0.75 * 6; // 4.5
half3 intensity3 = half3(i,i,i); //(4.5,4.5,4.5)

half3 weights0 = saturate(intensity3 - half3(0,1,2));
// weights0 = (1,1,1)

half3 weights1 = saturate(intensity3 - half3(3,4,5));
//weights1 = (1,0.5,0)
Ok, that’s more useful! Kinda, there’s still a few things to take care of here. For one, we said we needed a maximum of 2 non zero weights, and we have 5 right now. What we need to do is get rid of the weights for our lower values, so that the only ones remaining are for the two textures we actually want. We also want those two remaining weights to add up to 1.
Luckily all it takes is a bit of subtraction to fix everything up:
weights0.xy -= weights0.yz;
weights0.z -= weights1.x;
weights1.xy -= weights1.yz;
Nifty right? Using our example value of 0.75, this would give us two weight vectors: (0,0,0) and (0.5, 0.5, 0.0), which means that an input of 4.5 is a 50% blend of our 4th and 5th texture samples, which is exactly what we want to do!
So now that we have our weights, the rest is just some Multiply/Add operations:
half3 hatching = half3(0.0, 0.0, 0.0);
hatching += hatch0.r * weightsA.x;
hatching += hatch0.g * weightsA.y;
hatching += hatch0.b * weightsA.z;
hatching += hatch1.r * weightsB.x;
hatching += hatch1.g * weightsB.y;
hatching += hatch1.b * weightsB.z;
Which we can further optimize by vectorizing the multiplications before we add things together:
half3 hatching = half3(0.0, 0.0, 0.0);
hatch0 = hatch0 * weightsA;
hatch1 = hatch1 * weightsB;

half3 hatching = hatch0.r +
    hatch0.g + hatch0.b +
    hatch1.r + hatch1.g +
    hatch1.b;
There are two things to note in the above. The first is how we’re handling black. Because our effect relies on keeping the relationship of less light == denser pencil strokes, we can’t treat black as a separate texture sample, because when we move between our darkest texture and pure black we won’t be adding any more strokes. Instead, when we’re blending between our darkest two texture samples, what we’re really doing is (darkestTexture * 1.0 - i) + (2ndDarkest * i). This is expressed above but it isn’t immmediately obvious.
Second, you may have realized that the above all relies on a very big assumption: that our intensity will never exceed 1.0. Of course this is nonsense, but assuming it up until now has both made our math easier, and given us a fun hack to let us go to pure white when being lit very brightly. At the beginning of our math, we just need to store max(0, intensity - 1.0), and add it back at the end. For values less than 1.0, this is going to be zero and for anything super bright, it’s going to push us into pure white territory.
Altogether, the hatching function looks like this:
fixed3 Hatching(float2 _uv, half _intensity)
{
    half3 hatch0 = tex2D(_Hatch0, _uv).rgb;
    half3 hatch1 = tex2D(_Hatch1, _uv).rgb;

    half3 overbright = max(0, _intensity - 1.0);

    half3 weightsA = saturate((_intensity * 6.0) + half3(-0, -1, -2));
    half3 weightsB = saturate((_intensity * 6.0) + half3(-3, -4, -5));

    weightsA.xy -= weightsA.yz;
    weightsA.z -= weightsB.x;
    weightsB.xy -= weightsB.yz;

    hatch0 = hatch0 * weightsA;
    hatch1 = hatch1 * weightsB;

    half3 hatching = overbright + hatch0.r +
    	hatch0.g + hatch0.b +
    	hatch1.r + hatch1.g +
    	hatch1.b;

    return hatching;
}
If we plug that into our pixel shader like so:
fixed4 frag (v2f i) : SV_Target
{
    fixed4 color = tex2D(_MainTex, i.uv);
    fixed3 diffuse = color.rgb * _LightColor0.rgb * dot(_WorldSpaceLightPos0, normalize(i.nrm));

    fixed intensity = dot(diffuse, fixed3(0.2326, 0.7152, 0.0722));

    color.rgb =  Hatching(i.uv * 8, intensity);

    return color;
}
We end up with a lovely hatch material:
Last thing to note here is that I’m multiplying the input UVs by 8 when I pass them to the hatch function. This is purely a hack because I think it looks better with the hatch textures I’m using. YMMV, especially if you’re generating your own TAM.
A Post Processing Effect
So now that we have the basic effect, it’s time to do something more exciting with it. Moving this to a post effect makes it much easier to use in a project, and do fun things like integrate with other effects, like a vignette:
But for now, I’m just going to walk through turning this into a plain old full screen sketch effect:
This is surprisingly straightforward. We’re already rendering the entire scene with lighting in our main pass, which means that we can pull our intensity value from there. This has the advantage of letting us sketchify scenes using complicated materials or Unity’s dynamic GI without us having to think about anything. Other than that, about the only thing we need is the UVs of the objects we’re shading.
But as is usually the case with graphics, we need to do a bit of setup first:
[RequireComponent(typeof(Camera))]
public class PencilSketchPostEffect : MonoBehaviour
{
public float bufferScale = 1.0f;
public Shader uvReplacementShader;
public Material compositeMat;

private Camera mainCam;
private int scaledWidth;
private int scaledHeight;
private Camera effectCamera;

void Start ()
{
    Application.targetFrameRate = 120;
    mainCam = GetComponent<Camera>();

    effectCamera = new GameObject().AddComponent<Camera>();
}

void Update()
{
    bufferScale = Mathf.Clamp(bufferScale, 0.0f, 1.0f);
    scaledWidth = (int)(Screen.width * bufferScale);
    scaledHeight = (int)(Screen.height * bufferScale);
}
If you’re familiar with my previous posts, this should look very familiar. All we’re doing is setting up our effect to use a second camera, and updating some variables to scale any buffers we need to create. Simple stuff. The fun starts inside OnRenderImage:
private void OnRenderImage(RenderTexture src, RenderTexture dst)
{
    effectCamera.CopyFrom(mainCam);
    effectCamera.transform.position = transform.position;
    effectCamera.transform.rotation = transform.rotation;

    //redner scene into a UV buffer
    RenderTexture uvBuffer = RenderTexture.GetTemporary(scaledWidth, scaledHeight, 24, RenderTextureFormat.ARGBFloat);
    effectCamera.SetTargetBuffers(uvBuffer.colorBuffer, uvBuffer.depthBuffer);
    effectCamera.RenderWithShader(uvReplacementShader, "");

    compositeMat.SetTexture("_UVBuffer", uvBuffer);

    //Composite pass with packed TAMs
    Graphics.Blit(src, dst, compositeMat);

    RenderTexture.ReleaseTemporary(uvBuffer);
}
Again, mostly, this is all the same as previous effects. We copy the settings we need from the main camera to the effect camera, create our temporary buffer to render UVs into, and then render the scene UVs.
Once we have our UV buffer populated, we pass it to our composite shader, which does the rest of the work.
It’s very easy to make a mistake when rendering the UV buffer. With UVs, we need much more precision than we can store in a default RT texel. Remember earlier when I was talking about needing to store the luminosity constant in a half3 because a fixed3 didn’t have enough precision? That goes double for UVs. If you forget about this and try output your UVs to a regular buffer, you end up with a mess:
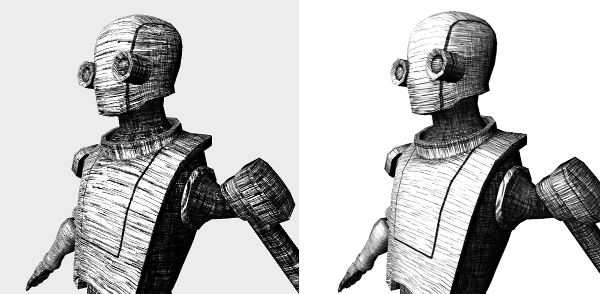 Wrong Precision Left, Correct Precision Right
Since we’re going to use a floating point buffer, that means that our fragment shader needs to return a float, so our UV replacement shader looks like this:
float4 frag (v2f i) : SV_Target
{
    float2 uv = i.uv;

    return float4(i.uv.x, i.uv.y, _MainTex_ST.x, _MainTex_ST.y);
}
I’m also taking the time here to output the tiling and offset info from the main texture so that we can use it later to (hopefully) get a more accurate effect.
Finally, the composite shader is very simple, now that you know what the hatching function is:
fixed4 frag (v2f i) : SV_Target
{
    fixed4 col = tex2D(_MainTex, i.uv);

    float4 uv = tex2D(_UVBuffer, i.uvFlipY);

    half intensity = dot(col.rgb, float3(0.2326, 0.7152, 0.0722));

    half3 hatch =  Hatching(uv.xy * 8, intensity);

    col.rgb = hatch;

    return col;
}
Speaking of precision though, you’ll notice that using the above code, the hack we used earlier to have very bright objects go to white no longer works, this is again because of buffer precision: the buffer that our main camera is rendering to only stores values up to 1.0, so that extra information is getting clipped before it gets to us. You can certainly make it happen - you’ll need the main camera rendering into a high precision buffer, and you’ll need the shaders on individual elements to output halfs or floats - but this violates our principle of not requiring changes to the shaders objects are using, therefore I’m calling it outside the scope of this post.
Performance
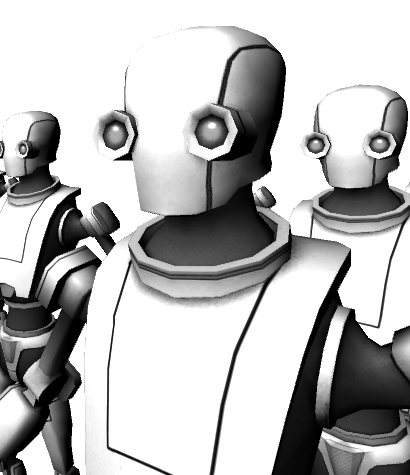
On an iPhone 6, rendering the scene you see in the gif at the beginning of the post with a htaching shader on each robot was blazing fast (almost exactly the speed that rendering them with a diffuse shader was). However, turning on the post effect added 4 ms to the render time. This is likely due to the fact that we’re performing 4 texture lookups (main cam, uv buffer, 2 hatch textures) and a not insignificant amount of math inside the composite shader (which operates at full res).
I didn’t do any performance testing on desktop, mostly because after working in mobile for half a decade, it’s just easier for me to grab the numbers off of a phone. My gut says that anything a phone can do in 4 ms, my laptops can do in basically no time, but I’m basing that on basically nothing but a hunch.
Conclusion
Firstly, all the code that I talked about is available on github. It’s GPL’ed because to the best of my knowledge, the hatch images I found were released under the GPL.
There are lots of potential issues you’ll run into with this effect if you use it in a real project. For example, handling non uniform object scale can present some odd issues, especially if you don’t want to break static batching by passing scale to the object’s material. I think you could get around this by encoding the scale of objects into their vertex color, but if you know the scale of your object at bake time, you should probably just resize your mesh.
In reality though, the effect as presented here is likely not going to make your art team very happy. I think you’d likely run into artists wanting to author custom TAMs with different types of strokes, and maps for each object to control which type of stroke was used where.
That about wraps things up, this was a lot of fun! If you have any questions, shoot me a message on twitter, I’d love to see more projects using this type of effect, so send me screenshots of anything you build with it!
[Update: 5/18/2020: Thanks to @__seb for pointing out a typo in the hatching shader]