Fixeds, Floats and a Block Damage Effect
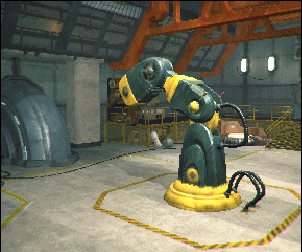
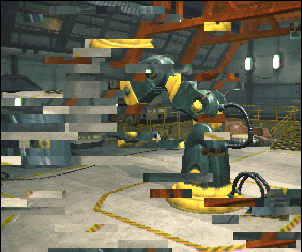
As you may have guessed from the everything that I post, I love cheesy rendering effects, and no surprise, that means that I’m a big fan of cyberpunk games, especially ones that really go over the top with effects. As such, I thought I’d spend some time this weekend building a classic glitch effect:
It’s a very simple effect, but it’s also a perfect excuse to talk about using the correct precision for variables when writing shaders. In the last article I wrote, I touched a bit on using texture formats that have enough precision for the data you’re storing in them; today I’m going to go over how to decide whether to use a fixed, half or float on a line to line basis when writing a shader.
That will come later though, first, let’s go over how the glitch effect we’re building works:
How It works
The first thing we’ll need to do is find some way to divide our screen up into rectangular regions, identified by a scalar value. You can do this with UV math right in the shader, but it’s much easier to play with if this is texture driven, so we’ll need to create a texture like the following:
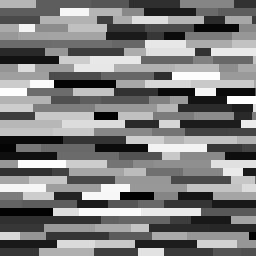
Since this texture identifies each block with a value between 0 and 1 (the intensity of the colour), we’ll pass a second value to our shader also between 0 and 1. As the shader executes, any fragment which is in a block that has a value greater than our control value will sample the screen buffer using UVs which have had a constant value added or subtracted to them. This will keep all texture samples within a block cohesive with each other, producing the effect we want:
if we use the grayscale image above however, our UV offset will always be diagonal and in the same direction, which isn’t exactly what we want. So I’m going to use the R channel as our identifier channel, and put different random values into the GB channels of the noise texture, which we’ll use to drive our UV offsets:
(I wrote a quick tool to generate these types of maps, I’m not going to walk through building it, but you can grab it in the github repo here)
Then we’ll modify the effect to randomly choose which blocks to glitch, so that we don’t end up with a predictable pattern of glitchiness (which…kinda looks the opposite of glitchy), and I’ll talk a bit about some things you can do to make the whole effect look a bit more convincing (imo), and different ways you can extend it. I’ll also sprinkle in some notes about optimization.
So let’s get started!
Getting Something On Screen
I always try to get something on screen as fast as possible when I work, both so that I can verify that my code is doing what I think it should be, and to make sure that what I’m building actually looks good. So let’s start this effect the same way, by just getting the glitch effect working and distorting the whole screen.
Like usual, we’re going to be making a post effect, so we need to start with a bit of scaffolding in C#. Unlike past articles, this effect is simple enough that we don’t need to set up any extra cameras, we just need to make sure that blit to the screen using our effect material:
[RequireComponent(typeof(Camera))]
public class GlitchFX: MonoBehaviour
{
public float glitchAmount = 0.0f;
public Texture2D blockTexture;

private Shader _glitchShader;
private Material _glitchMat;

void Start ()
{
    _glitchShader = Shader.Find("Hidden/GlitchFX/GlitchFX_Shift");
    _glitchMat = new Material(_glitchShader);
    _glitchMat.SetTexture("_GlitchMap", blockTexture);
}

private void OnRenderImage(RenderTexture source, RenderTexture destination)
{
    Graphics.Blit(source, destination, _glitchMat);
}

void Update ()
{
    glitchAmount = Mathf.Clamp(glitchAmount, 0.0f, 1.0f);
    _glitchMat.SetFloat("_GlitchAmount", glitchAmount);
}
We’ll revisit this script later on when we want to tweak the effect, but for now, this is all we’ll need to get going. Next up, we need to get our shader set up. I’m going to assume that you can set up most of the material file yourself, and skip right to the fragment shader. If you’re lost, the shader is also in the github repo here
fixed4 frag (v2f i) : SV_Target
{
    fixed2 glitch = (tex2D(_GlitchMap, i.uv)).rg;
    fixed4 col = tex2D(_MainTex, i.uv + glitch.rg);
    return col;
}
Alright, now we’re cooking! If you run this now you should get a full screen of glitchy goodness! If you’re seeing weirdness around the edges of the blocks like this:
Make sure that you’ve set your noise map texture to “point” filtering.
Optimization Notes Part 1
While what we’re doing is very straightforward, it’s worth taking a minute to talk about a quick optimization point. Notice that I’m only grabbing 2 channels from the texture. This is going to be very slightly faster than grabbing the whole texture, or grabbing just 1 channel and creating a fixed2 from that.
You can test this yourself the same way I did, and run the above post process effect 101 times per frame, like so:
private void OnRenderImage(RenderTexture source, RenderTexture destination)
{
    RenderTexture t = RenderTexture.GetTemporary(source.width, source.height);
    for (int i = 0; i < 50; ++i)
    {
        Graphics.Blit(source, t, _glitchMat);
        Graphics.Blit(t, source, _glitchMat);
    }
    Graphics.Blit(source, destination, _glitchMat);
    RenderTexture.ReleaseTemporary(t);
}
On my iPhone 6, the performance impact was too small to see without doing something like the above, and even in the above stress test, we’re talking about a difference of about 2 ms. It’s not like your project will fail if you don’t know this technique, but small optimizations add up, especially when you’re trying to hit 60 fps on mobile.
So that covers the texture sample line, but I also mentioned that we’d pay special attention to the precision of variables in this post, so let’s talk about why the texture sample was stored in a fixed2, and not a float2, for instance. As we’ll see when we have more instructions to look at, it’s a matter of minimizing the number of times we need to cast our data to a different precision. Some functions take floats as args, so passing in a fixed will require it to be cast up into a higher precision type or vice versa.
It’s also worth looking at the glsl that will be generated by Unity’s shader compiler for the above shader:
uniform sampler2D _MainTex;
uniform sampler2D _GlitchMap;
varying highp vec2 xlv_TEXCOORD0;
void main ()
{
  lowp vec4 tmpvar_1;
  tmpvar_1 = texture2D (_GlitchMap, xlv_TEXCOORD0);
  highp vec2 P_2;
  P_2 = (xlv_TEXCOORD0 + tmpvar_1.xy);
  lowp vec4 tmpvar_3;
  tmpvar_3 = texture2D (_MainTex, P_2);
  gl_FragData[0] = tmpvar_3;
}
Notice that by default, sampler2Ds in CG code are turned into low precision samplers in GLSL by Unity. GLSL lowp, mediump and highp float precision qualifiers map to CG’s fixed, half and float datatypes. This means that if we used a float2 instead of a fixed2 to store the texture lookup, we’d need to the value returned by the tex2D call up into float precision. You can see this happen if you change glitch to a float2 and examine the glsl again:
uniform sampler2D _MainTex;
uniform sampler2D _GlitchMap;
varying highp vec2 xlv_TEXCOORD0;
void main ()
{
  highp vec2 glitch_1;
  lowp vec2 tmpvar_2;
  tmpvar_2 = texture2D (_GlitchMap, xlv_TEXCOORD0).xy;
  glitch_1 = tmpvar_2;
  highp vec2 P_3;
  P_3 = (xlv_TEXCOORD0 + glitch_1);
  lowp vec4 tmpvar_4;
  tmpvar_4 = texture2D (_MainTex, P_3);
  gl_FragData[0] = tmpvar_4;
}
This may look like a trivial change (in fact, the PowerVR Shader Editor doesn’t even recognize it as an extra instruction), but the performance impact of minimizing precision casts is very real. Again, I highly recommend you write some tests to try it out for yourself, using the same method as before (running it 100 times per frame). If you do, you’ll notice that the cost of an individual cast isn’t that high, but across a whole project, these costs can add up.
Also, since we’re not sampling from a half precision or floating point texture, there really isn’t anything to be gained from using anything but a fixed here. If you need to sample from one of those textures, you can add a suffix to your sampler2D uniform to get a half or full precision sampler:
sampler2D_float _GlitchMap;
sampler2D_half _GlitchMap;
Ok, that’s a lot of analysis for now, let’s do something a bit more flashy.
Finishing the Glitch Effect
So far our post process shader is assuming that we want to distort the entire screen RIGHT NOW, but that isn’t how the glitch effect we want works, we want to distort different parts of the screen at different times.
I’m going to start by using the value of the red channel in our map as the noise value for the blocks. This will give us an effect that follows a predictable pattern, but it will be way more convincing than what we have now. Once this is working, we can worry about adding randomness.
So what we need to do is pass a float value to the shader, and compare the value of each block against this value. Blocks which have a value less than or equal to our passed in control value will use the offset UVs (appearing glithed), and blocks with a value greater will appear normal. This means that if we pass a value of 1.0 to our control value, all blocks will glitch because no value can be greater than 1.
If all GPUs were good at branching, this could be written like this:
fixed4 frag(v2f i) : SV_Target
{
    fixed2 glitch = (tex2D(_GlitchMap, i.uv)).rg;

    float2 uvShift = glitch.rg;
    if (glitch.r >= _GlitchAmount)
    {
        uvShift *= 0.0;
    }

    fixed4 col = tex2D(_MainTex, frac(i.uv + uvShift));
    return col;
}
But since we can’t be sure what device this effect will need to run on, I’m going to replace the conditional with a bit of math that accomplishes the same thing:
fixed4 frag(v2f i) : SV_Target
{
    fixed2 glitch = (tex2D(_GlitchMap, i.uv)).rg;

    float2 uvShift = glitch.rg * ceil(_GlitchAmount - glitch.r);

    fixed4 col = tex2D(_MainTex, i.uv + uvShift));
    return col;
}
All we’re doing here is comparing our two values with a subtract and rounding up to the nearest whole number, this only works because we know that both numbers have the same range (0 to 1). However, this has an edge case: if your glitch value is exactly 1.0, this calculation can result in a value of -1, which would distort part of the image even when we want no glitching, which is obviously incorrect. I’m going to add a max to the calculation here to resolve this:
float2 uvShift = glitch.rg * ceil(max(-0.99,_GlitchAmount - glitch.r));In a real project though, you’ll want to pre-process your glitch map to make sure it doesn’t have any 1.0 blocks so that you can get rid of this extra instruction and save some performance.
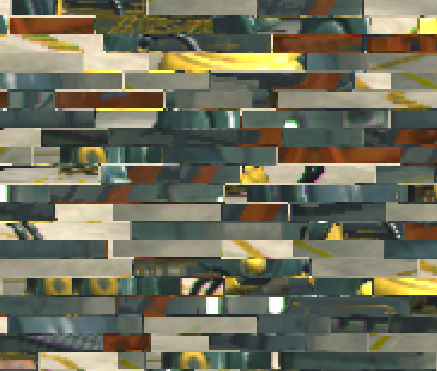
You may have noticed if you run this right now, you get some weird colours in your glitched image, for me, this looked like way more brown than there should have been:
This is because when we add our UV offset to our UV coordinates, we’re ending up sampling from outside of the area of the screen buffer. The buffer is set to clamp at the border, meaning what we’re seeing is a lot of fragments picking up pixels from the edge of our image. Since we don’t care about the integer value of our UV coordinates (and in fact want to get rid of them), we can add a frac() function to our shader and get home-grown UV wrapping.
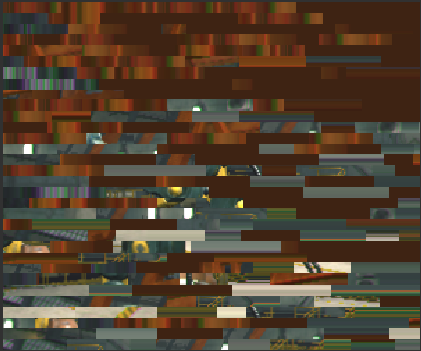
fixed4 col = tex2D(_MainTex, frac(i.uv + uvShift));Put all this together and you get an effect that looks like this as the _GlitchAmount value pans from 0 to 1:
Optimization Notes Part 2
We have another line of shader code now, so let’s talk about
float2 uvShift = glitch.rg * ceil(max(-0.99,_GlitchAmount - glitch.r));First of all, it’s almost always a bad idea to use anything but floats to hold UV coordinates. The other datatypes don’t have enough precision to accurately sample a texture, which is what you want them to do 99% of the time.. We don’t really care about whether or not our shifted coordinates are super accurate though, so the question of what data type to use comes down to raw performance.
Boringly enough this doesn’t actually change anything, because _GlitchAmount is a float, and the tex2D() function expects the uv coordinates that get passed to it to be floats, so no matter what we start with, we very quickly need to cast our variable up to a float anyway, so we may as well keep to the standard rule of “uv math gets done in full precision” here too.
It’s worth noting that although we’re working with fixeds a lot in this post, on newer hardware, most GPUs have full support for halfs and will go so far as to ignore the fixed qualifier and do everything in halfs and floats. Check the specifics for your target devices, but it’s usually safe to say that if your iOS device supports metal, it’s safe to use halfs instead of fixeds. I’m under the impression that this is even more common on Desktops.
Alright, back to making things look cool!
Randomizing the Glitch
Our effect is looking better, but it still isn’t really “glitchy” is it? If we leave our glitch value along, the effect stays static, distorting fixed blocks on the screen. As well, even with the _GlitchAmount value changing, our effect follows a predictable pattern, always glitching blocks in the same order. It’s time to make this a bit more random.
To do this, we’re going to need to be able to get a random value for each block to use instead of the red channel intensity to decided when to glitch a block. Further, we’re going to want this random value to not only be uniform across an entire block, we also want to be able to control when the random values change so that we can control how fast our effect updates.
Luckily, the commonly copy/pasted one liner for generating random numbers in a shader takes two parameters as input:
float rand(float2 co)
{
    return frac(sin(dot(co.xy, float2(12.9898, 78.233))) * 43758.5453);
}
So we’re going to use that, and pass the red channel value as the first component of co, and pass a uniform float that we send from c# to the shader as the second component. It’s beyond the cope of this post to talk about how this one liner works, but if you have a spare second it’s definitely worth googling.
This time we’re using floats because we want more potential variety in our random number. Using a half or a fixed reduces the number of values that can be represented between 0 and 1. It might make a huge difference if you use halfs here instead of floats, but it will make some, and as you’ll see in a second, we would need to cast it up to a float back in our fragment function anyway.
Our shader now looks like this:
sampler2D _MainTex;
sampler2D _GlitchMap;

float _GlitchAmount;
float _GlitchRandom;

float rand(float2 co)
{
    return frac(sin(dot(co.xy, float2(12.9898, 78.233))) * 43758.5453);
}

fixed4 frag(v2f i) : SV_Target
{
    fixed2 glitch = (tex2D(_GlitchMap, i.uv)).rg;

    float r = (rand(float2(glitch.r, _GlitchRandom)));
    float gFlag = max(0.0, ceil(_GlitchAmount - r));

    float2 uvShift = glitch.rg * gFlag;

    fixed4 col = tex2D(_MainTex, frac(i.uv + uvShift));
    return col;
}
And in c#, we have to add a line to our update() function:
void Update ()
{
    glitchAmount = Mathf.Clamp(glitchAmount, 0.0f, 1.0f);
    _glitchMat.SetFloat("_GlitchRandom", Random.Range(-1.0f, 1.0f));

    _glitchMat.SetFloat("_GlitchAmount", glitchAmount);
}
If you set your _GlitchAmount to 0.2 and run this now it looks something like this:
Which is much better, but a little bit too spastic for my liking. I ended up putting my _GlitchRandom setter inside another function that I called using Invoke, so that I could control how often I wanted my effect to update:
void Start ()
{
    _glitchShader = Shader.Find("Hidden/GlitchFX/GlitchFX_Shift");
    _glitchMat = new Material(_glitchShader);
    _glitchMat.SetTexture("_GlitchMap", blockTexture);

    Invoke("UpdateRandom", 0.25f);
}

void UpdateRandom()
{
    _glitchMat.SetFloat("_GlitchRandom", Random.Range(-1.0f, 1.0f));
    Invoke("UpdateRandom", Random.Range(0.01f, 0.15f));
}
It’s a little change, but it makes a big difference!
Adding New Sample Directions
We have two final problems to solve:
- when the effect is set to 1.0, the screen still ends up with a static looking glitch effect
- all our texture lookups are going in the same direction, since we’re using a gray value as our offset
Thankfully both are pretty easy to solve. To fix the first one, all I’m going to do is multiply the UV offset by the random value for the block. This way, even when the entire screen is glitching, when _GlitchRandom updates, every block will use different UV coordinates, making it much less uniform.
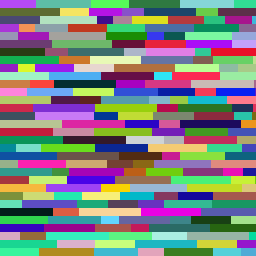
float2 uvShift = glitch.rg * gFlag * r;And secondly, we’re finally going to use that coloured noise map I showed you at the very beginning! Until now, we’ve been using the rg components of the noise texture as a cheap way to get a uv offset. Now we’re going to change to using the coloured map, and use the green and blue components for this vector:
fixed4 frag(v2f i) : SV_Target
{
    fixed3 glitch = (tex2D(_GlitchMap, i.uv)).rgb;

    float r = (rand(float2(glitch.r, _GlitchRandom)));
    float gFlag = max(0.0, ceil(_GlitchAmount-r));

    float2 uvShift = glitch.gb * gFlag;

    fixed4 col = tex2D(_MainTex, frac(i.uv + uvShift));
    return col;
}
This is better, but since the .gb channels will always have positive values, our texture lookups still only in 2 directions: positive in both axes. To fix this, we need to stretch the range of these channels so that 0.5 becomes our new 0, and values lower than 0.5 become negative. This just takes a quick multiply and subtract:
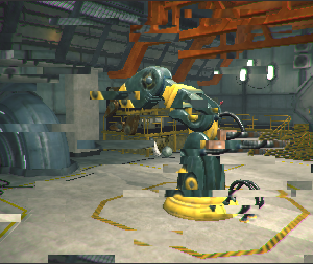
float2 uvShift = (glitch.gb * 2.0 - 1.0) * gFlag;If you run this now, you’re going to get exactly the effect that was shown at the start of the article!
Wrap Up
As usual, all of the code I talked about here is available on github, feel free to grab that and use it however you want!
Let’s end by talking about performance, and some ways you could extend this effect.
From a performance standpoint, this is a remarkably light effect. Even though we’re introducing a dependent texture read on a full resolution screen buffer, my iPhone 6 barely noticed this thing running, taking around 0.2 ms to render it. One thing to keep in mind with this effect is that the cost is the same whether you’re glitching the whole screen, or not glitching anything, so if you have this in a project, it might be worth adding some logic on the c# side to disable the effect when _GlitchAmount is set to 0.
Finally, there are LOTS of ways you can extend this effect! You could hue shift the glitched blocks, tint them colours, you could add chromatic aberration to the glitched blocks, or use a noise texture to add weird artifacts over them. The sky is really the limit here. If you want some inspiration, take a look at the page the DigiEffects Damage AfterEffects Package. Glitch effects are really fun because there’s so much you can do with them since you’re not trying to make things look “correct,” which is probably why so many people like making glitch art.
That’s it for now! As usual, if you have questions, or want to say hi, or see something I got wrong, please send me a message on Twitter! Have a good one!