Combining Pure Data and Unity
About 6 months ago, for 1GAM, Johannes and I spent a month tinkering with LibPD (the end result was Synapse). LibPD, for those of you who don’t know, is a library for working with Pure-Data, a visual programming tool for procedural audio. Out of the box, it doesn’t work nicely with Unity, but there’s a repository called libpd4unity that simplifies the process.
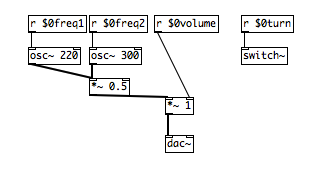
The sample pd program used in this tutorial
Libpd4unity isn’t suited to really in depth PD development in Unity (at the moment it seems to only support loading one patch at a time), but you can still do some interesting things with it. So today, I’m going to go over the process of setting up libpd4unity with Unity.
If you’re on mac, you may be a bit disappointed to see that there isn’t a mac compatible pd library in the libpd4unity class, so the first step for us is to compile a .bundle for mac. If you’re on windows, skip down to the actual programming.
Building libpdcsharp.bundle
Thankfully this is pretty straightfoward, if a bit weird:
- Download the LibPD Project from github
- In terminal, cd into the downloaded project folder and type the command make csharplib
- libcsharp.dylib should now be created inside the libs folder. Copy that to the Assets/Plugins folder in Unity
- Rename this file to libcsharp.bundle. Unity has a problem locating dylibs.
- You’re good to go!
LibPD and Unity
Note: You will need to download Libpd4Unity
Ok now that that’s out of the way, it’s time for some fun stuff. First off, copy the LibPD folder from libpd4unity/Assets, and paste it into the assets folder of your project.
Next, make an Assets/Resources folder. This is a special folder that allows you to specify resources that you want to have available to Unity at runtime. Put your patches in this folder (or a subfolder of it). If you don’t have a patch to work with, or want to follow along exactly with this demo, you can grab the simple sine patch from the repo for this post’s example project (patch courtesy of johannesg.com ).
Now that all the housekeeping is taken care of, it’s time to actually interact with a patch program from Unity. LibPd4Unity comes with an example script called LibPdFilterRead.cs that will serve as the basic outline for our class, but we’re going to tailor ours to suit our needs a bit better.
using UnityEngine;
using System.Collections;
using LibPDBinding;
using System;
using System.Runtime.InteropServices;

public class OSCControl : MonoBehaviour
{
	public string patch;
	public bool playOnAwake = false;
	public bool patchIsStereo = false;

	private int patchName;
	private bool islibpdready;
	private string path;
	private GCHandle dataHandle;
	private IntPtr dataPtr;
	private float freq = 500;
The script I’m going to build here interacts with the sample patch linked above.
Lets go through these variables:
- patch: the name of the patch file to use
- playOnAwake: what it says on the tin
- patchIsStereo: only check this if you are SURE your patch is stereo, otherwise you’ll hear garbled crap
- patchName: the integer patch name generated by LibPD
- islibpdready: does what it says on the tin
- path: this will be the patch variable with the rest of the filepath prepended to it
- dataHandle: this will eventually be used to let us have access to the audio stream from pd without worrying about the garbage collector
- dataPtr: this will hold the address of the patch we’re interacting with
- freq: the frequency we want to pass to our program
Now let’s get to some functionality
void Awake ()
{
	path = Application.dataPath + "/Resources/" + patch;
	if ( playOnAwake)loadPatch ();
}

public void loadPatch ()
{
	if(!islibpdready)
	{
		if (!patchIsStereo)	LibPD.OpenAudio (1,1, 48000);
		else LibPD.OpenAudio(2,2,48000);
	}

	patchName = LibPD.OpenPatch (path);
	LibPD.ComputeAudio (true);
	islibpdready = true;
}
Awake isn’t all that interesting, except to show off how to get the actual file path to the patch. Also note that loadPath() needs to be called before we can start working with pd.
loadPatch is the standard initialization sequence for working with libPd.
I’m going to hold off on the good stuff until the end, so we’re going to skip from the initialization process down to the cleanup process. This is a little more involved than the usual in C# because we are explicitly telling the garbage collector to not interact with the data stream, so we need to do a bit of manual memory management. This is taken directly from the example project in LibPd4Unity.
public void closePatch ()
{
	LibPD.ClosePatch (patchName);
	LibPD.Release ();
}

void OnApplicationQuit ()
{
	closePatch ();
}

public void OnDestroy()
{
	dataHandle.Free();
	dataPtr = IntPtr.Zero;
}
I don’t have a good explanation for why we don’t need to free the dataHandle on close patch, so if anyone has an idea, shoot me a message on twitter and I can update the post. Otherwise, this is boilerplate code that will need to be added to every class that you write that will handle loading a Pd program.
And now finally, the good stuff!
public void OnAudioFilterRead (float[] data, int channels)
{
	if(dataPtr == IntPtr.Zero)
	{
		dataHandle = GCHandle.Alloc(data,GCHandleType.Pinned);
		dataPtr = dataHandle.AddrOfPinnedObject();
	}

	if (LibPD.Process(32, dataPtr, dataPtr)==0) {
		LibPD.SendFloat(patchName + "freq1", freq);
		LibPD.SendFloat(patchName + "freq2", freq);

	}
}

void OnGUI()
{
	Rect r = new Rect(Screen.width/2 - 50 ,
			Screen.height/2 - 150,
			100,
			300);

	freq = GUI.VerticalSlider(r,freq,1000, 400);

	Rect r2 = new Rect(Screen.width/2-30,
			Screen.height/2 - 30,
			80,
			30);

	GUI.Box(r2, ""+freq+" hz");
}
OnAudioFilterRead is the callback method used by LibPd4Unity’s library. It will be called whenever the internal audio buffer has been filled. I’m really not sure why we’re checking that libPD.Process returns 0, although I assume that’s LibPD’s “all good” return value. Inside that block you can see how to pass messages to the currently running patch. What tripped me up for awhile was both the need to prepend the target value’s name with the int name of the loaded patch, and the need to leave off the “$0” part of the variable name, which is displayed when you open the patch in pd.
Building a Project on Mac
Everything should now work fine in the editor, but if you’re on mac, your journey is not over yet!
If you have tried to actually create a build, you will have noticed the big, ugly error message that pops up:
Error building Player: IOException: Cannot create Temp/StagingArea/UnityPlayer.app/Contents/Plugins/libpdcsharp.bundle/libpdcsharp.bundle because a file with the same name already exists.
Apparently Unity really really hates people who use libpd. Thankfully, there is a solution!
- Remove libpdcsharp.bundle from your plugins folder (but don’t delete it, we’ll need it in a second)
- Build your project as you normally would
- Locate the .app file that you just built, right click on it, and select “Show Package Contents,” and open the “Contents” folder within
- If there is no folder named “Plugins” inside Contents, create one now.
- Paste libpdcsharp.bundle into the Plugins folder
- Go back to your Unity project, and copy the .pd file from your resources folder
- Paste this file into the Resources folder located inside your .app’s Contents folder.
All of this is necessary because Unity’s build process doesn’t like the libpdcsharp bundle, and attempts to copy it multiple times (creating that ugly error), and completely ignores the patch file in Resources because it doesn’t recognize the file extension. Thankfully, all that’s needed to resolve this a mildly annoying process.
If you’ve made it this far, you should now have a unity project that can interact with Pure Data plugins, and can actually create builds! Congratulations! If you’ve hit any difficulties or need further clarification on something I’ve said here, you can download a sample project from my dropbox, or send me a message on Twitter. Hope this tutorial helped!