GBA By Example - Sprite Animation
(Note: This is Part 5 of my GBA by Example series. A list of my other GBA tutorials can be found here)
Whew, it’s been awhile! I know I said I’d put up another tutorial in 2 weeks…but that didn’t happen. Between shipping a game at work, and diving into Vulkan, my interest for GBA stuff definitely took a back seat. Lesson learned, don’t put a deadline on blog posts :)
So far, I’ve gotten by with doing the bare minimum for anything art related, but our end products have never been too exciting. So this article is going to fix that. First, we’re going to walk through the process of grabbing some (public domain) sprites off of OpenGameArt.org, importing those into our game, and then using them to animate a character as we move them around the screen.
At the end of the article, we should have something that looks like this:
Wooooo! Finally something that kinda looks like a game! Let’s get this train rolling.
Getting Our Assets
All the character sprites we’re working with today come from this asset on OpenGameArt, I chose these sprites not only because they had a sane palette and sprite size (which is hard to find, since not a lot of people are making assets with the GBA’s limitations), but also because they’re public domain, so I can use them in this article without the chance of getting sued. woohoo!
It also means you can use these sprites in your own projects (even commercial projects), which is also pretty cool.
I took the liberty of extracting only the character sprites we’re going to use today into their own spritesheet, which you can grab below:
This should save us having to do any pixel editing for this blog post, but we will have to export these sprites into a useable format for our game. To do that, we’re going to use a nifty open source tool called Grit. I mentioned this tool in a previous post, but today I’m going to walk through using it as well. If you don’t have that downloaded already, grab it now and let’s get started.
Exporting Sprite Data
Grit is a tool for taking bitmap images, and exporting them into .h/.c files (among other potential types of files), for consumption by a GBA game. We need to export each of our character sprites using it, and then manually load that data in our program like we’ve been doing before.
I’m going to use the GUI version of grit, which you can find in the program folder, titled “wingrit.” There’s a command line app as well, but I haven’t needed to use it yet (and if I can avoid memorizing more command line args, I will), so if you’re following along with me, open wingrit, and you should see the following:
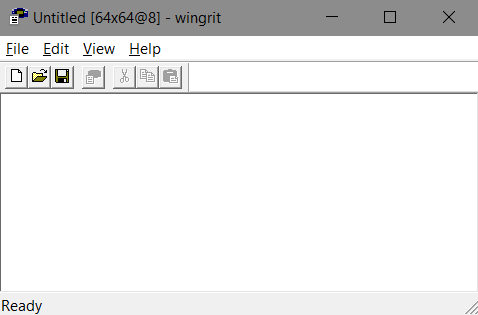
Simply open our sprite sheet image (with File->Open), and you should see it in the GUI window. Once you see the image, we need to open the export window, so go to View->GBAExport, and you should see this rather intimidating window pop up:
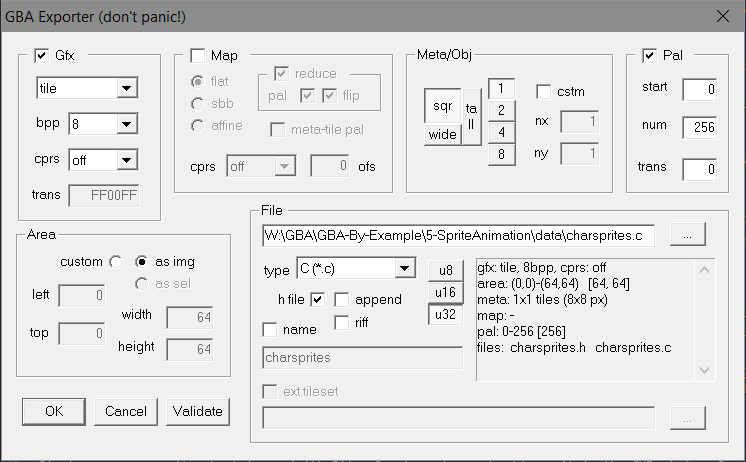
Like the window itself says, don’t panic :) there’s only a few things we need to do. First, we need to make sure that we’ve set the exported to 8 bits per pixel, you’ll find that option in the top right of the window. Next, tell it to export .h/.c files, so in the “File” section, set the type to “C (*.c),” you’ll also want to set where the exported files should go in the larget text field above the type dropdown. Finally, we need to set the size of our sprite, which, for all of our sprites here, means setting the “Meta/Obj” section to square, size 2, which corresponds to 16x16 pixel sprites.
Finally, I always export the data as unsigned integers. Whenever I use a smaller data type I end up running into weirdness with memcpy at some point. Since we aren’t going to be modifying the raw data anyway, the fact that storing all the data as 32 bit integers makes it harder for humans to read is a non issue. So set your export type to “u32”
Once all that is set up, click ok, and you should see a success popup.
One of the coolest parts about grit is its ability to export multiple sprites from a sprite sheet. Since we told Grit that our sprites were 16x16 pixels in size, it was smart enough to be able to parse the sprite sheet correctly and give us .h/.c files with the data in a nicely useable format. So don’t worry about needing to run grit for each individual sprite, it’s already done all the work for us.
Importing Sprite Data
Now that we have our sprite data exported, we need to get it into VRAM. This should look familiar if you’ve been following along with previous articles. All we need to do is a few memcpys and we’re good to go:
#include "charsprites.h"
#include <string.h>
#include "gba.h"

int main()
{
    memcpy(&MEM_TILE[4][0], charspritesTiles, charspritesTilesLen);
    memcpy(MEM_PALETTE, charspritesPal, charspritesPalLen);

}
One thing that is different this week is that I’ve moved all the memory address defines, and typedefs that we need to use to an include file called gba.h . This is mostly for my sanity, and to keep my code samples cleaner. You can grab this include file here. Everything that is in this include has been shown explicitly in a previous post I’ve made, so don’t worry about parsing through it, unless you see something in a code sample that you don’t remember.
Ok, now that we have our data into video memory, we also need to set up our application’s Display Control register so it knows how to interpret it:
REG_DISPLAYCONTROL = VIDEOMODE_0 | BACKGROUND_0 | ENABLE_OBJECTS | MAPPINGMODE_1D;This should look identical to the last time we used sprites, because it is ;) but as a refresher:
- VIDEOMODE_0 is a tiled video mode, meaning that we’re using sprites instead of drawing directly to the screen buffer
- BACKGROUND_0 enables the 0th background. I’m going to use this to colour the background of our game
- ENABLE_OBJECTS is the flag that tells our program to use sprites
- MAPPINGMODE_1D means that our sprites are stored in a 1 Dimensional array. Grit takes care of this for us.
Wonderful! To finish off our setup, let’s add our game loop. Remember that returning from a GBA program’s main function is undefined, so our game loop needs to never terminate. For now, let’s also add a call to our hacky little vsync function in the main loop. This function is defined in gba.h, but is the same as every other post I’ve made.
Put together, our starting point looks like this:
#include "charsprites.h"
#include <string.h>
#include "gba.h"
int main()
{

    memcpy(&MEM_TILE[4][0], charspritesTiles, charspritesTilesLen);
    memcpy(MEM_PALETTE, charspritesPal, charspritesPalLen);

    REG_DISPLAYCONTROL =  VIDEOMODE_0 | BACKGROUND_0 | ENABLE_OBJECTS | MAPPINGMODE_1D;

    while(1)
    {
        vsync();
    }

    return 0;
}
Perfect! No we’re ready to get down to the fun stuff!
Getting our Character On Screen
I always like to work in small, easily verifiable steps when I’m learning something new. So before we dig really far into animating our character, let’s just get our hero on screen. We covered this in an earlier post, but today I want to do things a bit differently. Since we’re animating our character today, we should probably talk about double buffering object memory.
Since the GBA hardware draws the screen 1 line at a time, it’s possible to modify the object memory for a sprite while it’s being drawn. In some cases this will just mean a bit of tearing (if the sprite is moving), but in the case of animation, it could lead to the top of the sprite being rendered in a different animation frame from the bottom part. Gross! This isn’t really an issue for us today because we aren’t doing enough work for us to leave the VBLANK pause, but it’s worth noting so that we learn to do things right before from the get go.
In order to avoid this potential problem, one thing we can do is to create a second buffer of memory, which shadows object memory. Whenever we want to update something about a sprite in our game logic, we modify the data inside our own copy of object memory. Then when we hit the VBlank pause, we copy all the data from our shadow buffer to real object memory. This lets us do whatever we want in our logic, while keeping our sprites looking exactly how they should.
We could define our object-memory shadow buffer like so:
ObjectAttributes oam_object_backbuffer[128];Remember that the definition of the ObjectAttributes struct is inside gba.h if you forget what that looks like.
Now we should also add the code to copy data from our backbuffer to the real Object Attribute Memory. For now, I’m just going to copy the first element, because that’s all we need for today. In a real application, you’d probably want to copy the whole thing, or at least larger chunks at a time.
while(1)
{
    vsync();
    MEM_OAM[0] = oam_object_backbuffer[0];
}
Now that that’s set up, let’s actually copy something useful into VRAM.
ObjectAttributes *spriteAttribs = &oam_object_backbuffer[0];
spriteAttribs->attr0 = 0x2000;
spriteAttribs->attr1 = 0x4000;
spriteAttribs->attr2 = 0;
Which means that, when everything is put together, your main function should look like this:
int main()
{

    memcpy(&MEM_TILE[4][0], charspritesTiles, charspritesTilesLen);
    memcpy(MEM_PALETTE, charspritesPal, charspritesPalLen);

    REG_DISPLAYCONTROL =  VIDEOMODE_0 | BACKGROUND_0 | ENABLE_OBJECTS | MAPPINGMODE_1D;

    ObjectAttributes *spriteAttribs = &oam_object_backbuffer[0];
    spriteAttribs->attr0 = 0x2000;
    spriteAttribs->attr1 = 0x4000;
    spriteAttribs->attr2 = 0;

    while(1)
    {
        vsync();
        MEM_OAM[0] = oam_object_backbuffer[0];
    }

    return 0;
}
With the sprite defined like we have, running the program should yield this:

Perfect! Now we know our data is in memory correctly! Next let’s get some animations going.
Hello Sprite Animation
Before we dig into making our hero run and jump, let’s just get his idle animation cycle running to be sure that things are working how we expect. In the sprite sheet that I provided earlier, the animation cycle is located in the first 4 frames. We want to have our hero cycle through these frames whenever he isn’t moving.
Setting this up a single animation like this is really simple, because all we need to do is point attr2 in our sprite attributes to a new place in tile memory. You’ll notice that right now, our sprite is simply stuck on the first frame of his idle animation. This is because we put the sprites into tile memory at the start of the tile block, so the index of the first frame is 0. It stands to reason that updating this should just be a simple add…
spriteAttribs->attr2 = (spriteAttribs->attr2 + 1) % 3;buuut it isn’t! Remember that attr2 is the index of the tile to use to render the top left most part of your sprite. Since our sprite is 2 tiles by 2 tiles, this means that in theory, to advance a whole frame, our attr2 value must increment by 4. In reality, since we are using 8bpp tiles, we have to double that, so advancing a frame of animation means advancing attr2 by 8. With that in mind, running our idle loop actually requires the following:
spriteAttribs->attr2 = (spriteAttribs->attr2 + 8) % 32;With that bit of code added to the update loop, our protagonist should now be happily bouncing in place:

Alright, with that in mind, let’s move on to actually hooking up some input and getting this guy moving around the screen.
Setting Up Input
Just like last time, all our input handling code is stored in input.h, so make sure that you add that to your includes. Once that’s included, just make sure to add a call to key_poll in your main function, otherwise we’ll never know when the input state changes. If you’re following along, your main function should look like this:
while(1)
{
    vsync();
    key_poll();

    spriteAttribs->attr2 = (spriteAttribs->attr2 + 8) % 32;

    MEM_OAM[0] = oam_object_backbuffer[0];
}
Before we get to actually writing our movement and animation functions there, there’s one last bit of theory to get out of the way: there are some new bits in the object attributes attr1 variable that we’re going to need today.
More Details About Object Attributes
When I last talked about sprites, I presented 3 tables describing which bits in the sprite attribute values corresponded to what. In the interest of simplicity, I left out a lot of details. In this post, we need to fill in one of those details, so here is a more complete description of what attribute 1 does:
| Attr 1 | 0x FEDC BA98 7654 3210 |
|---|---|
| FE | Sprite Size (discussed below) |
| D | Vertical Flip |
| C | Horizontal Flip |
| BA98 | Not Used Today |
| 7654 3210 | X coordinate |
Yes, there’s still some data we don’t need to worry about, but the stuff to pay attention to here are the bit flags for vertical and horizontal flipping. You may have noticed that our sprites only have our protagonist facing one way, the horizontal flip flag is how we’re going to handle the other direction.
Moving Our Hero
Let’s tackle moving our hero around the screen next, and finish off with adding support for the rest of our animation frames. To make things easier (and more readable), I’m going to define a struct to hold all the information we need to move and animate our hero. For simplicity’s sake, I’m just going to make all the fields we need ints.
Here’s what my struct and it’s initialization code look like:
const int FLOOR_Y = 160-16;

typedef struct
{
    ObjectAttributes* spriteAttribs;
    int facingRight;
    int firstAnimCycleFrame;
    int animFrame;
    int posX;
    int posY;
    int velX;
    int velY;
    int framesInAir;
}HeroSprite;

void InitializeHeroSprite(HeroSprite* sprite, ObjectAttributes* attribs)
{
    sprite->spriteAttribs = attribs;
    sprite->facingRight = 1;
    sprite->firstAnimCycleFrame = 0;
    sprite->animFrame = 0;
    sprite->posX = 0;
    sprite->posY = FLOOR_Y;
    sprite->velX = 0;
    sprite->velY = 0;
    sprite->framesInAir = 0;
}
Nothing too fancy here. Notice though, that I also defined a constant for the location of the “floor” which is actually 16 pixels above the floor. This is because our hero is 16 pixels tall and when you set a sprite’s position, you set it’s top left corner; thus, I’ve defined the floor Y as the location of the top of our hero’s head when he’s on the floor for simplicity.
To handle character movement, I’m going to create another function called updateSpritePosition.
void updateSpritePosition(HeroSprite* sprite);This function is going to first determine our hero’s velocity for the current frame, and then add those velocities to his position. It will also set up a few other bits of data that we’ll use later when determining what animation frame to display, and actually translate these struct member vars into actual values inside object attribute memory. To start with though, let’s just start dealing with user input from the DPAD:
const int WALK_SPEED = 4;

void updateSpritePosition(HeroSprite* sprite)
{
    if (getKeyState(KEY_LEFT))
    {
        sprite->facingRight = 0;
        sprite->velX = -ANIM_SPEED;
    }
    else if (getKeyState(KEY_RIGHT))
    {
        sprite->facingRight = 1;
        sprite->velX = ANIM_SPEED;
    }
    else sprite->velX = 0;

    sprite->posX += sprite->velX;
    sprite->posX = min(240-16, sprite->posX);
    sprite->posX = max(0, sprite->posX);
This should all be pretty straightforward. The only bit you may be wondering about is the facingRight flag. We’re going to use this later to handle horizontally flipping our sprites so that we can use one set of sprites but have our hero be able to look and move both left and right. Also note that I’m clamping the x position to keep our sprite on the screen at all times.
Next, we need to add support for jumping. Note that if we’re already in the air, we don’t want to jump again, so we’re going to have to take that into account:
void updateSpritePosition(HeroSprite* sprite)
{
    //previous code omitted for brevity

    int isMidAir = sprite->posY != FLOOR_Y;

    if (getKeyState(KEY_A))
    {
        if (!isMidAir)
        {
            sprite->velY = JUMP_VI;
            sprite->framesInAir = 0;
        }
    }

    if (isMidAir)
    {
        sprite->velY = JUMP_VI + (GRAVITY * sprite->framesInAir);
        sprite->velY = min(5, sprite->velY);
        sprite->framesInAir++;
    }

    sprite->posY += sprite->velY;
    sprite->posY = min(sprite->posY, FLOOR_Y);
}
Hopefully nothing here is surprising. If you haven’t implemented gravity before, you may want to check out this excellent article on Khan Academy about Kinematic equations. Since they’re not the focus of today, that’s all I’m going to say about them here. I’m using the framesInAir variable in place of an actual time calculation for now, which is why it reset whenever a new jump starts.
None of this code actually moves our sprite, so we need to finish off this function by setting a few key variables:
sprite->spriteAttribs->attr0 = 0x2000 + sprite->posY;
sprite->spriteAttribs->attr1 = (sprite->facingRight? 0x4000 : 0x5000) + sprite->posX;
As you can see, because the lowest bits in these flags store positions, it’s enough for us to just add our x and y position to the end of them. You can also see how the facingRight flag corresponds to the value we set in the horizontal flip bit that we talked about earlier.
Now we need to add a call to this function to main:
int main()
{

    memcpy(&MEM_TILE[4][0], charspritesTiles, charspritesTilesLen);
    memcpy(MEM_PALETTE, charspritesPal, charspritesPalLen);

    REG_DISPLAYCONTROL =  VIDEOMODE_0 | BACKGROUND_0 | ENABLE_OBJECTS | MAPPINGMODE_1D;

    HeroSprite sprite;
    InitializeHeroSprite(&sprite, &oam_object_backbuffer[0]);

    while(1)
    {
        vsync();
        key_poll();

        updateSpritePosition(&sprite);
        MEM_OAM[0] = oam_object_backbuffer[0];
    }
    return 0;
}
And with that, you should be able to move your sprite around using the dpad and A button to jump. He just won’t be animating yet:

Our Animation function
As the heading suggests, we’re going to be writing one more function today, which is going to implement our animation:
void tickSpriteAnimation(HeroSprite* sprite);We’re going to be choosing the tile to point our attr2 variable at by setting two separate values, the firstAnimCycleFrame and animFrame values in our HeroSprite struct:
- firstAnimCycleFrame will hold the index to the first frame in that animation cycle. Our idle animation cycle is 4 frames long and starts at index 0, so for the idle animation cycle, this will be set to 0
- animFrame will hold the current frame of animation we are at in our animation cycle. If we want the third frame of an animation, this would be set to two (since frames are zero indexed)
Knowing that, it’s probably useful for us to take another look at our sprite sheet, and figure out where our walk, run, and jump cycles start in the seet. I’ve oultined them below:
So that puts our idle cycle starting at index 0, our run cycle at index 4, and our jump cycle at index 7. Given that we use 4 tiles per sprite, and have 8bpp tiles, this means that the real indices we need are:
- Idle starts at 0
- Run starts at 32
- Jump starts at 56
Let’s start off by just writing the first and last line of our function:
void tickSpriteAnimation(HeroSprite* sprite)
{
    ObjectAttributes* spriteAttribs = sprite->spriteAttribs;

    //set firstAnimCycleFrame and animFrame in code here

    spriteAttribs->attr2 = sprite->firstAnimCycleFrame + (sprite->animFrame * 8);
}
This is just to give you an idea of how this function works. Note that if you were using 8bpp sprites, you would only need to multiply animFrame by 4.
Alright, here’s our first, and easiest case: jumping. We only have 2 sprites for jumping, one when we’re on the way up, and one when we’re on the way down.
int isMidAir = sprite->posY != FLOOR_Y;

//update velocity for gravity
if (isMidAir)
{
    sprite->firstAnimCycleFrame = 56;
    sprite->animFrame = sprite->velY > 0 ? 1 : 0;
}
If we aren’t in the air, the only other two options are that we’re standing still, or that we’re walking around:
else
{
    if (sprite->velX != 0)
    {
        sprite->firstAnimCycleFrame = 32;
        sprite->animFrame = (++sprite->animFrame) % 3;

    }
    else
    {
        sprite->firstAnimCycleFrame = 0;
        sprite->animFrame = (++sprite->animFrame) % 4;
    }
}
Obviously none of this code is very re-useable; we are hardcoding both the length of the anim cycles, and their start points in sprite sheets, but it works for our example.
With the above two chunk of code added to our animation function, all that’s left is to call the animation function from main:
while(1)
{
    vsync();
    key_poll();

    updateSpritePosition(&sprite);
    tickSpriteAnimation(&sprite);
    MEM_OAM[0] = oam_object_backbuffer[0];
}
And you should (finally) be in possession of your very on animated character!
Wrapping Up
If you got stuck at any part of this, the code for the finished product can be found on github.
Finally, as always, I’m available on Twitter to answer questions, say hi, etc. I’d love to hear if you’re building something for the GBA after reading these posts :)
Have a good one!