Setting Up OpenMP on Mavericks
If you’ve ever worked with me (or talked with me for more than a half hour) it’s not a secret that I’m completely fascinated with ray and path tracers. My last project was building a relatively simple ray tracer, so I think it’s time to build a path tracer.

The Blender monkey rendered in my first ray tracer
I’ve tinkered with a few open source path tracers out there, but the one that caught my eye originally was SmallPT, which uses OpenMP. OpenMP is an API built by Intel that makes it dead simple to write parallel code. Want to have a for loop distribute itself over multiple cores? That looks like this:
#pragma omp parallel for
for (int i = 0; i < 100; i++)
{
	printf("Loop executed on thread %d",  omp_get_thread_num());
}
After working with Boost’s Thread library on the ray tracer, which ended up dictating a lot of the structure of the renderer, OpenMP seems like a great way to let the compiler/runtime handle the implementation of the threading code and let me focus on actually building something cool.
So with that in mind, today’s article is all about how to set up OpenMP on Mavericks and get it working with a Makefile in Xcode 5; it’s a heck of a lot more involved than I originally anticipated. I suppose one caveat of this post is that most of the information here is taken from other places (which I’ve linked to), I’m just collecting it all in one place for the next person who wants to do this.
Extreme Yak Shaving
The first step to getting OpenMP up and running on Mavericks is to install a new compiler. No joke. The version of Clang installed on your system doesn’t support OpenMP, and Apple very quietly replaced gcc with a symlink to Clang with XCode 5, so we’re starting this process up a bit of a creek.
There are 2 commonly recommended options at this point. Probably the most logical solution is to simply install GCC 4.9 using Homebrew or Macports (or build it yourself if that turns your crank), but the Homebrew recipe for GCC 4.9 was broken at the time of writing this, and while I was looking for how to grab it from MacPorts I came across OpenMP®/Clang.
OpenMP®/Clang, unsurprisingly, is a modified version of Clang which supports OpenMP. Given that I’m already used to using Clang this seemed like a great idea, especially since the website is active, and indicates that the plan is to eventually contribute to the Clang trunk. May as well jump on the bandwagon early.
Installing OpenMP®/Clang
This part is tricky, but luckily StackOverflow has our back. If you check out this post you can find a script that user Jason Parham wrote for automating the process of installing / configuring the tools we need (namely OpenMP®/Clang, and the OpenMP® runtime itself). I modified the paths that everything got built to, but otherwise the steps I took mimic that script almost exactly.
One thing to pay attention to is that the script above will bind the new version of clang to the commands “clang2” and “clang2++,” which is great because it means we don’t have to screw with the moderately important command currently bound to “clang.”
Aside from that though, that script should take care of a lot of the heavy lifting needed to get us going.
Clang2 and XCode
If you’re happy just using Makefiles by themselves you can actually just stop here and use them to build you projects (remembering to use the -fopenmp flag), but I still wanted to use XCode as a front end for the llvm debugger so my odyssey continued for a bit. If that sounds like something you want too, the rest of this article will outline how to get that working.
Setting up a makefile based project in XCode is (relatively) straightforward:
- Create a new project like normal, choosing whatever template makes sense.
-
Go to your project settings and delete the pre-generated target(s) for your application
- Create a new target of type “External Build System”
- Create a makefile for your project and put it somewhere in your project directory
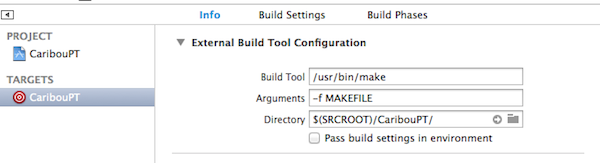
- In your Build Tool Configuration page, set the directory to wherever you’ve chosen to store your makefile, and set the arguments to “-f NAME_OF_YOUR_MAKEFILE”
If you’ve followed those steps, your Build Tool Configuration page should look something like the following:
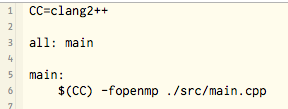
Great. Next up is to actually write the makefile. For the most part this is the same as any other makefile, except that you need to specify “clang2” as the compiler, and include the -fopenmp flag when you compile files that include OpenMP. A really simple makefile that does this might look like the following:
We’re almost there, but XCode isn’t through with us yet. If you try to build now, you’ll notice that it fails spectacularly and spits out a cryptic error that boils down to not knowing what the heck “clang2” is. This is because for some reason XCode doesn’t read the PATH variables that we set up in that script ealier, so we need to tell it where to find our compiler.
I’m sure theres a better way of doing this, but after a couple of hours of banging my head against a wall, I’ve resigned to launching XCode from the command line like so:
$ source ~/.profile
$ open -a "Xcode"
This will open XCode with the path variables we need set up properly. If you like Spotlight as much as I do, I recommend wrapping these in an Automator application so you can run these commands from there.
If you build from the XCode that was opened from the command line, you should finally we able to run your program. If you’re looking for a good test, I recommend the example found on clang-opm.github.io. If OpenMP is running correctly, you should be able to see the printf statement get executed from multiple threads when that file is run.
Normally this is where I tell you to contact me with any questions, but I fear that I’m as in the dark about this as you are right now, although hopefully that changes over the next few weeks. In any case, you can get a hold of me on twitter if you want to say hi. Happy Coding!