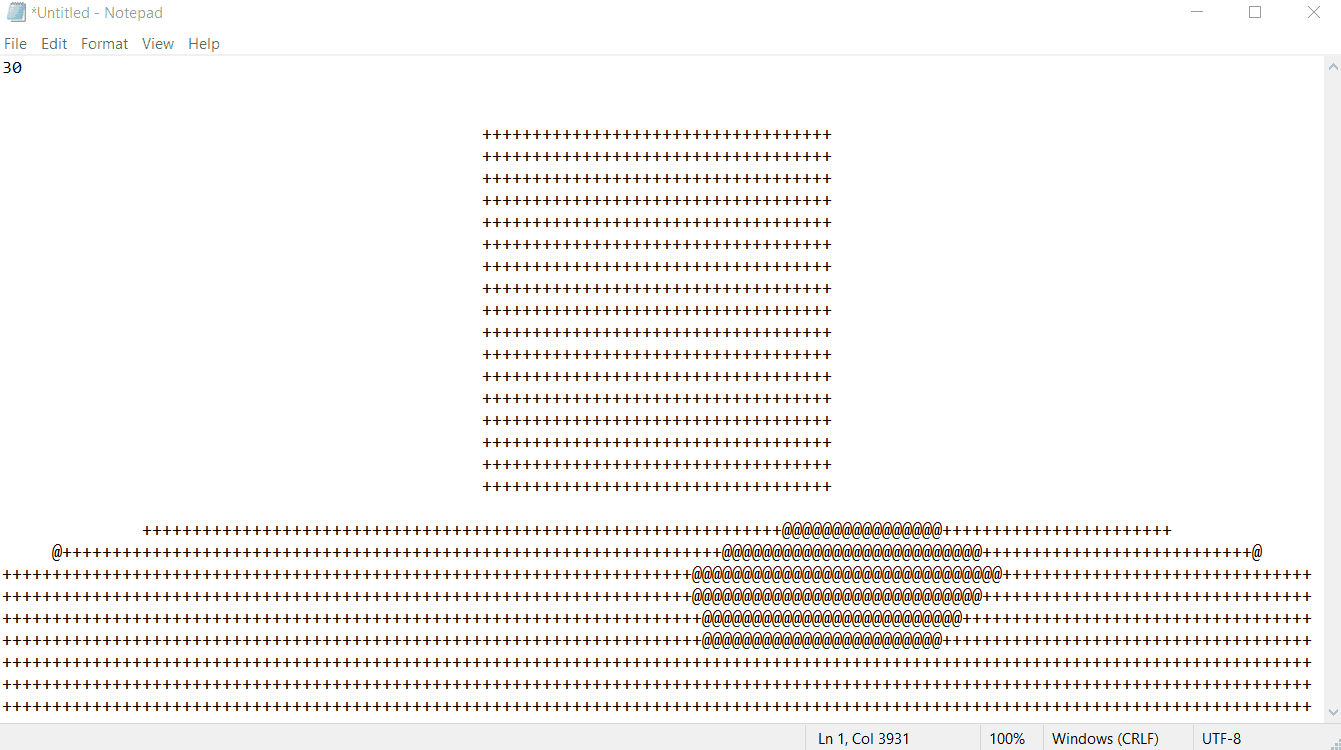
Ray Tracing In Notepad.exe At 30 FPS
A few months back, there was a post on Reddit (link), which described a game that used an open source clone of Notepad to handle all its input and rendering. While reading about it, I had the thought that it would be really cool to see something similar that worked with stock Windows Notepad. Then I spent way too much of my free time doing exactly that.
I ended up making a Snake game and a small ray tracer that use stock Notepad for all input and rendering tasks, and got to learn about DLL Injection, API Hooking and Memory Scanning along the way. It seemed like writing up the stuff I learned might make for an interesting read, and give me a chance to show off the dumb stuff I built at the same time, so that’s what these next couple blog posts will be about.
Due to length, I’ve split the writeup into two blog posts. This first post will talk about how Memory Scanners work, and how I used one to turn notepad.exe into a 30+ fps capable render target. I’ll also talk about the ray tracer that I built that rendered into Notepad.
The second post will talk about using windows hooks to capture input and share the Snake game I built that uses pretty much all the stuff described in both of these posts.
 This post will cover how I made Notepad do this
If you just want to see the code, the whole project (including both the ray tracer and snake game) is up on github.
Sending Key Events To Notepad
The obvious place to kick all of this off is it to talk about sending key events to a running instance of Notepad. This was the boring part of the project so I’ll be brief.
If you’ve never built an app out of Win32 controls (like I hadn’t), you might be surprised to learn that every UI element, from a menu bar to a button is technically it’s own “window,” and sending key input to a program involves sending that input to the UI element you want to receive it. Luckily Visual Studio comes with a tool called Spy++ that can list all the windows that make up a given application.
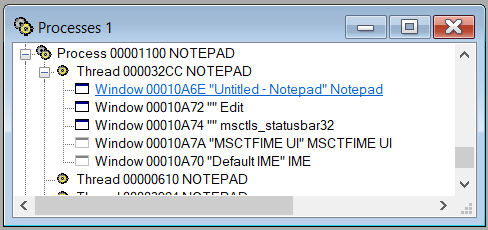 The windows listed for Notepad in Spy++
Spy++ revealed that the Notepad child window I was after was the “Edit” window. Once I knew that, it was just a matter of figuring out the right mix of Win32 function calls to get an HWND for that UI element, and then sending key inputs there. Getting that HWND looked something like this:
HWND GetWindowForProcessAndClassName(DWORD pid, const char* className)
{
  HWND curWnd = GetTopWindow(0); //0 arg means to get the window at the top of the Z order
  char classNameBuf[256];

  while (curWnd != NULL){
    DWORD curPid;
    DWORD dwThreadId = GetWindowThreadProcessId(curWnd, &curPid);

    if (curPid == pid){
      GetClassName(curWnd, classNameBuf, 256);
      if (strcmp(className, classNameBuf) == 0) return curWnd;

      HWND childWindow = FindWindowEx(curWnd, NULL, className, NULL);
      if (childWindow != NULL) return childWindow;
    }
    curWnd = GetNextWindow(curWnd, GW_HWNDNEXT);
  }
  return NULL;
}
Once I had the HWND for the right control, drawing a character in Notepad’s edit control was just a matter of using PostMessage to send a WM_CHAR event to it.
Note that if you want to use Spy++ yourself, you probably want to use the 64 bit version of it, which is inexplicably not the verion that Visual Studio 2019 launches by default. Instead you’ll need to search your Visual Studio Program files for “spyxx_amd64.exe.”
It took about 10 seconds after getting this working to realize that even if I could find a non-janky way to use window messages to draw full game screens into Notepad, it would be way too slow to even come close to approaching a 30hz refresh cycle. It was also really boring, so I didn’t spend too long looking for ways to make it go any faster.
CheatEngine For Good Guys
While getting the fake key input set up, I was reminded of CheatEngine. It’s a program that let’s users find and modify memory in processes running on their machines. Most of the time it’s used by people trying to cheat at games or do other stuff that makes game devs sad, but it turns out if can also be a force for good.
Memory Scanners like CheatEngine work by finding all the memory addresses in a target process which contain a specific value. Let’s say you’re playing a game and you want to give yourself more health, you could follow a process that look like this:
- Use a memory scanner to find all addresses in the game’s memory that store the value of your health (let’s say 100).
- Do something in game to modify your health to a new value (like 92).
- Search all the addresses you found previously (that stored 100) to find ones that now store 92.
- Repeat this process until you have a single memory address (which most likely is where your health is stored)
- Modify the value at that address
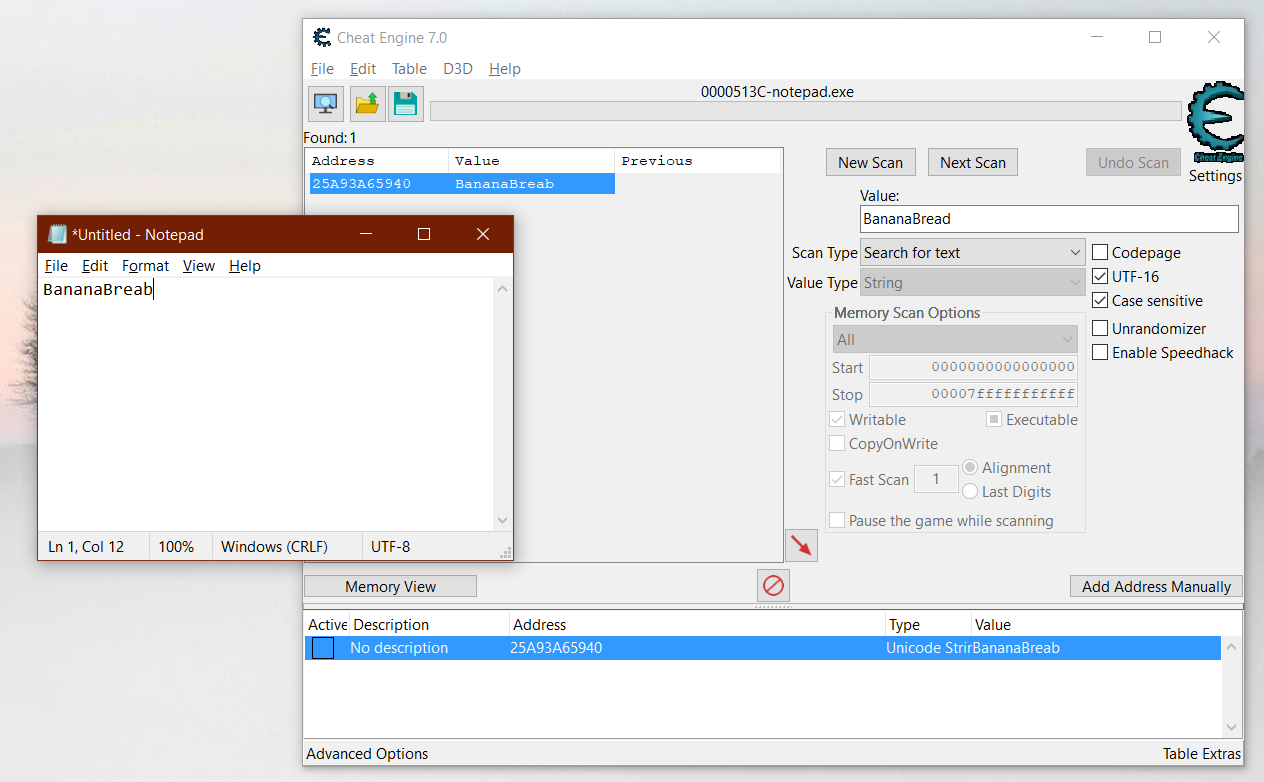 CheatEngine and Notepad, friends at last
This is pretty much what I did, except instead of a health value, I searched for memory that stored the string of text currently displayed in Notepad. After some trial and error, I was able to use CheatEngine to find (and change) the text being displayed. I also learned three important bits of info about Notepad:
- Notepad’s edit window stores on screen text in UTF-16, even if the bottom right part of the window says your file is UTF-8
- If I kept deleting and retyping the same string, CheatEngine would start finding multiple copies of this data in memory (possibly the undo buffer?)
- I couldn’t replace the displayed text with a longer string, meaning that Notepad wasn’t preallocating a text buffer up front
Building A Memory Scanner
Despite not being able to modify the length of the text buffer, this seemed promising enough that I decided to write my own small memory scanner to embed in my project.
I couldn’t find a lot of information about building memory scanners, but I did find a great blog post by Chris Wellons that talks about (and links to) a memory scanner that he wrote for his own cheat tool. Using that blog post and the bit of experience I had with CheatEngine, I was able to piece together that the basic algorithm for a memory scanner looks something like this:
FOR EACH block of memory allocated by our target process
    IF that block is committed and read/write enabled
        Scan the contents of that block for our byte pattern
        IF WE FIND IT
            return that address
My whole memory scanner implementation only ended up being ~40 lines of code, so I’m just going to walk through all of it.
Iterating Over A Process’ Memory
The first thing a memory scanner needs to be able to do is iterate over a process’ allocated memory.
Since the range of virtual memory for every 64 bit process on windows is the same (0x00000000000 through 0x7FFFFFFFFFFF), I started by making a pointer to address 0 and used VirtualQueryEx to get information about that virtual address for my target program.
VirtualQueryEx groups continguous pages that have identical memory attributes into MEMORY_BASIC_INFORMATION structs, so it’s likely that the struct returned by VirtualQueryEx for a given address contains information about more than 1 page. The returned MEMORY_BASIC_INFORMATION stores this shared set of memory attributes, along with the address of the start of its span of pages, and size of the whole span.
Once I had the first MEMORY_BASIC_INFORMATION struct, iterating through memory was just a matter of adding the current struct’s BaseAddress and RegionSize members together, and feeding the new address to VirtualQueryEx to get the next set of contiguous pages.
char* FindBytePatternInProcessMemory(HANDLE process, const char* pattern, size_t patternLen)
{
  char* basePtr = (char*)0x0;

  MEMORY_BASIC_INFORMATION memInfo;

  while (VirtualQueryEx(process, (void*)basePtr, &memInfo, sizeof(MEMORY_BASIC_INFORMATION)))
  {
    const DWORD mem_commit = 0x1000;
    const DWORD page_readwrite = 0x04;
    if (memInfo.State == mem_commit && memInfo.Protect == page_readwrite)
    {
      // search this memory for our pattern
    }

    basePtr = (char*)memInfo.BaseAddress + memInfo.RegionSize;
  }
}
The above code above skips ahead a bit and also determines if a set of pages has been committed and is read/write enabled, by examining the .State and .Protect struct members. You can find all the possible values for these vars in the documentation for MEMORY_BASIC_INFORMATION, but the values that my scanner cared about were a state of 0x1000 (MEM_COMMIT) and a protection level of 0x04 (PAGE_READWRITE).
Searching A Process’ Memory For a Byte Pattern
It’s not possible to read data in a different process’ address space directly (or at least, I didn’t stumble on how to do it). Instead, I first needed to copy the contents of a page range to the memory scanner’s address space. I did this with ReadProcessMemory.
Once the memory was copied to a locally visible buffer, searching it for a byte pattern was easy enough. To make things simpler, I ignored the possibility that there could be multiple copies of the target byte pattern in memory in my first scanner implementation. I ended up coming up with a hacky workaronud for this problem later on that saved me from ever having to actually address it in my scanner logic.
char* FindPattern(char* src, size_t srcLen, const char* pattern, size_t patternLen)
{
  char* cur = src;
  size_t curPos = 0;

  while (curPos < srcLen){
    if (memcmp(cur, pattern, patternLen) == 0){
      return cur;
    }

    curPos++;
    cur = &src[curPos];
  }
  return nullptr;
}
If FindPattern() returned a match pointer, it’s address needed to be converted to the address of the same bit of memory in the target process’ address space. To do that, I subtracted the starting address of the local buffer from the address that was returned from FindPattern to get an offset, and then added that to the base address of the memory chunk in the target process. You can see this below.
char* FindBytePatternInProcessMemory(HANDLE process, const char* pattern, size_t patternLen)
{
  MEMORY_BASIC_INFORMATION memInfo;
  char* basePtr = (char*)0x0;

  while (VirtualQueryEx(process, (void*)basePtr, &memInfo, sizeof(MEMORY_BASIC_INFORMATION))){
    const DWORD mem_commit = 0x1000;
    const DWORD page_readwrite = 0x04;
    if (memInfo.State == mem_commit && memInfo.Protect == page_readwrite){
      char* remoteMemRegionPtr = (char*)memInfo.BaseAddress;
      char* localCopyContents = (char*)malloc(memInfo.RegionSize);

      SIZE_T bytesRead = 0;
      if (ReadProcessMemory(process, memInfo.BaseAddress, localCopyContents, memInfo.RegionSize, &bytesRead)){
        char* match = FindPattern(localCopyContents, memInfo.RegionSize, pattern, patternLen);

        if (match){
          uint64_t diff = (uint64_t)match - (uint64_t)(localCopyContents);
          char* processPtr = remoteMemRegionPtr + diff;
          return processPtr;
        }
      }
      free(localCopyContents);
    }
    basePtr = (char*)memInfo.BaseAddress + memInfo.RegionSize;
  }
}
If you want to see a working example of this, check out the “MemoryScanner” project in the github repo that accompanies this blog post. Try it on Notepad! (it hasn’t been tried on anything else, so ymmv).
Using UTF-16 Byte Patterns
Remember from earlier that Notepad stores its on screen text buffer as UTF-16 data, so the byte pattern that gets fed to FindBytePatternInMemory() also has to be UTF-16. For simple strings, this just involves adding a zero byte after every character. The MemoryScanner project in github does this for you:
//convert input string to UTF16 (hackily)
const size_t patternLen = strlen(argv[2]);
char* pattern = new char[patternLen*2];
for (int i = 0; i < patternLen; ++i){
  pattern[i*2] = argv[2][i];
  pattern[i*2 + 1] = 0x0;
}
Updating and Redrawing Notepad’s Edit Control
Once I had the address of the displayed text buffer in Notepad, the next step was to use WriteProcessMemory to modify it. Writing code for that was trivial, but I quickly learned that just writing to the text buffer wasn’t enough to make Notepad redraw it’s Edit control.
Luckily the Win32 api had my back on this, and provides the InvalidateRect function to force a control to redraw itself.
All together, modifying the displayed text in Notepad something looked like this:
void UpdateText(HINSTANCE process, HWND editWindow, char* notepadTextBuffer, char* replacementTextBuffer, int len)
{
  size_t written = 0;
  WriteProcessMemory(process, notepadTextBuffer, replacementTextBuffer, len, &written);

  RECT r;
  GetClientRect(editWindow, &r);
  InvalidateRect(editWindow, &r, false);
}
From Memory Scanner to Renderer
The gap between a working memory scanner and a full fledged notepad renderer is surprisingly small. There were only three issues that needed to be sorted out to go from what I’ve described so far to the ray tracer teased at the beginning of this post.
These issues were:
- I needed to control the size of the Notepad window
- I still couldn’t expand the size of the on screen text buffer
- My memory scanner didn’t handle duplicate byte patterns.
The first issue wasn’t much of a problem on it’s own. It was trivial to add a call to MoveWindow, but I included it in the list because this was an important part of how I approached the next issue on the list.
I ended up hard coding the size I wanted my Notepad window to be, and then counted how many characters (of a monospace font) it would take to exactly fill a window of that size. Then after calling MoveWindow, I pre-allocated the on screen text buffer by sending that many WM_CHAR messages to Notepad. This felt like cheating, but the good kind of cheating.
To make sure that I always had a unique byte pattern to search for, I just randomized which chars I sent in the WM_CHAR messages.
I’ve included what this might look like in code. The actual code in the github repo is formatted a little bit differently, but works the same way.
void PreallocateTextBuffer(DWORD processId)
{
  HWND editWindow = GetWindowForProcessAndClassName(processId, "Edit");

  // it takes 131 * 30 chars to fill a 1365x768 window with Consolas (size 11) chars
  MoveWindow(instance.topWindow, 100, 100, 1365, 768, true);

  size_t charCount = 131 * 30;
  size_t utf16BufferSize = charCount * 2;

  char* frameBuffer = (char*)malloc(utf16BufferSize);
  for (int i = 0; i < charCount; i++){
    char v = 0x41 + (rand() % 26);
    PostMessage(editWindow, WM_CHAR, v, 0);
    frameBuffer[i * 2] = v;
    frameBuffer[i * 2 + 1] = 0x00;
  }

  Sleep(5000); //wait for input messages to finish processing...it's slow.
  //Now use the frameBuffer as the unique byte pattern to search for
}
What this meant for the end product is that immediately after starting, I had to watch my Notepad window slowly fill up with random characters, before I could acquire the text buffer pointer and clear the screen.
All of the above relies on using a known font face and font size in order to work right. I was going to add some code to force notepad to use the fonts I wanted (Consolas, 11pt), but for some reason sending WM_SETFONT messages kept messing up how fonts were displaying, and I didn’t feel like figuring out what was going wrong there. Consolas 11pt was the default Notepad font on my system, which was good enough for me.
Ray Tracing In Notepad
Explaining how to build a ray tracer is well beyond the scope of what I want to talk about in this post. If you’re unfamiliar with ray tracing in general, head over to ScratchAPixel and learn you some ray tracing for great good. What I want to finish off this post with is a quick discussion of the nuts and bolts of hooking a ray tracer up to all the stuff I just talked about.
It probably makes sense to start off with the frame buffers. In order to minimze the amount of WriteProcessMemory calls (both for sanity and performance), I allocated a ray-tracer-local buffer that was the same size as Notepad’s text buffer (number of characters * 2 (because UTF16)). All the rendering calculations would write to this local buffer until the end of the frame, when I used a single WriteProcessMemory call to replace the entire contents of Notepad’s buffer at once. This led to a really simple set of functions for drawing:
void drawChar(int x, int y, char c); //local buffer
void clearScreen(); // local buffer
void swapBuffersAndRedraw(); // pushes changes and refreshes screen.
On the ray tracing side, given the low resolution of my render target (131 x 30), I had to keep things very simple, since there just wasn’t enough “pixels” to display fine detail nicely. I ended up only tracing a single primary ray, and a shadow ray for each pixel being rendered to, and I thought about ditching the shadows until I found a nice grayscale float to ascii color ramp on Paul Bourke’s website. Having such a low complexity scene and small render surface also meant that I didn’t end up needing to parallelize the rendering at all.
I also ran into some issues getting things to look right due to characters being taller than they are wide. In the end, I “fixed” this by halving the width value I used in my aspect ratio calculations.
float aspect = (0.5f * SCREEN_CHARS_WIDE) / float(SCREEN_CHARS_TALL);The one remaining problem that I haven’t found a workable solution for is that updating the contents of the Notepad’s edit control so frequently causes a very noticeable flicker. I tried a bunch of different things to get rid of this, including trying to double buffer the edit control by allocating twice the number of characters and using WM_VSCROLL messages to “swap” the buffer by adjusting the scroll bar position. Unfortunately nothing I tried worked, and the flicker remains.
Part 2: Input Boogaloo is Available Now!
The next (and final) part of my quest to make a real-time game in Notepad was to figure out how to handle user input. If you’ve gotten this far and are thirsty for more, the next post is available here!