A Spline Based Object Placement Tool
I’m convinced that one of the secrets to levelling up your Unity skills is to become very comfortable writing custom editor tools. Every project I’ve worked on in the past year has been made significantly better by building tools to automate repetitive or time consuming tasks.
For example, imagine you are working on a project which requires placing gems at even distances (like coins in Temple Run, or rings in Sonic). Placing all of these by hand isn’t a good use of anyone’s time, and making changes to these layouts sucks because moving a gem in the middle of a row means that everything after it needs to be adjusted as well.
A tool that automatically places objects at even spaces along a spline would not only allow you to get the objects placed faster, but make it way easier to make changes later. This post is going to show you the basics of how to put a tool like this together.
(there’s a unitypackage download at the end of this post if you just want the code).
The General Idea
The tool we’re building is fairly simple, but there are a few different parts we need to set up. We’ll cover these in order:
- A way to make a spline
- A way to manipulate (and see) our spline
- A way to place objects on the spline, and manage these objects
Making a Spline
I could probably write a few blog posts just covering different spline creation algorithms, but thankfully the Unity wiki has us covered here. Head over there and grab the Interpolate.cs script. This will handle all the complicated parts of creating our spline for us. All that’s left for us is to define the inputs.
If you look at Interpolate.cs, you’ll find the method that we’ll be using to generate our splines:
IEnumerable<Vector3> NewCatmullRom(Transform[] nodes, int slices, bool loop) So the inputs we need are an array of node positions (the initial control points that will define the shape of our spline), the number of slices (points placed between these initial nodes), whether or not we want our spline to loop and finally the GameObject we want to duplicate along the path.
However, none of the logic regarding what these inputs are should be put into Interpolate.cs, which means it’s time for us to start writing our custom tool class.
Seeing and Manipulating the Spline
So as mentioned, the first thing our tool will need to do is provide inputs to the Interpolate class. So let’s set that up:
public class SplinePlacer : MonoBehaviour
{
	public Transform[] initialNodes;
	public int curveResolution;
	public bool loop;
	public GameObject objectToPlace;
}
You can go ahead and set these up in the inspector if you want, although you won’t see anything yet. so perhaps we should also set up the gizmos to visualize the spline. Gizmos (for those who are unfamiliar with them) are objects which are drawn in the scene view but do not appear in your actual game. We’re going to be using the Gizmo api to draw our spline.
To write a custom gizmo for a component, you need to override the OnDrawGizmos method. Let’s start by drawing a sphere at every initial node point, so that we don’t need the Transform objects we’re supplying to have a mesh renderer attached to them. The code below allocates an array of Vector3[]s that isn’t really being used in this example, but we will be using this array later, so I’ve included it now to avoid needing to change code as we go.
void OnDrawGizmos()
{
Vector3[] initialPoints = new Vector3[initialNodes.Length];
for (int i = 0; i < initialNodes.Length; i++)
{
initialPoints[i] = initialNodes[i].position;
Gizmos.DrawWireSphere(initialPoints[i], 0.1f);
}
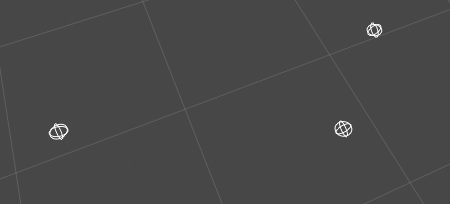
}If you switch back to the editor, and add a few empty GameObjects to the list of initialNodes, you should now have shiny wireframe spheres in the scene view to help you see what’s going on.
Great! Now let’s get on with the business of actually seeing our spline.
To do this, we need to create a spline on every call of the OnDrawGizmos method, and draw a line segment between each node on the newly created spline (we create a new spline on every call so that we can see the updates to the spline as we move the nodes in the scene view).
void OnDrawGizmos()
{
if (initialNodes == null) return;
if (initialNodes.Length < 2) return;
Vector3[] initialPoints = new Vector3[initialNodes.Length];
for (int i = 0; i < initialNodes.Length; i++)
{
initialPoints[i] = initialNodes[i].position;
Gizmos.DrawWireSphere(initialPoints[i], 0.15f);
}
IEnumerable<Vector3> spline = Interpolate.NewCatmullRom(initialNodes,
curveResolution,
loop);
IEnumerator iterator = spline.GetEnumerator();
iterator.MoveNext();
var lastPoint = initialPoints[0];
while (iterator.MoveNext())
{
Gizmos.DrawLine(lastPoint, (Vector3)iterator.Current);
lastPoint = (Vector3)iterator.Current;
//prevent an infinite loop if we want our spline to loop
if (lastPoint == initialPoints[0]) break;
}
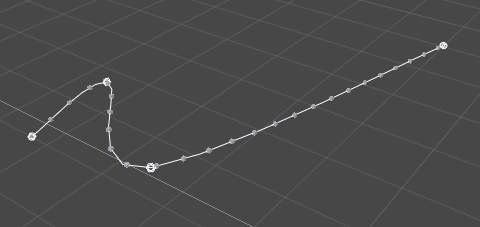
}If you compile this, and throw a few control points into the inspector panel, you should be able to drag them around see something like this:
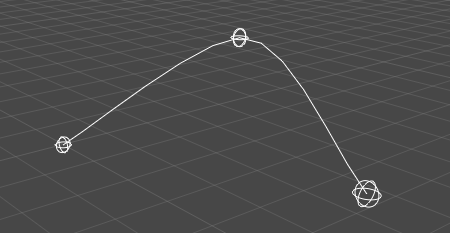
Although this looks cool, it really isn’t useful yet, which brings us to part 3:
Placing Objects on the Spline
The most common use case I’ve found for this type of tool is placing objects along the spline while setting up the scene (ie/ before runtime), so that’s what we’ll cover here.
I’ve found the most intuitive way to handle this is to write a custom inspector for the SplinePlacer class that draws a button that triggers the placement action. So lets do that now:
using UnityEngine;
using UnityEditor;
using System.Collections;
[CustomEditor(typeof(SplinePlacer))]
public class SplinePlacerEditor : Editor
{
public override void OnInspectorGUI()
{
DrawDefaultInspector();
if (GUILayout.Button("Place Objects"))
{
SplinePlacer placer = (SplinePlacer)target;
placer.PlaceObjects();
}
}
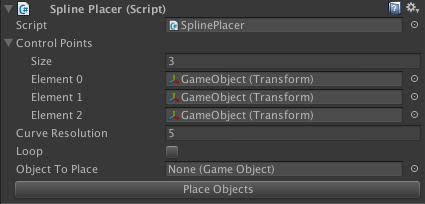
}This code won’t compile yet, because we haven’t defined the PlaceObjects method in SplinePlacer, so go ahead and add an empty method with that name now. Once you’ve done that, throw this new inspector class into your Editor folder and let it compile. If you click back to your spline placer object it should look something like this:
Now all that’s left is to actually have PlaceObjects do something and we’re good to go. This gets a bit a hairy, especially because I’m duplicating a lot of code so that I can present a self contained method for this tutorial, but the algorithm is as follows:
- Place an object at the first control point
- Traverse a distance along the spline (our distance variable)
- When we have moved far enough along, place another object
- continue this process until we reach the end of the spline
And an implementation of this might look like this:
public void PlaceObjects()
{
//To make things easier to understand
//we're going to parse the spline into a
//list of Vector3s instead of using the iterator
IEnumerable<Vector3> spline = Interpolate.NewCatmullRom(initialNodes,
							curveResolution,
							loop);
IEnumerator iterator = spline.GetEnumerator();
List<Vector3> splinePoints = new List<Vector3>();
while (iterator.MoveNext())
{
	splinePoints.Add((Vector3)iterator.Current);
}

//distanceToMove represents how much farther
//we need to progress down the spline before
//we place the next object
int nextSplinePointIndex = 1;
float distanceToMove = distanceBetweenObjects;

//our current position on the spline
Vector3 positionIterator = splinePoints[0];

//our algo skips the first control point, so
//we need to manually place the first object
GameObject.Instantiate(objectToPlace, positionIterator, Quaternion.identity);
while(nextSplinePointIndex < splinePoints.Count)
{
	Vector3 direction = (splinePoints[nextSplinePointIndex] - positionIterator);
	direction = direction.normalized;
	float distanceToNextPoint = Vector3.Distance(positionIterator,
						splinePoints[nextSplinePointIndex]);
	if (distanceToNextPoint >= distanceToMove)
	{
		positionIterator += direction*distanceToMove;

		GameObject.Instantiate(objectToPlace,
						positionIterator,
						Quaternion.identity);
		distanceToMove = distanceBetweenObjects;
	}
	else
	{
		distanceToMove -= distanceToNextPoint;
		positionIterator = splinePoints[nextSplinePointIndex++];
	}
}
}
Once this code compiles, pressing the “Place Objects” button should populate your spline with the object you provided to be duplicated.
YAY! :D
Where to go next
Depending on your needs, there are a ton of different ways to improve on this tool. One addition I’ve found useful is to bind a keyboard shortcut to the act of creating another initial node, adding it to the end of the list of nodes, and selecting it in the hierarchy. This simplifies the process of creating paths greatly.
Another option I’ve found handy in some cases is to automatically select all the spawned objects after placing them, allowing a really quick group edit of their components.
You may also want to write additional inspector buttons for doing things like deleting all spawned children, or serializing their positions, or any of a million other things that might make your specific use case better. There isn’t a “right” way to go about this, as long as your life is better when you’re done the tool.
If you’re running into any issues getting things to work, feel free to grab this unitypackage, which contains all of the code presented above. If you’re still running into issues, or you have tools of your own that you want to share, send me a message on twitter!