Writing Shaders for Deferred Lighting in Unity3D
Awhile ago, I wrote a post called Writing Multi Light Pixel Shaders in Unity, and covered the basics of how to write shaders that use a whole bunch of lights in forward rendering. This post is the (8 months late) sequel to that post, in which I’m going to talk about the basics of writing shaders for deferred lighting in Unity.
Unlike last time though, we’re going to be writing surface shaders today; I’ll explain why that is below. If you’re unfamiliar with surface shaders, now would probably be a good time to head over to the Unity docs and read up a little bit. Don’t worry about grokking all of it though, we aren’t doing anything fancy today.
If you’re dead set on writing pixel shaders that work with deferred lighting, check out my post on that here

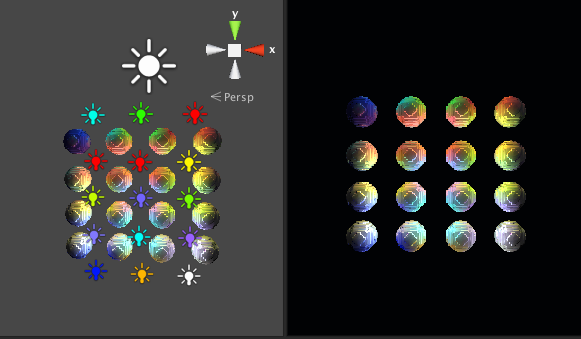
A quick demo of deferred lighting: all 16 lights in the scene are treated as pixel lights
It seems easiest to start by describing how forward rendering and deferred lighting work so that we can see how they differ from one another, and understand what our shaders are actually doing in the deferred rendering path.
A Very Brief Intro to Forward Rendering
In traditional forward rendering, each object is drawn once for every pixel light that touches it (with all the vertex lights being lumped into the base pass). Each pass works independently of the other passes, and runs a vertex and a fragment shader to do its magic (and then adds that result to the previous passes).
This works great for simple scenes, but when you need to have a large number of lights it can get bogged down pretty quickly. To use draw calls as an example: in forward rendering your draw call count is (roughly) numberOfObjects * numberOfLights.
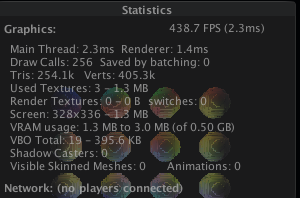
For example: the screenshot above has 16 spheres, each being lit by 16 pixel lights, predictably, this results in 256 draw calls, as shown in the stats window:

Normally unity would be using a bunch of tricks to minimize those draw calls, by batching calls, and automatically setting some lights to vertex lights, but I’ve turned all that off for demonstration purposes.
So if forward rendering chokes with tons of lights, how do games render scenes with hundreds of lights in them? That’s where deferred techniques come in.
A Brief Intro to Deferred Lighting
Deferred lighting solves the problem of handling a large number of lights by assuming that all objects use the same lighting model, and then calculating the lighting contribution to each pixel on the screen in a single pass. This allows the rendering speed to be dependent on the number of pixels being rendered, not the objects in the scene.
As described in greater detail in the docs, Unity’s deferred lighting system is a 3 step process.
- Step 1: Initial data buffers are constructed. These buffers consist of a depth buffer (Z-Buffer), and a buffer containing the specular power and normals of the objects visible to the camera (G-Buffer).
Step 2: the previously built buffers are combined to compute the lighting for each pixel on the screen.- Step 3: all of the objects are drawn again. This time, they are shaded with a combination of the computed lighting from step 2 and their surface properties (texture, colour, lighting function, etc).
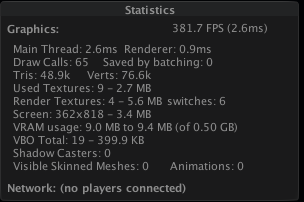
As you may have guessed, this technique comes with much more overhead than forward rendering, but it also scales much better for complex scenes. To relate things back to draw calls, each object produces 2 draw calls, and each light produces 1 call (+1 for lightmapping). Thus, the example scene from above ends up being roughly 16 ∗ 2 + 16 ∗ 2. Unity’s window says 65 draw calls, don’t ask me where that extra one came from.

It’s worth noting that draw calls really aren’t a great way to measure how performant a rendering technique is, but they’re a useful way to understand how these techniques differ from one another. In actuality, it’s more useful to say that forward rendering’s performance is dependent on the number of lights and objects in a scene, whereas deferred lighting’s performance is dependent on the number of lights and the number of pixels being lit on the screen.
One final thing: Unity uses “deferred lighting” (aka Light Pre-Pass), which is different from the confusingly similar named “deferred rendering.” I won’t go into the differences here, but just be aware of this so you’re not confused later.
So about those shaders...
As you also may have noticed from the above description, deferred lighting assumes that all objects use the same lighting model. This doesn’t mean that objects can’t appear to be lit differently, but it does mean that things like light attenuation and how the diffuse and specular terms are calculation are uniform across all objects.
As such, one of the tradeoffs with deferred lighting is a loss of control in your shaders. Since the lighting model is uniform across all objects, we no longer get to define that per shader.
In light of this, surface shaders are the best way to tackle writing custom shaders for deferred lighting. They’re already set up to work with Unity’s system, and enforce the restrictions we’re working with by design.
Let's write something already
To start off, create a new shader. Unity will give you a skeleton of a surface shader. I’ll post it here for those of you not playing along at home:
Shader "Custom/DeferredDiffuse"
{
Properties
{
	_MainTex ("Base (RGB)", 2D) = "white" {}
}
SubShader
{
	Tags { "RenderType"="Opaque" }
	LOD 200

	CGPROGRAM
	#pragma surface surf Lambert

	sampler2D _MainTex;

	struct Input {
		float2 uv_MainTex;
	};

	void surf (Input IN, inout SurfaceOutput o) {
		half4 c = tex2D (_MainTex, IN.uv_MainTex);
		o.Albedo = c.rgb;
		o.Alpha = c.a;
	}
	ENDCG
}
}
Out of the box, Unity’s built in lighting functions already will all work fine with deferred lighting, so technically, the above is a fully functioning diffuse deferred shader.
Here’s how this plays out in deferred lighting (roughly):
- The surface function defines all the material specific properties for this object
- Unity computes the lighting buffer. If the surface function writes to a variable used in one of these buffers (like the fragment’s normal), the data for the buffer comes from the surface function instead of the raw geometry.
- The Lambert lighting function controls how the lighting buffer and object’s surface properties get combined into the final output for the current fragment.
Now, using the built in Lambert lighting function is cheating a bit, so let’s see how to write our own diffuse lighting function:
float4 LightingMyDiffuse_PrePass(SurfaceOutput i, float4 light)
{
	return float4(i.Albedo * light.rgb, 1.0);
}
This is very similar to writing lighting functions for forward rendering. All you have to do is add “_PrePass” to the end of the function name, and change the input arguments to take the output struct from your surface function and a single float4 for the combined lighting at that pixel.
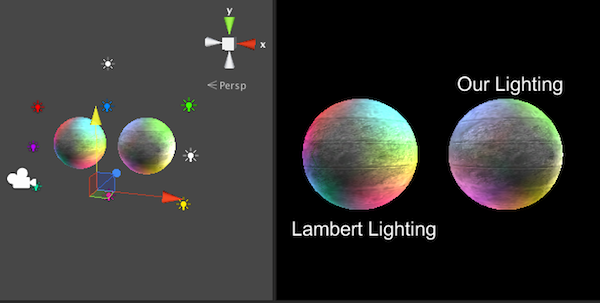
That’s really all there is to it. For completenesses sake, here’s the full shader, and how it looks:

Shader "Custom/DeferredDiffuse"
{
Properties
{
	_MainTex ("Base (RGB)", 2D) = "white" {}
}
SubShader
{
	Tags { "RenderType"="Opaque" }
	LOD 200

	CGPROGRAM
	#pragma surface surf MyDiffuse

	sampler2D _MainTex;

	struct Input {
		float2 uv_MainTex;
	};

	void surf (Input IN, inout SurfaceOutput o) {
		half4 c = tex2D (_MainTex, IN.uv_MainTex);
		o.Albedo = c.rgb;
		o.Alpha = c.a;
	}

	float4 LightingMyDiffuse_PrePass(SurfaceOutput i, float4 light)
	{
		return float4(i.Albedo * light.rgb, 1.0);
	}
	ENDCG
}
}
Conclusion
So there you have it, a custom diffuse shader for deferred lighting! Surface shaders really aren’t as much fun as regular pixel shaders (imo), but they definitely fit the bill in this case.
If you notice any errors, have a good system worked out for writing non surface shaders with Unity’s deferred path, or just want to say hi, send me a message on twitter. Happy coding!