Writing Multi-Light Pixel Shaders in Unity
One of the first things that people get shown when they start learning shaders is how to write a simple, single light, diffuse shader. I have yet to see a single shader tutorial out there that ever returns to this initial exercise to demonstrate how to write shaders which can properly interact with multiple (and different kinds of) lights. So I’m going to try to fill in that gap with what I’ve managed to figure out on my own.
This will hopefully serve as a good starting point for any truly custom lighting shaders you want to write. To be clear, the end goal of this tutorial is simply to have a pixel shader that looks as close as possible to the built in Diffuse shader. The end result of this shader looks like this:
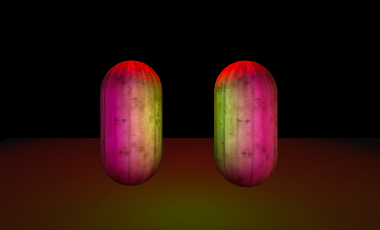
Our shader is on the left, compared to the built in diffuse on the right
Ok, let’s get started with a basic skeleton of what we’re building. Mulit-light shaders (in Forward Rendering) use a separate pass for each pixel light in the scene. How this looks in practice is 2 defined passes in the shader. One (the Base Pass) renders the first light in the scene, and the second pass (the Add pass) gets called once for each additional light, and is additively blended with the previous passes. It looks something like this:
Shader "BetterDiffuse"
{
  Properties
  {
  _Color ("Main Color", Color) = (1,1,1,1)
  _MainTex ("Base (RGB) Alpha (A)", 2D) = "white" {}
  }
  SubShader
  {

  Tags {"Queue" = "Geometry" "RenderType" = "Opaque"}
  Pass
  {
  Tags {"LightMode" = "ForwardBase"}
  CGPROGRAM
  #pragma vertex vert
  #pragma fragment frag

  ENDCG
  }

  Pass
  {
  Tags {"LightMode" = "ForwardAdd"}
  Blend One One
  CGPROGRAM
  #pragma vertex vert
  #pragma fragment frag

  ENDCG
  }
  }
  Fallback "VertexLit"
}
Nothing compiles yet, but at least we have the basic structure we’re going to use in place. You can see above that the base and add passes are marked using the LightMode tag. This is a tag which tells unity which pass to use for which. The “Forward” prefix on Add and Base identifies that these passes are for Forward rendering. This tutorial won’t cover Deferred Rendering (mostly because I haven’t wrapped my head around it yet).
If you’re wondering, the fallback to VertexLit allows us to use the VertexLit shaders shadow passes. Our shader will not cast shadows properly without this.
Next, let’s look at what our vertex input and output structs need to be:
struct vertex_input
{
  float4  vertex  : POSITION;
  float3  normal  : NORMAL;
  float4  texcoord  : TEXCOORD0;
};
struct vertex_output
{
  float4  pos   : SV_POSITION;
  float2  uv  : TEXCOORD0;
  float3  lightDir  : TEXCOORD1;
  float3  normal  : TEXCOORD2;
  LIGHTING_COORDS(3,4)
};
Output wise, we need the obvious position, uv coords and vertex normal, we also need to get the vector from our vertex to the current light in object space. Finally, we need to grab light attenuation information, and shadow info. Unity has a macro for grabbing those last two items, LIGHTING_COORDS(x,y). This macro will put lighting info into TEXCOORDX and shadow info into TEXCOORDY. This takes care of the messy business of dealing with all the different datatypes needed for different types of lights.
Just remember to include UnityCG.cginc, Lighting.cginc and AutoLight.cginc if you’re using the Unity macros.
Ok, things are looking pretty good here. Let’s move on the vertex program. For the most part, the vertex program for each pass is fairly normal (for now, we’ll come back to this later when we talk about vertex lights).
vertex_output vert (vertex_input v)
{
  vertex_output o;

  o.pos = mul( UNITY_MATRIX_MVP, v.vertex);
  o.uv = v.texcoord.xy;
  o.normal =  v.normal;

  o.lightDir = ObjSpaceLightDir(v.vertex);
  TRANSFER_VERTEX_TO_FRAGMENT(o);

  return o;
}
The 2 lines before the return bear a bit more explanation. ObjSpaceLightDir(float4 x) is a method provided in AutoLight.cginc. Simply put, it returns a vector going from the light to the current vertex in object space. You can check out ObjSpaceLightDir in UnityCG.cginc if you’re interested in the details, but for our purposes, using the built in function will be fine.
TRANSFER_VERTEX_TO_FRAGMENT is the macro provided to transfer the data declared with LIGHTING_COORDS to the fragment program. It does some co-ordinate space conversions as well, but since we’re just going to grab the end values from all these calculations for our light attenuation, we don’t need to worry about them right now. For now our goal is just a pixel shader that looks like the Diffuse surface shader.
Alright, on to the fragment program for our passes. For one, we’re going to need to grab the colour from the texture we have applied to our mesh, and do a colour multiply on it to take into account the inspector inputs we defined at the top of the page. Then we’re going to be getting the lighting attenuation value from Unity. Finally, we’re going to use the lightDir variable we set in the vertex shader to calculate the diffuse lighting value with.
sampler2D _MainTex;
float4 _MainTex_ST;
fixed4 _Color;
fixed4 _LightColor0;

half4 frag(vertex_output i) : COLOR
{
  fixed4 tex = tex2D(_MainTex, i.uv * _MainTex_ST.xy + _MainTex_ST.zw);
  tex *= _Color;

  fixed atten = LIGHT_ATTENUATION(i);

  i.lightDir = normalize(i.lightDir);

  fixed diff = saturate(dot(i.normal, i.lightDir));

  fixed4 c;
  c.rgb = UNITY_LIGHTMODEL_AMBIENT.rgb * 2 * tex.rgb;
  c.rgb += (tex.rgb * _LightColor0.rgb * diff) * (atten * 2);
  c.a = tex.a + _LightColor0.a * atten;
  return c;
}
Not much here should be too out of the ordinary (save for the call to LIGHT_ATTENUATION). One thing that I’ve yet to be able to account for are the multiplications by 2 in the diffuse calculations. It’s very clear that this gives us an end result that looks like the built-in diffuse shader, but I’m not entirely sure why the built in diffuse shader would be multiplying these values by 2 either. Nevertheless, to hit our goal, we’re going to do it too. Just remember to leave out the ambient calculations in the ForwardAdd pass, otherwise things will be way too bright.
Great! If you try out the shader now, it should look pretty darn good. Don’t get too comfy though, there’s still one more task to do. If you add more than 3 lights to your scene you will notice the shader starts behaving strangely right now. This is because we haven’t specified what we want to do with Vertex lights. Unity only supports up to 4 Per-Pixel lights, but it will allow 4 more lights to be used on a per vertex basis. Unfortunately our current code doesn’t take into account these lights, so we need to add support for them now.
Step one is to add a float3 to our output struct to hold the summed colour of the lights for the current vertex. Next we need to convert our object space position and normal into world space, and pass them to a for loop that calculates the diffuse lighting for each of the 4 possible vertex lights. Once we get that colour into our frag shader, we just add it to the colour we’re already multiplying the texture by. The end result isn’t exactly identical to the built in shaders, but it’s a reasonable approximation.
Our new ForwardBase vertex_output struct looks like this:
struct vertex_output
{
  float4  pos   : SV_POSITION;
  float2  uv  : TEXCOORD0;
  float3  lightDir  : TEXCOORD1;
  float3  normal  : TEXCOORD2;
  LIGHTING_COORDS(3,4)
  float3  vertexLighting : TEXCOORD5;
};
That pass’ vertex function is now:
    vertex_output vert(vertex_input v)
    {
      vertex_output o;
      o.pos = mul( UNITY_MATRIX_MVP, v.vertex);
      o.uv = v.texcoord.xy;

      o.lightDir = ObjSpaceLightDir(v.vertex);

      o.normal = v.normal;

      TRANSFER_VERTEX_TO_FRAGMENT(o);

      o.vertexLighting = float3(0.0, 0.0, 0.0);

      #ifdef VERTEXLIGHT_ON

      float3 worldN = mul((float3x3)_Object2World, SCALED_NORMAL);
      float4 worldPos = mul(_Object2World, v.vertex);

      for (int index = 0; index < 4; index++)
      {
        float4 lightPosition = float4(unity_4LightPosX0[index],
        unity_4LightPosY0[index],
        unity_4LightPosZ0[index], 1.0);

        float3 vertexToLightSource = float3(lightPosition - worldPos);

        float3 lightDirection = normalize(vertexToLightSource);

        float squaredDistance = dot(vertexToLightSource, vertexToLightSource);

        float attenuation = 1.0 / (1.0  + unity_4LightAtten0[index] * squaredDistance);

        float3 diffuseReflection = attenuation * float3(unity_LightColor[index])
          * float3(_Color) * max(0.0, dot(worldN, lightDirection));

        o.vertexLighting = o.vertexLighting + diffuseReflection * 2;
       }

       #endif

       return o;
      }
and the ForwardBase fragment function is:
fixed4 frag(vertex_output i) : COLOR
{
  i.lightDir = normalize(i.lightDir);
  fixed atten = LIGHT_ATTENUATION(i);

  fixed4 tex = tex2D(_MainTex, i.uv);
  tex *= _Color + fixed4(i.vertexLighting, 1.0);

  fixed diff = saturate(dot(i.normal, i.lightDir));

  fixed4 c;
  c.rgb = (UNITY_LIGHTMODEL_AMBIENT.rgb * 2 * tex.rgb);
  c.rgb += (tex.rgb * _LightColor0.rgb * diff) * (atten * 2);
  c.a = tex.a + _LightColor0.a * atten;
  return c;
}
The source for for the entire shader can be found here.
If you made it this far, congratulations! You now have a diffuse shader that takes into account all the lights unity has to offer! As always, feedback is very welcome (especially if you’ve spotted errors, or things that i’ve gotten wrong). You can find me on Twitter. Hope this tutorial helped!