GBA By Example - Drawing and Moving Rectangles
The idea of making something for GameBoy has always appealed to me. Not only was it my platform of choice when I was a little kid, but naively, it has always looked like the relaxing combination of hardware simple enough to really understand, an OS (or BIOS) that gets out of your way (no firmware updates), and a platform that’s open enough to not need to deal with jailbreaking the device, and the GBA could do 3D!
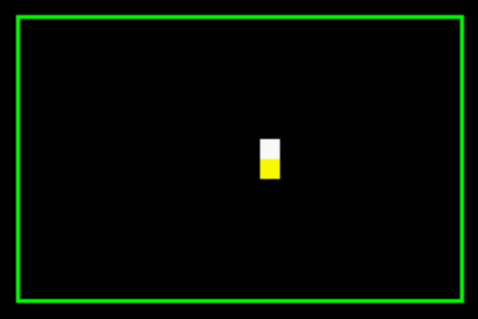
I’ve had a Kirkzz Everdrive sitting around for a few months that I’ve meant to play with, and I finally had some time during my vacation lask week to try it out. Behold the fruits of my labors:
 (I on the other hand, cannot make the GBA do 3D yet)
So, it isn’t exactly impressive, but it was a lot of fun, and I definitely want to play around with the GBA some more.
One of the great things about being late to the dev scene for a console is that lots of people have come before you and written great material, especially GBATek and the Tonc Tutorials. But what I really wish existed was a GBA version of the excellent Metal By Example, which does an amazing job at easing into the nuts and bolts of the Metal API, by presenting each step as a small, buildable example.
Since that doesn’t exist for the GBA yet, I’m here to make that happen. To that end: this article is going to focus on the absolute minimum you need to know to draw and move rectangles around the screen on the GBA. You can do a lot with just that, and it feels great to see something moving on screen, so let’s get started!
Setting Up Your Dev Environment
First thing first, we’re going to need a way to run our project. As mentioned, I have an Everdrive GBA cart so I could put my stuff on actual hardware, but that’s completely overkill for this tutorial (and to be honest, most of the time it was faster to work in emulator anyway). I downloaded VisualBoyAdvance to work with, which is a great open source emulator, but there are lots out there to choose from, and any of them should be able to do what we need them to do.
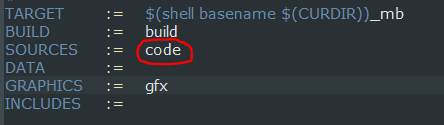
Secondly, we’re going to need a way to build our projects. There are fewer options here, and the one that I found the best was DevKitPro. This has tools for lots of platforms, but make sure you enable the GBA and ARM components when you’re installing. Once you have that installed, it’s time to set up your project. The easiest thing for my was to copy one of the makefiles from the devkitpro examples folder and simply change the name of the “sources” folder to the one that I was using for my build:
I placed that make file in the same directory as the folder which held my code (which was the root dir of my project). With that, all it took was a simple call to make to get a fully working GBA game!
If you’re dubious about this working, this gist has a minimal gba example which will clear the screen red. Try putting that in your source directory and running make, and then opening the result in your emulator of choice. If you see a red screen, everything is working as intended.
Setting a Video Mode
Ok, so now we know our build process works, it’s time to dig into the nuts and bolts of building something for gameboy!
The first thing we need to do is pick a video mode to use. The GBA has five different modes that control how you draw to the screen. Eventually, I’m sure it will be good to know how to use each one of these modes, but mode 3 seemed like the easiest to use, so that’s where I started. What this means is that our screen buffer is going to be a 240 x 160, 16 bit buffer. It’s also going to be single-buffered, so if we want to change the pixel at (50,50) on the screen, all we need to do is go to that point in video memory and change the value there.
Now here’s where things started feeling weird to me: in order to set the gameboy to video mode 3, we need to set a display control byte to the correct value. I expected that this meant there’d be a function to call, but there isn’t. What we need to do is go to memory address 0x04000000, and set the correct video mode flag there. It turns out that GBA dev is full of this paradigm - the hardware is simple enough that a lot of things can be controlled by a specific bit or byte being said, and rather than expose this via a system call, you just set the value directly at the appropriate address. Ahh, the wonders of old school tech.
Predictably, to set the hardware to video mode 3, we need to set the display control register (0x04000000) to a value of 3 (more specifically 0x0003). We also need to set a background mode. This is important for other video modes, but since we’re using mode 3, all we need to know is that our background mode needs to be set to mode 2 in order for anything to show up.
We can set these values like this:
typedef unsigned int    uint32;

#define REG_DISPLAYCONTROL *((volatile uint32*)(0x04000000))
#define VIDEOMODE_3         0x0003
#define BGMODE_2            0x0400

int main()
{
    REG_DISPLAYCONTROL = VIDEOMODE_3 | BGMODE_2;
    while(1){}
}
A lot of tutorials use more concise constant names, and while they may be more standard (like REG_DISPCNT), I found it much easier to use more descriptive names. Additionally, you may be wondering why our pointer to the REG_DISPLAYCONTROL address needs to be marked “volatile,” this is an instruction to the compiler to tell it that even though nothing in our code is reading from this address, we don’t want the compiler to optimize away the logic that sets it’s value (since the hardware is going to look at this address).
You probably also noticed that I defined my own convenience type for unsigned ints. Since we’re going to do a lot of writing values directly to memory addresses, the size of our integers matters a lot, and typing “unsigned int” out all the time will drive you mad.
Lastly, you definitely noticed that the program immediately enters an infinite while loop. We really, really, don’t want to have our main function exit, since that would mean the gameboy game would exit, and what that means is undefined. So instead of a traditional game loop with a flag to control when to exit, game loops on GBA will always be infinite.
If you run this, it will (unsurprisingly) do nothing, so maybe we should tell it to do something?
Drawing To The Screen
Like I mentioned before, in mode 3, we don’t need to worry about managing multiple color buffers, or working with tile maps, or anything else. All we need to do is set the pixels in video memory to what we want. This is virtually identical to what we had to do previously to set the video mode, except that the screen buffer starts at memory address 0x06000000:
typedef unsigned char      uint8;
typedef unsigned short     uint16;
typedef unsigned int       uint32;

#define REG_DISPLAYCONTROL *((volatile uint32*)(0x04000000))
#define VIDEOMODE_3         0x0003
#define BGMODE_2            0x0400

#define SCREENBUFFER        ((volatile uint16*)0x06000000)
#define SCREEN_W            240
#define SCREEN_H            160

int main()
{
    REG_DISPLAYCONTROL = VIDEOMODE_3 | BGMODE_2;

    for (int i = 0; i < SCREEN_W * SCREEN_H; ++i)
    {
    	SCREENBUFFER[i] = 0xFFFF;
    }

    while(1){}
    return 0;
}
Running this now will get you a nice white screen. Progress! Note that we don’t dereference the pointer to the screen buffer in the macro, because we want to index into the screen buffer array to set pixels that aren’t the top left corner of the screen (on GBA, the Y axis increases as it gets lower on screen), and to do that, we need a pointer to the beginning of the array.
The only sorta weird thing about this is how the GBA stores colours. Earlier I said that Mode 3 meant our screen was 16 bit color, but that’s not really true. The GBA actually uses 15 bit color, leaving the first bit alone. In the above example, we didn’t need to know this, because we were just setting things to pure white, but assuming you’ll want to write a colour that isn’t black or white, the following function comes in handy:
inline uint16 MakeCol(uint8 red, uint8 green, uint8 blue)
{
    return red | green << 5 | blue << 10;
}
To give credit where it’s due, the above function comes from the Tonc tutorial As you may have guessed from the above, colours on the GBA are stored as 16 bit integers, with the data laid out like this:
[unused bit] BBB BBGG GGGR RRRRNote that each colour getting only 5 bits means that channels can only store 1 of 32 values (0 - 31), so passing a number outside this range to the function is essentially useless. I’ve seen some other tutorials recommend AND-ing the passed in channel values with 0x1F to clamp them to a 5 bit value, but I feel like ensuring the inputs to your functions are correct is a problem for an assert in a debug build and not runtime cycles. That being said, how to debug a GBA game is beyond the scope of what I want to talk about today (and to be honest, outside the scope of what I know how to do right now), so maybe AND-ing isn’t such a bad idea:
inline uint16 MakeCol(uint8 red, uint8 green, uint8 blue)
{
    return (red & 0x1F) | (green & 0x1F) << 5 | (blue & 0x1F) << 10;
}
You can use the above function to make any colour your screen is capable of displaying, but right now all we have is the logic to clear the screen to a colour. Let’s do something a bit more interesting and write the (hopefully) extremely simple function for drawing differently sized rectangles:
void drawRect(int left, int top, int width, int height, uint16 clr)
{
    for (int y = 0; y < height; ++y)
    {
        for (int x = 0; x < width; ++x)
        {
    	   SCREENBUFFER[(top + y) * SCREEN_W + left + x] = clr;
        }
    }
}
That’s much more useful! Now we can make vertical and horizontal lines, and rectangles of all shapes and sizes. You can even divide up the screen into 8x8 blocks and set each one to something different if you feel like it!
 (I did)
But this is only useful if you want to make static images appear on your screen, and the title of this post also promised that our rectangles would move, so it’s time to move inside our infinite game loop and do some work there.
The GBA Drawing Process
Before we get to the fun stuff though, I need to talk briefly about how the GBA takes the data in the SCREENBUFFER array draws it on the screen.
The GBA draws each row of the screen sequentially, and serially (one after the other). Updating a pixel on the screen takes the hardware 4 cycles, which means that updating a single row of the screen takes 4 * 160 cycles. At the end of each row, the hardware pauses briefly. This pause is known as the Horizontal Blank, or HBLANK, and takes as long as it would take the hardware to update another 68 pixels (272 cycles).
This process continues for each row on the screen. Once all the rows have been updated, there is a larger pause called the Vertical Blank, or VBLANK. This pause lasts as long as it would take the hardware to update 68 more rows of pixels (including the HBLANK time). This works out to 4 * (240 + 68) * 68, or 83776 cycles. These numbers will be very important in more complex project, but are included here just because I thought it was good info to know.
This drawing process is going to occur no matter what our code is doing, without us having to tell the hardware to do it, which means that any code which modifies the data in the SCREENBUFFER array, should do so in the VBLANK pause. Otherwise, we could update the screen halfway through it being drawn, which would lead to tearing artifacts where part of the screen is displaying 1 frame behind other parts.
This means that we need to be able to detect when we’re in VBLANK! There’s two ways to do this, the proper way and the easy way. For my first attempt at GBA dev, I chose the easy way:
#define REG_VCOUNT      (* (volatile uint16*) 0x04000006)
inline void vsync()
{
  while (REG_VCOUNT >= 160);
  while (REG_VCOUNT < 160);
}
The value at REG_VCOUNT holds the index of the current row being drawn to by the hardware. The above function simply waits until we are at an index that is beyond the height of the screen (160). If called inside VBLANK, it will block until the next VBLANK is hit. Is this awful and complete overkill? YES! It also works pretty nicely for something as simple as a moving rectangle game.
It’s worth noting that you are free to do any calculations you want during VDRAW (what it’s called when the hardware is not in VBLANK), as long as you don’t update the values in the screen buffer.
Using the above vsync() function, we can finally add some animation, since the function above not only blocks until VBLANK, but will also block until next frame:
int main()
{
REG_DISPLAYCONTROL = VIDEOMODE_3 | BGMODE_2;
for (int i = 0; i < SCREEN_W * SCREEN_H; ++i)
{
SCREENBUFFER[i] = MakeCol(0,0,0);
}
int x = 0;
while(1)
{
vsync();
drawRect(x % SCREEN_W, (x / SCREEN_W) * 10, 10, 10,MakeCol(0,31,0));
x += 10;
}
return 0;
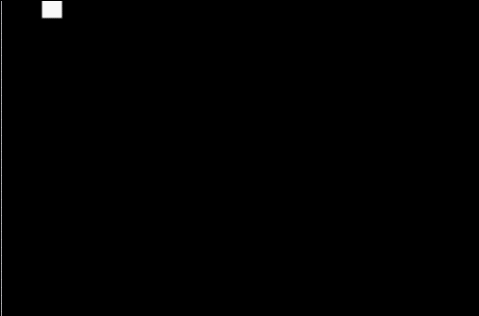
}If you run this, you’ll slowly see your screen get filled, 10 pixels at a time, by a lovely white color:

You’ll notice that the screen doesn’t do any clearing for us at all. This is actually good news, since writing to the SCREENBUFFER array takes up cycles, and we don’t want our hardware using up any of our precious CPU time that it doesn’t have to. This means that if you wanted to say, move a rectangle across the screen instead of having the screen fill up, you also need to write black to the previous location of the rectangle:
while(1)
{
    vsync();

    if ( x > SCREEN_W * (SCREEN_H/10)) x = 0;
    if (x)
    {
        int last = x - 10;
        drawRect(last % SCREEN_W, (last / SCREEN_W) * 10, 10, 10,MakeCol(0,0,0));
    }

    drawRect(x % SCREEN_W, (x / SCREEN_W) * 10, 10, 10,MakeCol(31,31,31));
    x += 10;

}
You’ll notice I also added a bit of logic to wrap the x value when it goes off the end of the screen. This gives you a lovely white rectangle which traverses each row on your screen. If it looks like the rectangle is skipping frames, make sure the “frameskip” option in your emulator isn’t turned on.
Note that the gif above IS skipping frames, because capturing my gif capturing program only suports up to 30 fps, so if your game is as choppy as the gif, your frameskip option is turned on.
Other than that, you should be good to go!
Wrap Up
Usually I’d talk about performance, but I haven’t figured out how to get a timer running on the GBA yet, so I really can’t, other than to say the snake game runs smoothly. I have no idea when I’ll post more about game boy stuff, since I have other projects that I want to get done, but hopefully this was helpful enough to get you started, and pointed at some much more detailed resources!
If you’re interested in the Snake game that I made for GBA, all the source is available on github here.
As always, if you have any questions, comments, or cat gifs, send them my way on Twitter!