GBA By Example - Getting User Input
(Note: This is Part 5 of my GBA by Example series. A list of my other GBA tutorials can be found here)
We’ve covered an awful lot of drawing in these posts, but it takes a lot more than drawing code to make a game. One of the key parts of building something playable is letting users actually be able to interact with our code, so today I’m going to go over how to get user input on the GBA. It’s going to be short and sweet, because it’s really not that complicated on this platform, which is great, because it means that we can spend more time on building an example program this week.
By the end of the post today, we’re going to end up with a simple program that displays a sprite and changes the background based on what button was last pressed. It’s going to look something like this:
 Initially this cleared the screen after each press so I could properly do the Konami code.
The gif was reeeaalllyy annoying though
Let’s get started :)
Detecting What Keys Are Pressed
I assume if you’re interested in these posts, you already know what a GBA looks like. Just in case, here’s a photo with all the inputs shows:
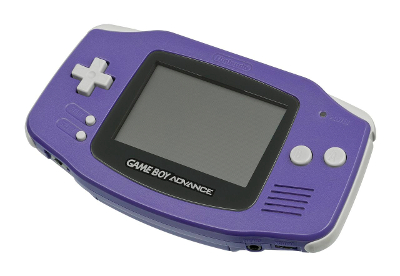
The GBA has 10 buttons that the user can press while a game is running:
- A / B buttons
- Start / Select Buttons
- R / L Shoulder Buttons
- DPAD - (Left, Right, Up, Down)
Each of these buttons can be in one of two states - down or up. Conveniently, the state of every button is stored in a single 16 bit value (with only the lower 10 bits used). This value is known as the Input Register. It, and the location of each key’s corresponding bit are as follows:
| REG_INPUT | 0x FEDC BA98 7654 3210 |
|---|---|
| FEDCBA | Ignored / Undefined Data |
| 9 | Left Shoulder Button |
| 8 | Right Shoulder Button |
| 7 | DPAD -> Down |
| 6 | DPAD -> Up |
| 5 | DPAD -> Left |
| 4 | DPAD -> Right |
| 3 | Start Button |
| 2 | Select Button |
| 1 | B Button |
| 0 | A Button |
The only bit of weirdness with all of this is that the GBA represents keys which are in their Up (un-pressed) state with a value of 1, and keys that are pressed with a value of 0. This means that if we were to read the value of the input register while the Start button was pressed, we would expect to see a value of 0x0000 0011 1111 0111, notice that the bit that corresponds to the start button is 0, because the button is down.
Turning the above table into a set of constants representing which bit is set for each key looks lkke this:
#define REG_KEYINPUT  (* (volatile uint16*) 0x4000130)

#define KEY_A        0x0001
#define KEY_B        0x0002
#define KEY_SELECT   0x0004
#define KEY_START    0x0008
#define KEY_RIGHT    0x0010
#define KEY_LEFT     0x0020
#define KEY_UP       0x0040
#define KEY_DOWN     0x0080
#define KEY_R        0x0100
#define KEY_L        0x0200

#define KEY_MASK     0xFC00
and using the above table, a function that returns a non zero value if a key is down might look like this:
uint32 getKeyState(uint16 key_code)
{
    return !(key_code & (REG_INPUT | KEY_MASK) );
}
Because we aren’t immediately inverting the value in the input register (like Tonc does), the bitwise logic for this can be a bit unintuitive, so let’s walk through how the above function works.
For the example, let’s assume that we’re testing to see if the Start button is currently pressed:
- First, We get the value from the REG_INPUT register, and OR it with a bit mask that makes sure the undefined bits in the value are set to 1 (called KEY_MASK above)
 INPUT:  ???? ??11 1111 0111
 FLAG : 1111 1100 0000 0000
 --------------------------
1111 1111 1111 0111- Next we AND the value with the Start mask: 0x0008
 INPUT:  1111 1111 1111 0111
 START: 0000 0000 0000 1000
 --------------------------
val= 0x 0000 0000 0000 0000
return (!val); //true, key is DOWN-
This gives us 0, because of how the GBA stores key states (Remember, 1 is UP), so we just return whether our result == false so that we get a non zero value when the button is down
-
If instead of the Start Mask, we checked a different button, like the A Button:
 INPUT: 1111 1111 1111 0111
 A BTN: 0000 0000 0000 0001
 --------------------------
val= 0x 0000 0000 0000 0001

return (!val); //false, key is UP
The KEY_MASK constant is important for this function to work, because we have no idea that the top 6 bits of this value are being set to (whatever it is, it’s junk data), and we want to be sure that we’re only testing our key_code value against data that we expect is in the input register.
Always masking the KEY_INPUT register by the KEY_MASK value seems a bit excessive to me though. What I prefer to do (and what you’ll see elsewhere on line), is to use a function that will store the value in the input register in a 16 bit variable, and perform the masking then. This function is called once per frame, and then you don’t have to worry about OR-ing with KEY_MASK every time you want to read a value from the hardware:
uint16 input_cur;

inline void key_poll()
{
    input_cur = REG_KEYINPUT | KEY_MASK;
}

uint32 getKeyState(uint16 key_code)
{
    return !(input_cur & key_code);
}

void main()
{
    while(1)
    {
        key_poll();
        if ( getKeyState(KEY_L) )
        {
            //key is down
        }
    }
}
This is great, but it only lets us test if the user is currently holding down a key, it doesn’t let us detect if the key has been just pressed. This is great for things like charging an attack, but not as good for something like triggering a jump, because it’s going to read as true for multiple frames unless your user has the reflexes of a cat.
Detecting Key Press and Key Release
The obvious next thing we need to do is to be able to detect if the user has just started pressing or releasing a button. To do this, we need to store a second input state variable, that holds the input of the previous frame. To determine if a key’s state is new, we just have to compare the current frame’s input register to the one from the previous frame. It makes sense to do this register-copying inside the function we use to store the current frame’s input:
uint16 input_cur;
uint16 input_prev;

void key_poll()
{
    input_prev = input_cur;
    input_cur = REG_KEYINPUT | KEY_MASK;
}
Then all we need are two new functions to detect key press and release:
uint16 wasKeyPressed(uint16 key_code)
{
    return (input_cur & ~input_prev) & key_code;
}

uint16 wasKeyReleased(uint16 key_code)
{
    return (~input_cur & input_prev) & key_code;
}
If you’re confused by the above, writing it out on paper really helps, but I’m going to skip walking through it here because it really only matters long enough to write the above functions.
When it’s all put together, your input handling code might look like this:
#ifndef INPUT_H
#define INPUT_H

unsigned short input_cur = 0x03FF;
unsigned short input_prev = 0x03FF;

#define REG_KEYINPUT  (* (volatile unsigned short*) 0x4000130)

#define KEY_A        0x0001
#define KEY_B        0x0002
#define KEY_SELECT   0x0004
#define KEY_START    0x0008
#define KEY_RIGHT    0x0010
#define KEY_LEFT     0x0020
#define KEY_UP       0x0040
#define KEY_DOWN     0x0080
#define KEY_R        0x0100
#define KEY_L        0x0200

#define KEY_MASK     0xFC00

inline void key_poll()
{
    input_prev = input_cur;
    input_cur = REG_KEYINPUT | KEY_MASK;
}

inline unsigned short wasKeyPressed(unsigned short key_code)
{
    return (key_code) & (~input_cur & input_prev);
}

inline unsigned short wasKeyReleased(unsigned short key_code)
{
    return  (key_code) & (input_cur & ~input_prev);
}

inline unsigned short getKeyState(unsigned short key_code)
{
    return !(key_code & (input_cur) );
}
#endif
That’s literally all there is to input handling on the GBA! You can stop here if that’s all you’re after, but I took it a step further and built the program you saw at the start of the article. I’m going to walk through how to put that together below.
But for the remainder of this post, and all future posts, I’m going to put the input handling code above into input.h
Sprite and BG Data
All the sprites that I’m using for the example project can be found on github. It isn’t super compact, but for such a simple program, that’s not really that important. If you want to follow along as I build this, grab the data from there. If you just want the final product, you can find the whole thing on github here.
The function to load the sprite data is as follows:
typedef unsigned char      uint8;
typedef unsigned short     uint16;
typedef unsigned int       uint32;

typedef uint16 ScreenBlock[1024];
typedef uint16 Tile[32];
typedef Tile TileBlock[256];

#define MEM_PALETTE             ((uint16*)(0x05000200))
#define MEM_TILE                ((TileBlock*)0x6000000)
#define MEM_OAM            ((volatile ObjectAttributes *)0x07000000)

typedef struct ObjectAttributes {
    uint16 attr0;
    uint16 attr1;
    uint16 attr2;
    uint16 pad;
} __attribute__((packed, aligned(4))) ObjectAttributes;

void LoadTileData()
{
    //each sprite is 32 tiles
    memcpy(MEM_PALETTE, Pal,  PalLen );
    memcpy(&MEM_TILE[4][0], ATiles, TileLen);
    memcpy(&MEM_TILE[4][32], BTiles, TileLen);
    memcpy(&MEM_TILE[4][64], SelectTiles, TileLen);
    memcpy(&MEM_TILE[4][96], StartTiles, TileLen);
    memcpy(&MEM_TILE[4][128], RIGHTTiles, TileLen);
    memcpy(&MEM_TILE[4][160], LEFTTiles, TileLen);
    memcpy(&MEM_TILE[4][192], UPTiles, TileLen);
    memcpy(&MEM_TILE[4][224], DOWNTiles, TileLen);
    memcpy(&MEM_TILE[5][0], LTiles, TileLen);
    memcpy(&MEM_TILE[5][32], RTiles, TileLen);

    volatile ObjectAttributes *spriteAttribs = &MEM_OAM[0];

    spriteAttribs->attr0 = 0x602F;
    spriteAttribs->attr1 = 0xC04F;
    spriteAttribs->attr2 = 0;

}
I’m not going to walk through this, because we’ve already covered how to load and set up sprites in a previous post
I’m also using a simple 1 colour background in the gif from earlier, which I just created procedurally like so:
#define MEM_BG_PALETTE          ((uint16*)(0x05000000))
#define MEM_SCREENBLOCKS        ((ScreenBlock*)0x6000000)
#define REG_BG0_CONTROL        *((volatile uint32*)(0x04000008))

void CreateBackground()
{
    MEM_BG_PALETTE[0] = RGB15(0,0,0);

    uint8 tile[64];
    for (int j = 0; j < 64; j++)
    {
        tile[j] = 0;
    }
    memcpy(MEM_TILE[0][0], tile, 64);

    uint16 screenBlock[1024];
    for (int i = 0; i < 1024; i++)
    {
        screenBlock[i] = 0;
    }

    memcpy(MEM_SCREENBLOCKS[1], &screenBlock[0], 2048);

    REG_BG0_CONTROL = 0x0180;

}
Again, I’m not going to talk too much about this, because I covered it last week.
Great! Now that that’s out of the way, let’s do something more interesting.
Drawing Sprites
The most obvious thing to do is to draw a different sprite depending on what button is currently pressed. This is pretty easy since we laid our sprites out sequentially in memory:
inline uint16 RGB15(uint32 red, uint32 green, uint32 blue)
{
    return red | (green<<5) | (blue<<10);
}

void DrawSprite(uint16 key_code)
{
    const uint16 keys[] = {KEY_A, KEY_B, KEY_SELECT,
                          KEY_START, KEY_RIGHT, KEY_LEFT,
                          KEY_UP, KEY_DOWN, KEY_L, KEY_R};

    int idx = 0;
    for (int i = 0; i < 10; ++i)
    {
        if (keys[i] == key_code)
        {
            idx = i;
            break;
        }
    }

    volatile ObjectAttributes *spriteAttribs = &MEM_OAM[0];
    spriteAttribs->attr0 = 0x602F;
    spriteAttribs->attr1 = 0xC04F;
    spriteAttribs->attr2 = idx * 32 * 2;

}
And then move the sprite off screen when we don’t want to draw any text at all:
void ClearSprite()
{
    volatile ObjectAttributes *spriteAttribs = &MEM_OAM[0];
    spriteAttribs->attr0 = 0x60AF;
}
Animating Palette Information
In addition to drawing a sprite, let’s animate our background. You’ll notice that the background I created earlier was just a single colour. Since the colours live in palette memory, we can change the colour of the background just by changing the first colour in the background palette.
To make things simpler, I just added the code to change the background colour ot the DrawSprite function from above. There are certainly better / cleaner ways to do this, but for a quick and dirty example, I think the following will do.
void DrawSprite(uint16 key_code)
{
    ...
    const uint16 bgCols[] = {RGB15(16,0,0), RGB15(0,16,0), RGB15(0,0,16),
                            RGB15(16,16,0),RGB15(16,16,16),RGB15(32,16,0),
                            RGB15(32,0,16),RGB15(16,0,32),RGB15(16,32,0),
                            RGB15(32,0,32)};
    MEM_BG_PALETTE[0] = bgCols[idx];
}
Finally, I added a single line to the ClearSprite function:
void ClearSprite()
{
    ...
    MEM_BG_PALETTE[0] = 0;
}
You can do a lot of interesting things by modifying palettes directly, like having parts of sprites flash when hit, or having different enemies use the same sprite but use different colours (like the old Legend of Zelda games did with red / blue enemies). What I’ve done here is the simplest possible example of doing something like that, but it’s effective nonetheless.
Putting It All Together
If you’re still with me, the hard part is over, and all that’s left is to write out the main function for our program, and make sure all the necessary #defines are there for things to work together.
//previous code from article omitted for brevity

#define VIDEOMODE_0    0x0000
#define ENABLE_OBJECTS 0x1000
#define MAPPINGMODE_1D 0x0040
#define BACKGROUND_0   0x0100
#define REG_DISPLAYCONTROL     *((volatile uint16*)(0x04000000))
#define REG_VCOUNT             *((volatile uint16*)(0x04000006))

inline void vsync()
{
  while (REG_VCOUNT >= 160);
  while (REG_VCOUNT < 160);
}

int main()
{
    CreateBackground();
    LoadTileData();

    REG_DISPLAYCONTROL =  VIDEOMODE_0 | ENABLE_OBJECTS | BACKGROUND_0 | MAPPINGMODE_1D;
    key_poll();
    ClearSprite();

    while(1)
    {
        vsync();
        key_poll();

        const uint16 keys[] = {KEY_A, KEY_B, KEY_SELECT,
                                KEY_START, KEY_RIGHT, KEY_LEFT,
                                KEY_UP, KEY_DOWN, KEY_L, KEY_R};
        ClearSprite();
        for (int i = 0; i < 10; ++i)
        {
            if (getKeyState(keys[i]))
            {
                DrawSprite(keys[i]);
            }
        }
    }

    return 0;
}
If you want to grab a fully put-together, runnable version of the code, you can find it here, I’m going to omit it here because all the code is already available on this page, and I think a github repo is a far better delivery mechanism for that much code than pasting it here.
This has the disadvantage of only showing one key press at a time (and prioritizing some keys over others), but I’m ok with that, I just wanted a fun example program to show off input handling, and to provide more examples of how to use stuff we’ve done in articles past. I suppose modifying the above to show all the buttons that are currently pressed instead of one is left as an exercise to the reader? ;)
Conclusion
That’s it for this week! I’m kind of excited that we’ve covered enough ground that I can throw up some code and refer to previous articles instead of having to explain every line, but if that ended up being unclear today make sure to let me know via reddit or twitter, or wherever so I can adjust future articles.
Finally, As much fun as pumping these articles out every week is, I’m going to slow down a bit and do one every two weeks , so that I have more time for some other hobby projects. We’ve covered enough ground now that there’s no reason to wait around for me to post more before starting to build the GBA game of your dreams though, so get to it!
And as always, if you want to say hello, or ask questions, or point out mistakes I’ve made, I’m most easily reached on Twitter.